Managing Connector Applications
This guide walks through creating a managed connector application, configuring its authentication and plugin settings, and starting it in an environment.
Type |
How-to guide |
Goal |
Create, configure, and run a managed connector application in Self-Service. |
Audience |
An application owner who integrates Kafka with an external system through a connector plugin. |
When to use |
When Axual runs a connector plugin for you and you need to set it up and start it. |
Creating Connect Applications
Create the connector application in the Self-Service portal, then instantiate it onto the environments you need:
-
Open the "Applications" page in the Self-Service portal.
-
Click the New Application button.
-
Fill the required information in the form:
-
ID: The Application ID of your Connect Application.
This is a string that uniquely identifies your Connect Application.
The maximum length is 255. It can contain letters, digits, and the-,_and.characters.
We recommend using a fully qualified package/class name, which is unique within the organisation.
E.g.com.company.division.AppName. -
Name: Full name of the Connect Application.
This value is displayed when opening this Connect Application’s page.
The maximum length is 50. Allowed characters are displayed in the UI. -
Short Name: A shorter name for the Connect Application. This name is displayed in the Applications Overview page, making it a little more important than the full name. The maximum length is 60. It can contain numbers, letters, and the
_character. It has to be unique within the company (tenant). -
Owner: All members of the selected group will be authorised to edit this Connect Application.
This dropdown lists all the groups you belong to. Choose an adequate group.
If no group is listed, ask a team member or platform-operator to add you to a group. -
Viewer Groups: (Optional) The groups that can view this Connect Application’s configuration. See Viewer Groups.
-
Plugin Name: choose the plugin corresponding to the system you wish to integrate with Kafka
-
Visibility: Controls read access. Public applications are readable to the entire organisation.
Private applications are only visible to its owners. -
Description: A short summary describing the purpose of this application.
Limit of 200 characters. -
Properties: (Optional) Additional metadata as key-value pairs, added with Add Property.
-
-
Click the Add Application button in the bottom-right of the screen.
Upon creating the Connector Application in the Self-Service portal, you will be directed to the application detail page.
Here you can "instantiate" this Connect Application onto multiple environments.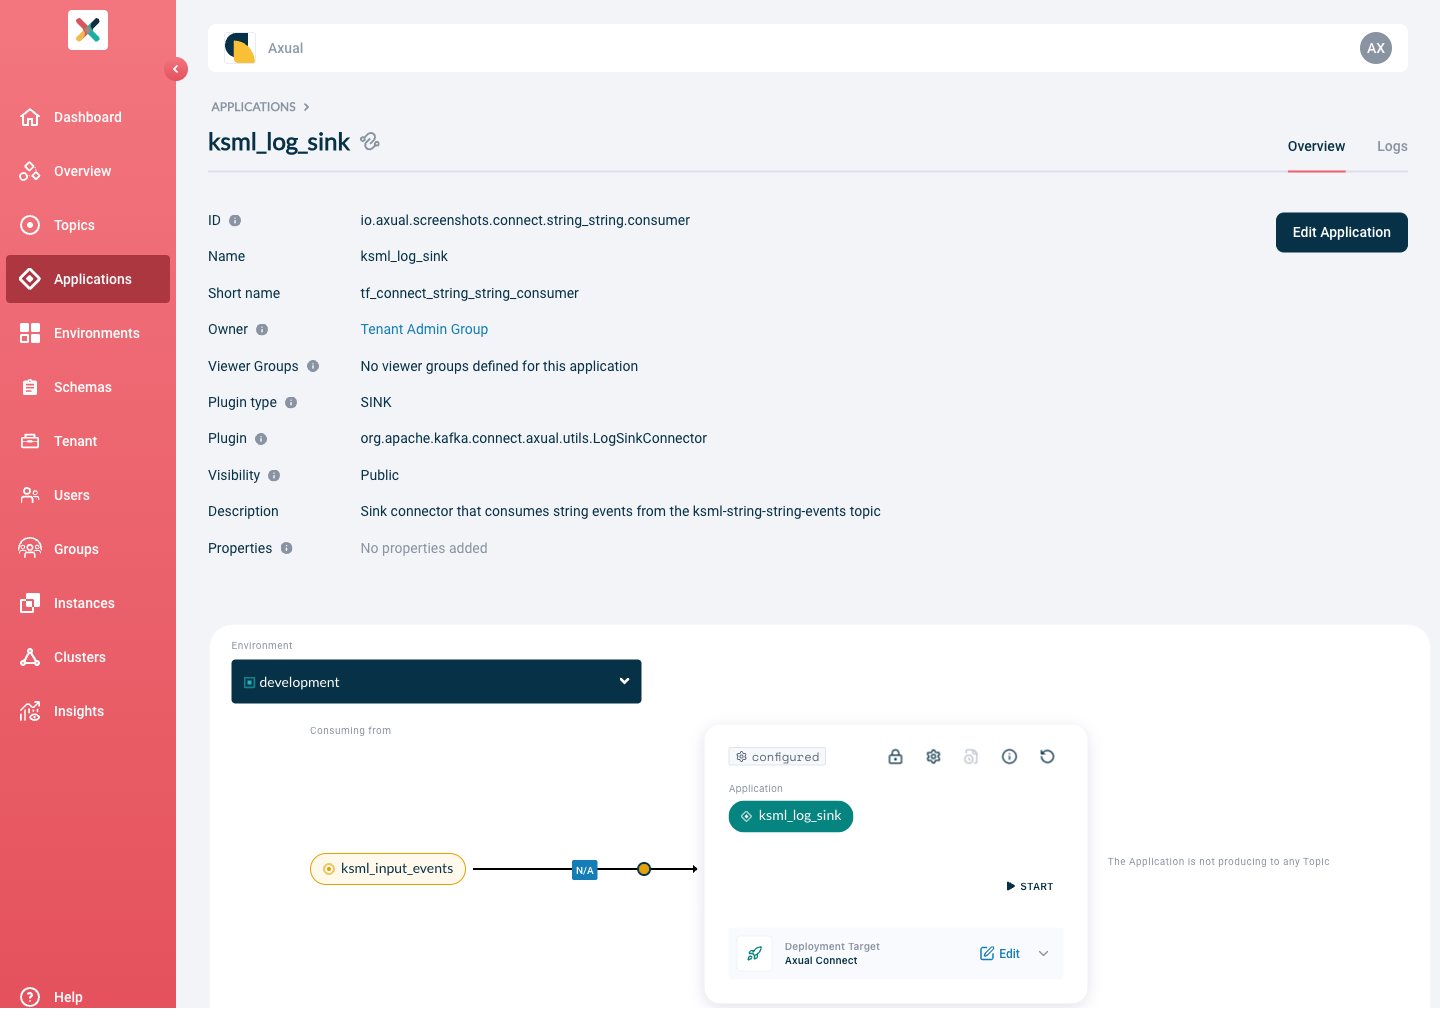
Configuring and starting Connector Applications
A Connector Application needs three things configured for every environment in which it’s deployed:
-
Deployment Target: the Kafka Connect cluster the connector runs on, and the plugin version to use.
-
Authentication: One or more certificate and private key pairs used for authentication and authorisation against the Kafka cluster.
-
Plugin Configuration: plugin-specific configuration, depending on the connector implementation (e.g. connectivity information for the integrated system).
|
|
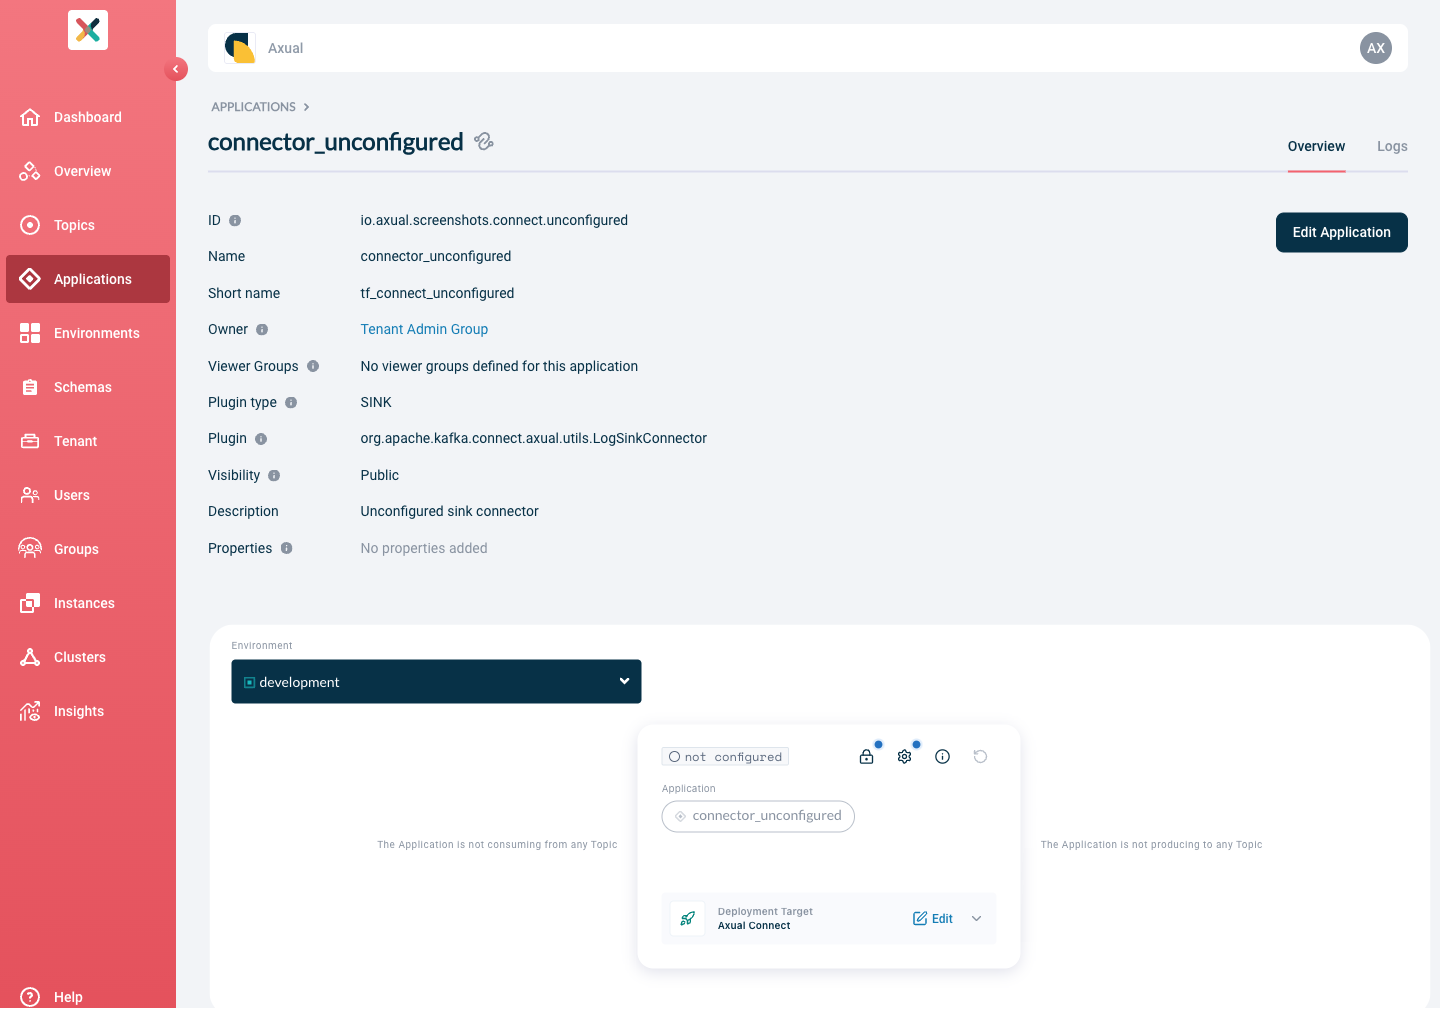
Deployment Target
Before a Connector Application can be authenticated, configured, or started, it needs a Deployment Target: the Kafka Connect cluster it will run on, and the version of its plugin to use on that cluster.
This selector is shown on the Application Card per environment.
-
Open the Connect cluster dropdown.
Clusters your application’s owner group is authorised to use, and that support your application’s plugin, are listed first.
Clusters that don’t meet those conditions are listed below a divider and cannot be selected.
Each cluster shows an authentication-method badge on the right (mTLS or SASL SCRAM).Hover over a greyed-out cluster to see why it’s unavailable: Owner group is not authorized,Required plugin is not installed, or both.Required plugin is not installedalso covers a plugin that is installed on the cluster but not yet known to Self-Service. If an operator has added it recently, refresh the cluster’s plugin list and try again. See Refreshing the cluster’s plugin list. -
Select a cluster.
The Plugin version dropdown becomes enabled, listing the plugin versions that cluster supports for your application’s plugin class. -
Select a Plugin version.
-
Click Confirm.
Once confirmed, the selector collapses into a summary showing the Connect cluster name. Expand the summary to see the cluster’s authentication method, the plugin version in use (Current Version), and the newest plugin version the cluster offers (Latest version available):
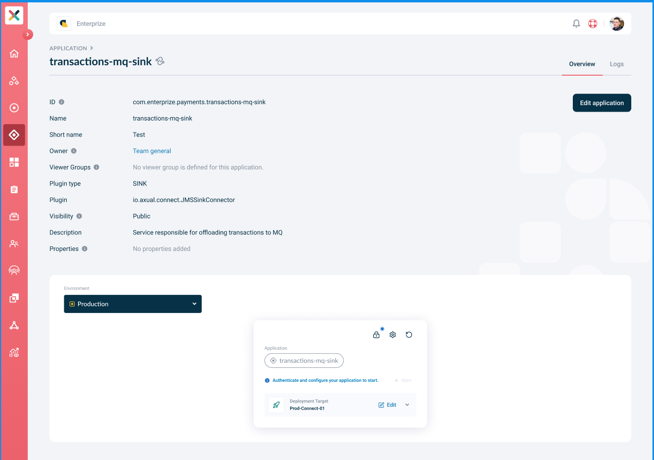
Changing the deployment target
An Edit (pencil) button on the summary reopens the selector, letting you change the cluster or plugin version.
|
Edit is only available when:
|
Authentication
The certificate and private key are used to authorise the Connector-Application against Kafka when accessing the topics, using the SSL method described in Authenticate with SSL. Each environment can hold multiple certificate and private key pairs. Exactly one pair is marked as Active, this is the pair currently used by the running connector. Uploading an additional certificate and activating it allows you to rotate credentials without stopping the connector.
-
The certificate must be
X.509formatted and contained within aPEMfile. Ideally, it should contain the whole certification chain. -
The private key must be
pkcs8formatted and contained within aPEMfile.
| If your key material is currently in JKS format, you can extract the certificate and private key using a tool such as Keystore Explorer. |
With both files available, configure the Connector Application’s authentication:
-
From the environment dropdown, select the environment for which you want to configure the certificate and private key.
-
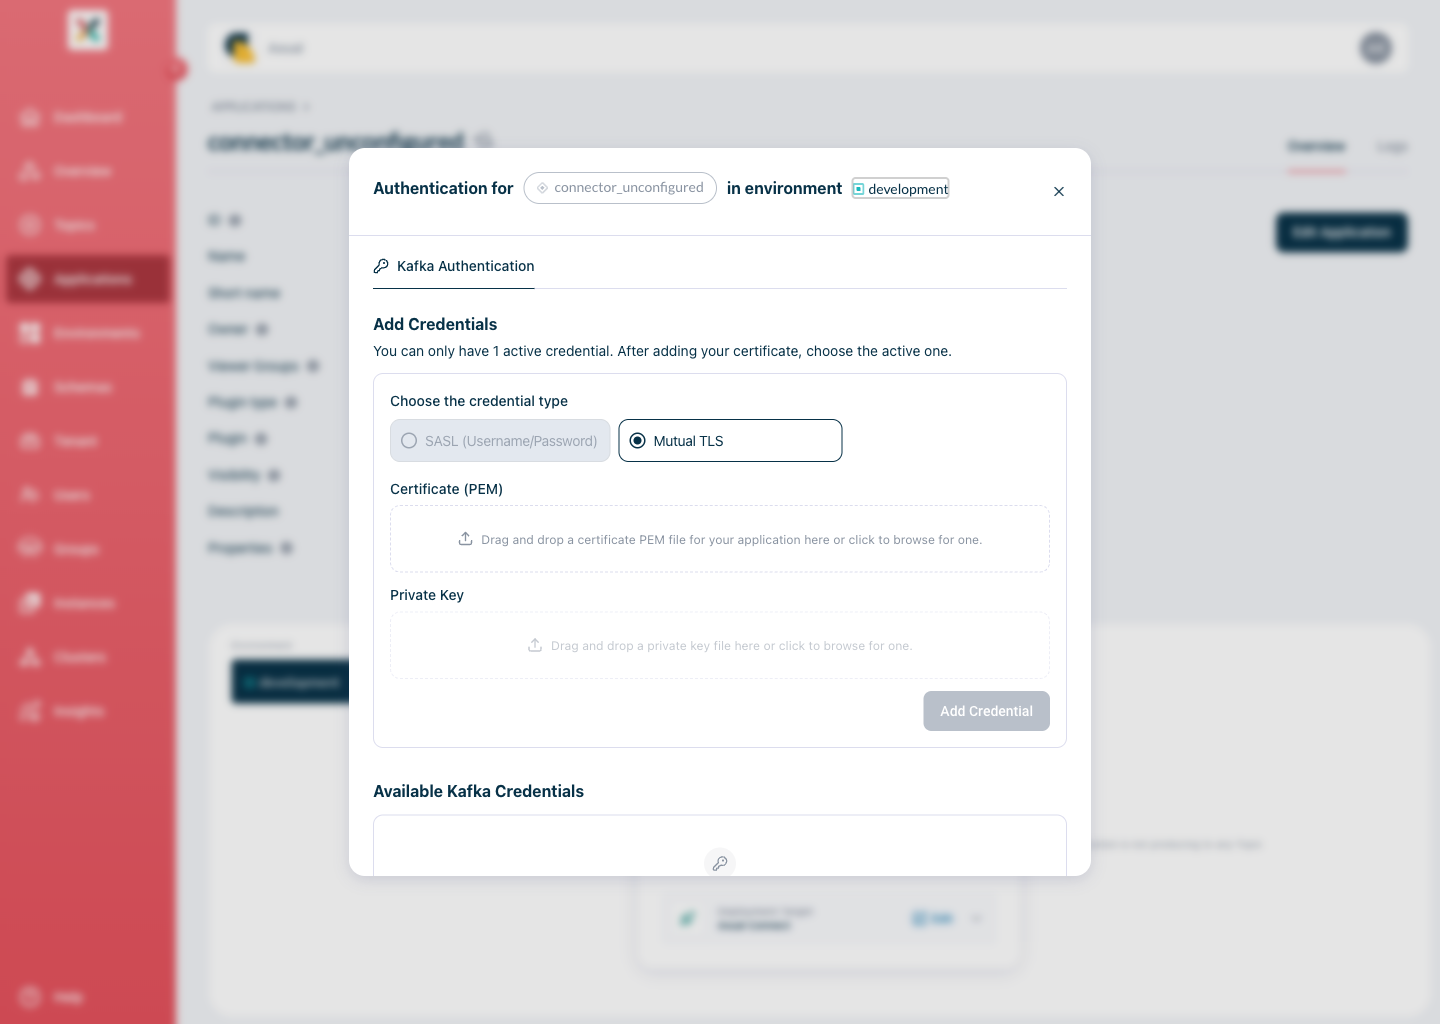
Click on the Padlock button in the application box. The Authentication modal opens on the Kafka Authentication tab, showing the Add Credentials section:
-
Under Choose the credential type, select Mutual TLS.
On a Deployment Target that supports only mTLS, SASL (Username/Password) is disabled and Mutual TLS is preselected. -
Upload the certificate file to the Certificate (PEM) field by dragging and dropping it onto the upload area, or clicking to browse.
-
Upload the private key file that matches the certificate to the Private Key field.
Self-Service validates the key and shows the messageUploaded private key is valid.The field shows the start of the key until you add the credential; after that, the private key is never displayed. -
Click Add Credential.
The new pair is listed under Available Kafka Credentials > Mutual TLS, with a row showing who uploaded the private key and when. -
Expand Mutual TLS under Available Kafka Credentials, then select the radio button to the left of the certificate’s Distinguished Name.
The pair is now active and shows the Active badge.Activating a connector principal is always a required user action. Even when you have added only a single certificate and key pair, you must explicitly select it as the active principal with its radio button. The connector does not start until a principal has been activated. Adding the credential alone is not sufficient.
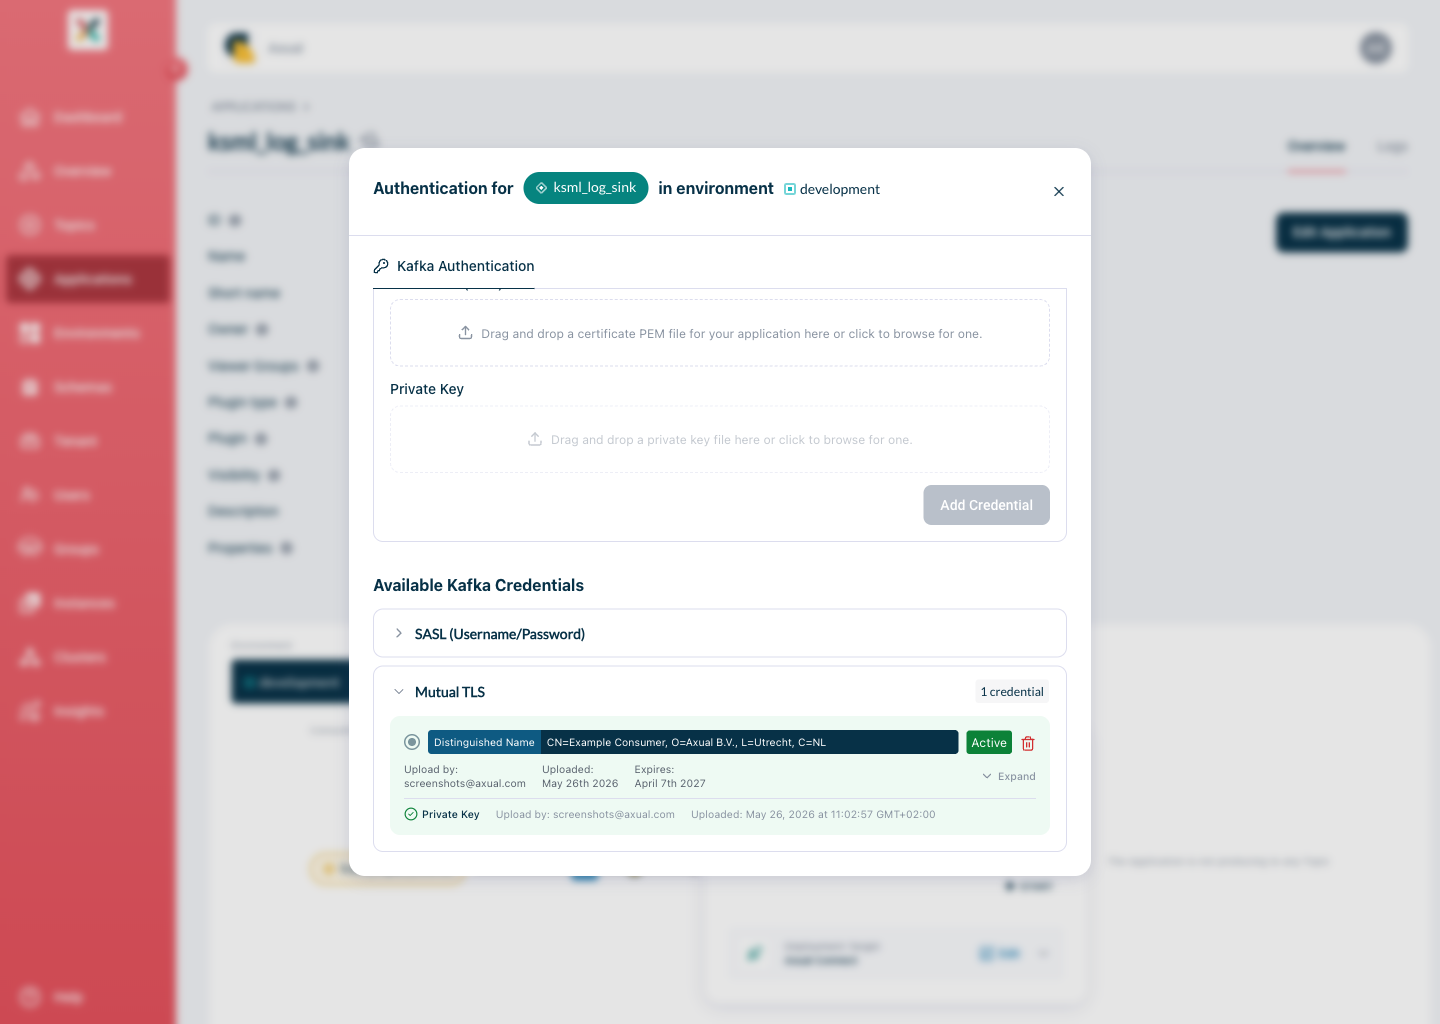
The trash icon to delete a certificate is disabled while the connector is running with that certificate as the active one.
Rotating certificates
To rotate the certificate of a running connector without downtime, follow these steps:
-
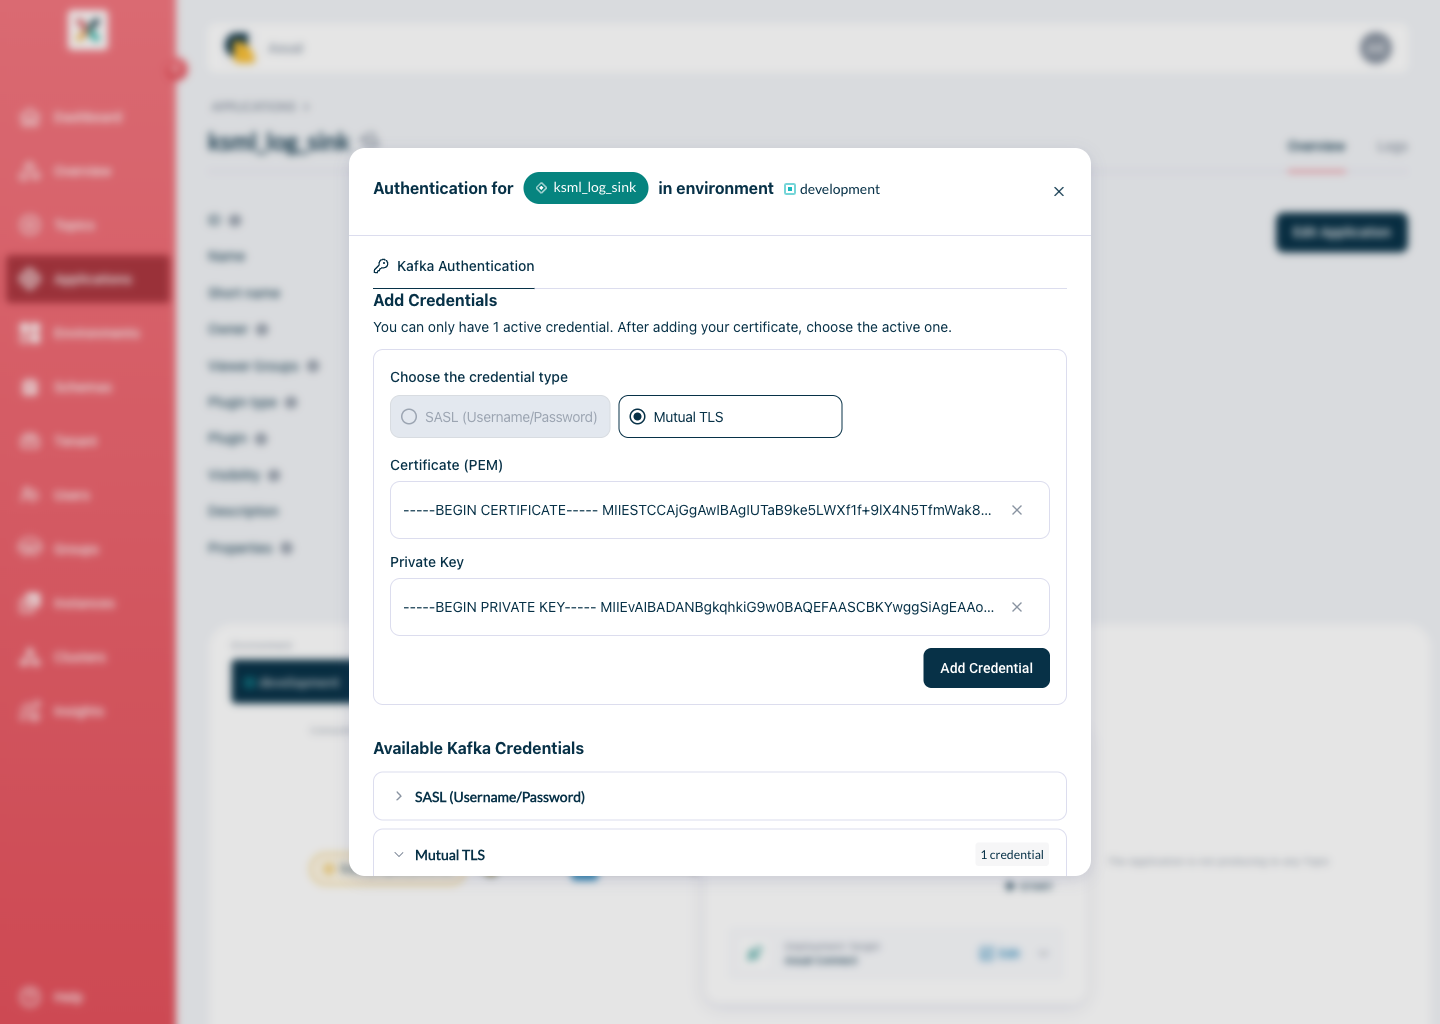
Upload a new certificate and private key pair in the Add Credentials section of the Authentication modal.
-
Click Add Credential. The new pair is listed under Available Kafka Credentials > Mutual TLS, next to the currently active one.
-
Activate the new pair by selecting the radio button to the left of its Distinguished Name.
The Platform Manager will upload the new credentials to Vault and restart the connector automatically to pick them up. -
Once the connector is running with the new certificate, you can delete the old one.
|
Using SASL SCRAM
This flow applies only to a connector deployed to a registered Deployment Target, a Kafka Connect (KC) cluster. The deprecated Axual Connect only supports mTLS (mutual TLS); a connector running on it cannot use SASL SCRAM.
Use this flow when the connector’s Deployment Target cluster shows the SASL SCRAM badge instead of mTLS. SASL (Simple Authentication and Security Layer) SCRAM (Salted Challenge Response Authentication Mechanism) authenticates the connector to Kafka with a generated username and password pair instead of a certificate.
-
Click the Padlock button in the application box. The Authentication modal opens on the Kafka Authentication tab.
-
Under Choose the credential type, select SASL (Username/Password) and generate a new credential pair. Platform Manager creates a username and password for the connector.
-
Activate the new pair under Available Kafka Credentials > SASL (Username/Password), the same way as a certificate pair.
As with a certificate pair, activating a SASL credential pair is always a required user action, even when only one pair exists. The connector does not start until a pair has been activated.
Platform Manager writes the active credential to the Connector Vault; see Understanding the Vault KV v2 path structure for the storage path.
To rotate a SASL credential without downtime, generate a new pair and activate it the same way described in Rotating certificates above: Platform Manager writes the new credential to Vault and restarts the connector automatically to pick it up. Delete the superseded pair once the connector is running with the new one.
Apicurio Registry configuration
This applies only to a connector deployed to a registered Deployment Target; a connector still running on the deprecated Axual Connect keeps resolving its own Schema Registry configuration, unchanged.
If the Instance Cluster behind the connector’s Deployment Target uses Apicurio Registry with BasicAuth enabled, and has Apicurio’s Keycloak support for an Instance configured, Platform Manager automatically configures the connector’s Apicurio Registry connection on every start.
Platform Manager inspects key.converter and value.converter independently, and configures each side entirely on its own, based on which vendor’s converter class it recognises there: Apicurio’s own converter, or Confluent’s.
A side that names neither vendor, or leaves the converter property unset, is left untouched, in that case the worker defaults configured during startup of the Kafka Connect cluster are used.
When the connector starts, Platform Manager generates a BasicAuth credential for the connector in that environment if it doesn’t have one yet, and stores the password in the Deployment Target cluster’s Connector Vault. For each recognised side, it then injects the Apicurio Registry URL, the credential, and the vendor’s own serde and subject-name settings under that side’s own converter configuration. Platform Manager always writes the credentials; you cannot override them. Everything else injected is a default: if you have already set that property explicitly in your plugin configuration, your value is kept (see User-provided configuration vs plugin defaults). For the full list of injected properties and which of them you can override, see Apicurio Registry properties.
This behaviour only applies when the Instance Cluster uses Apicurio Registry with BasicAuth enabled and has Apicurio’s Keycloak support configured; it doesn’t apply to an Instance Cluster backed by a different, Confluent-compatible registry, regardless of which vendor’s converter the connector itself uses.
Viewing the connector’s Apicurio Registry credential
Platform Manager manages this credential for you, but you can see which one the connector uses in an environment:
-
From the environment dropdown, select the environment.
-
Click the Padlock button in the application box to open the Authentication modal.
-
Open the
Schema Registrytab.After the connector’s first start in this environment, the tab shows the credential’s Username. The password is never displayed.
After you change the Deployment Target (see Changing the deployment target), the connector gets a new credential on its next start.
| The Apicurio Registry authentication flow for other application types, described in Apicurio Registry Authentication for SerDes, doesn’t apply to Managed Connector applications. |
Plugin configuration
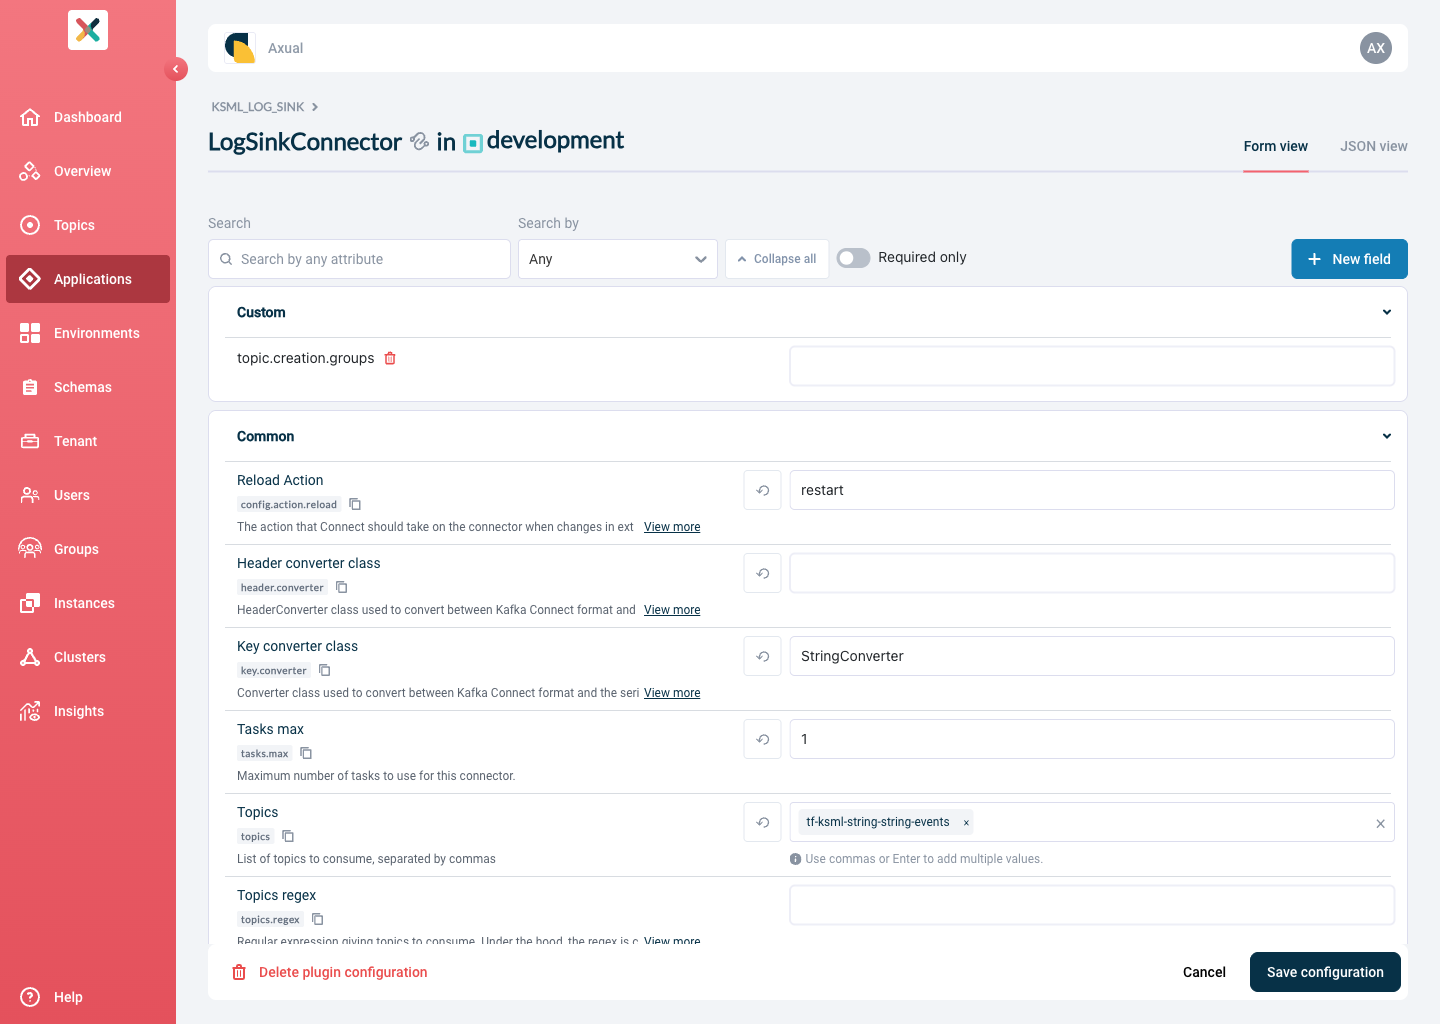
Clicking the Gear button opens a dedicated Plugin Configuration page for the selected environment. The page title shows the plugin class name and the target environment. To change the configuration of a running connector, see Updating connector configuration.
Form view
Configuration fields are grouped into collapsible sections (e.g. Common, Database, Data Mapping, Error Handling). Each field shows:
-
A human-readable label. Required fields are marked with an asterisk (
*). -
The underlying Kafka property key with a copy button.
-
A description (truncated with a View more link for long descriptions).
-
An input widget appropriate for the field’s type (text, number, boolean dropdown, multi-value tag input).
-
A Reset to default button to restore the original default value.
The toolbar above the form provides the following controls:
| Control | Description |
|---|---|
Search + Search by dropdown |
Filter fields by any attribute, or narrow the search to name, property key, or description specifically. |
Required only toggle |
Show only the fields that have no default value and must be provided before the connector can start. |
Collapse all |
Collapse all sections for a compact overview. |
+ New field |
Add a custom configuration property not listed in the plugin’s schema. |
JSON view
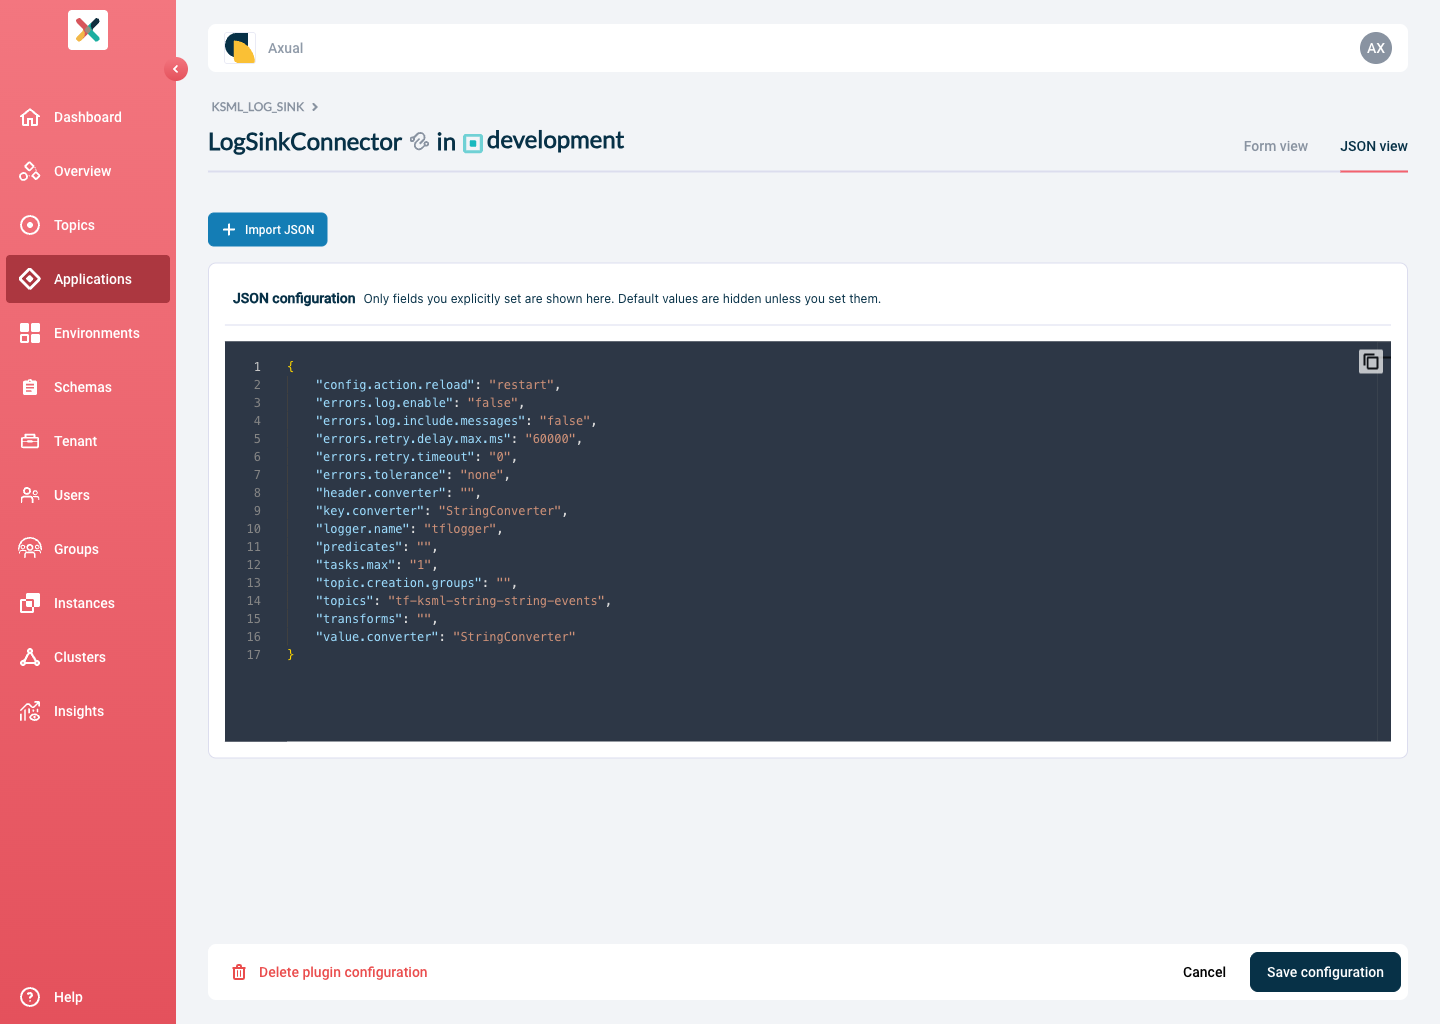
Switch to the JSON view tab to inspect or edit the configuration as raw JSON. The JSON view (and the configuration sent to Kafka Connect) shows only the properties you have explicitly set; plugin default values are omitted to keep the editor focused on your changes.
Use the Import JSON button to paste or upload an existing configuration.
User-provided configuration vs plugin defaults
A property is part of your configuration as soon as you set it explicitly, even if the value you choose happens to match the plugin’s default value. Setting a property to its default value is treated as a deliberate, user-provided choice: the property is kept in the configuration, remains visible in the JSON view, and is persisted across connector restarts.
For example, if you set "tasks.max": 1 in the JSON view and save, the property stays in your configuration and is still shown when you reopen the view, even though 1 is also the plugin default.
|
Keeping such values explicit matters during connector upgrades. If a newer version of the plugin changes a default, your explicitly-set value is preserved instead of silently following the new default. |
To stop providing a value and fall back to the plugin default, either use the Reset to default button next to the field in Form view, or remove the property from the JSON in JSON view. Because an explicitly-set value persists even when it matches the default, Reset to default is the only way to hand control of that property back to the plugin, which is useful when you no longer want to pin the value but the current plugin default itself may be unknown to you.
Saving and validation
Click Save configuration when done.
If any required fields are empty or contain invalid values, the page shows an error banner at the top listing each problem as a clickable link.
Clicking a link scrolls directly to the affected field and focuses it.
Sections containing errors display an N issues found badge on their heading, so you can spot problems even when sections are collapsed.
After a successful save, you will see the status box on the application detail page:
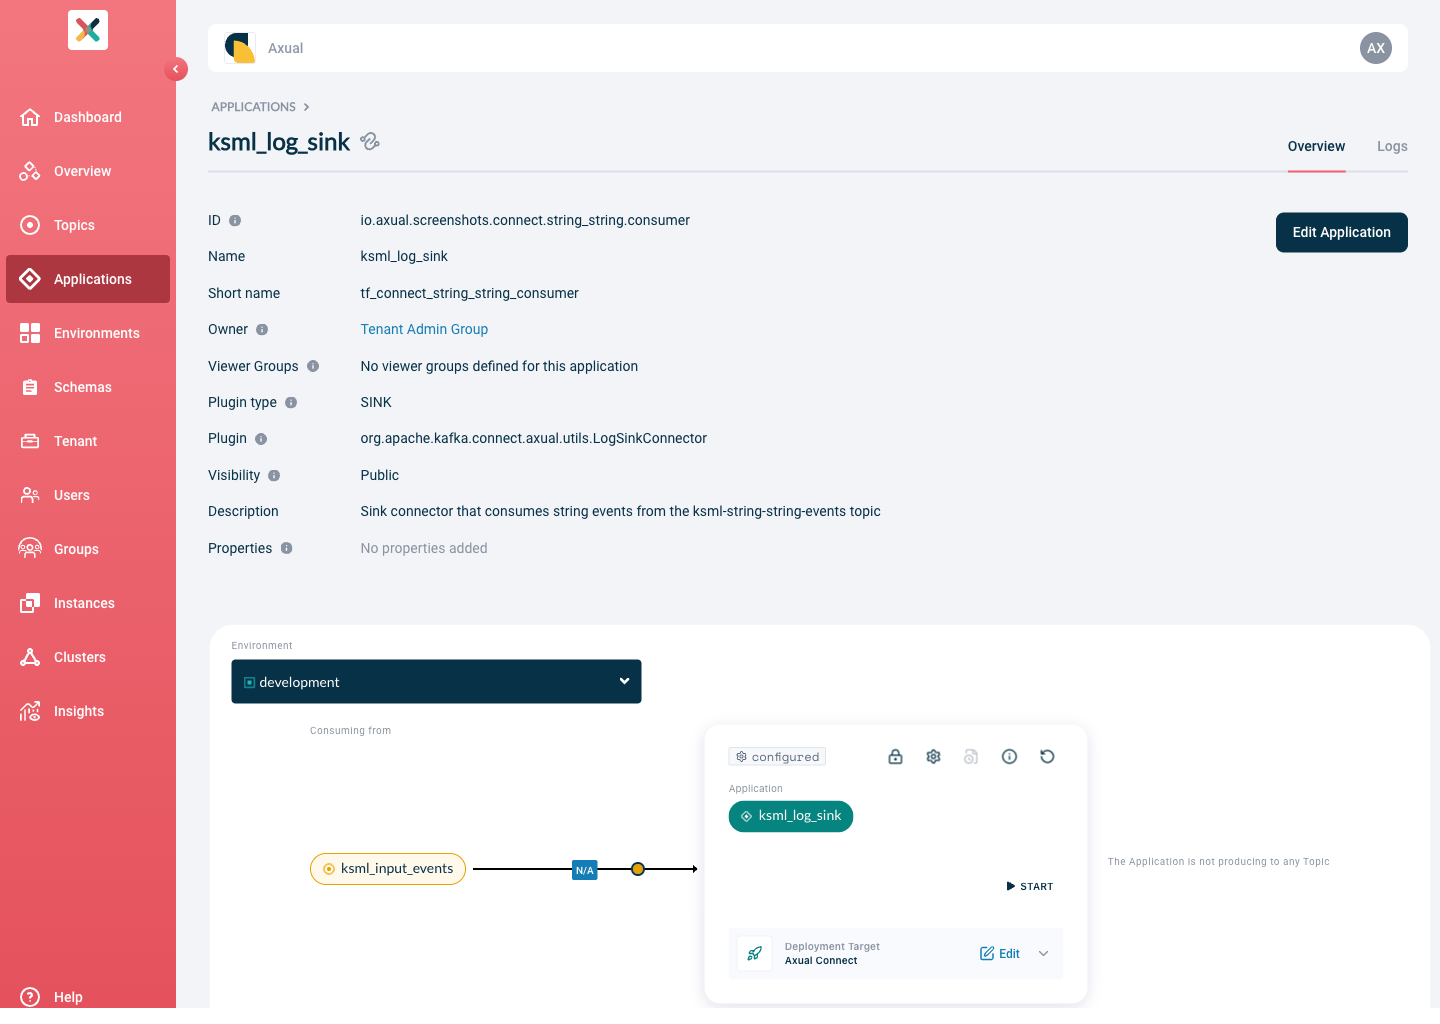
| To remove the entire plugin configuration for an environment, use the Delete plugin configuration button at the bottom of the Plugin Configuration page. |
Requesting Topic Access
Your Connector Application needs authorisation to produce to or consume from a Kafka topic before it can start.
Follow the steps to grant it access.
Starting and stopping Connector-Applications
You can start the Connector by clicking the 'START' button. Within seconds, the status should change to 'RUNNING'.
If the status changed to FAILED, you can click View tasks to open up a modal showing you a stack trace that should give you more information. Alternatively, you can take a look at the connector’s logging (see below).
For the actions, states, and status mapping, see Connector application states.
Viewing Connector logging
As soon as you have started your connector application and something goes wrong, e.g. your connector goes in a FAILED state, you can use connector logging to find pointers for the cause of the error.
Which logs you get depends on where the connector runs:
-
A connector deployed to a registered Kafka Connect cluster streams its logs live into the log console, opened with the
Logsbutton on the application card. That console can also show the logs of the whole Kafka Connect cluster, which is where a connector that never started leaves its reason. Follow Viewing Application Logs. -
A connector still served by Axual Connect uses the
Logstab described below, which searches a Kafka logging topic. ItsLogsbutton on the application card stays disabled.
The rest of this section covers the Axual Connect Logs tab.
The Logs tab is deprecated, together with Axual Connect itself. It still works today, but it receives no further development, and it is removed once support for Axual Connect is removed. Once your connectors run on a Kafka Connect cluster, their logs come from the log console instead, described in Viewing Application Logs. To move a connector across, see Migrate from Axual Connect to Kafka Connect.
|
Prerequisite: connector logging is enabled by the platform administrator. See also Enabling Connector Logging into Kafka.
-
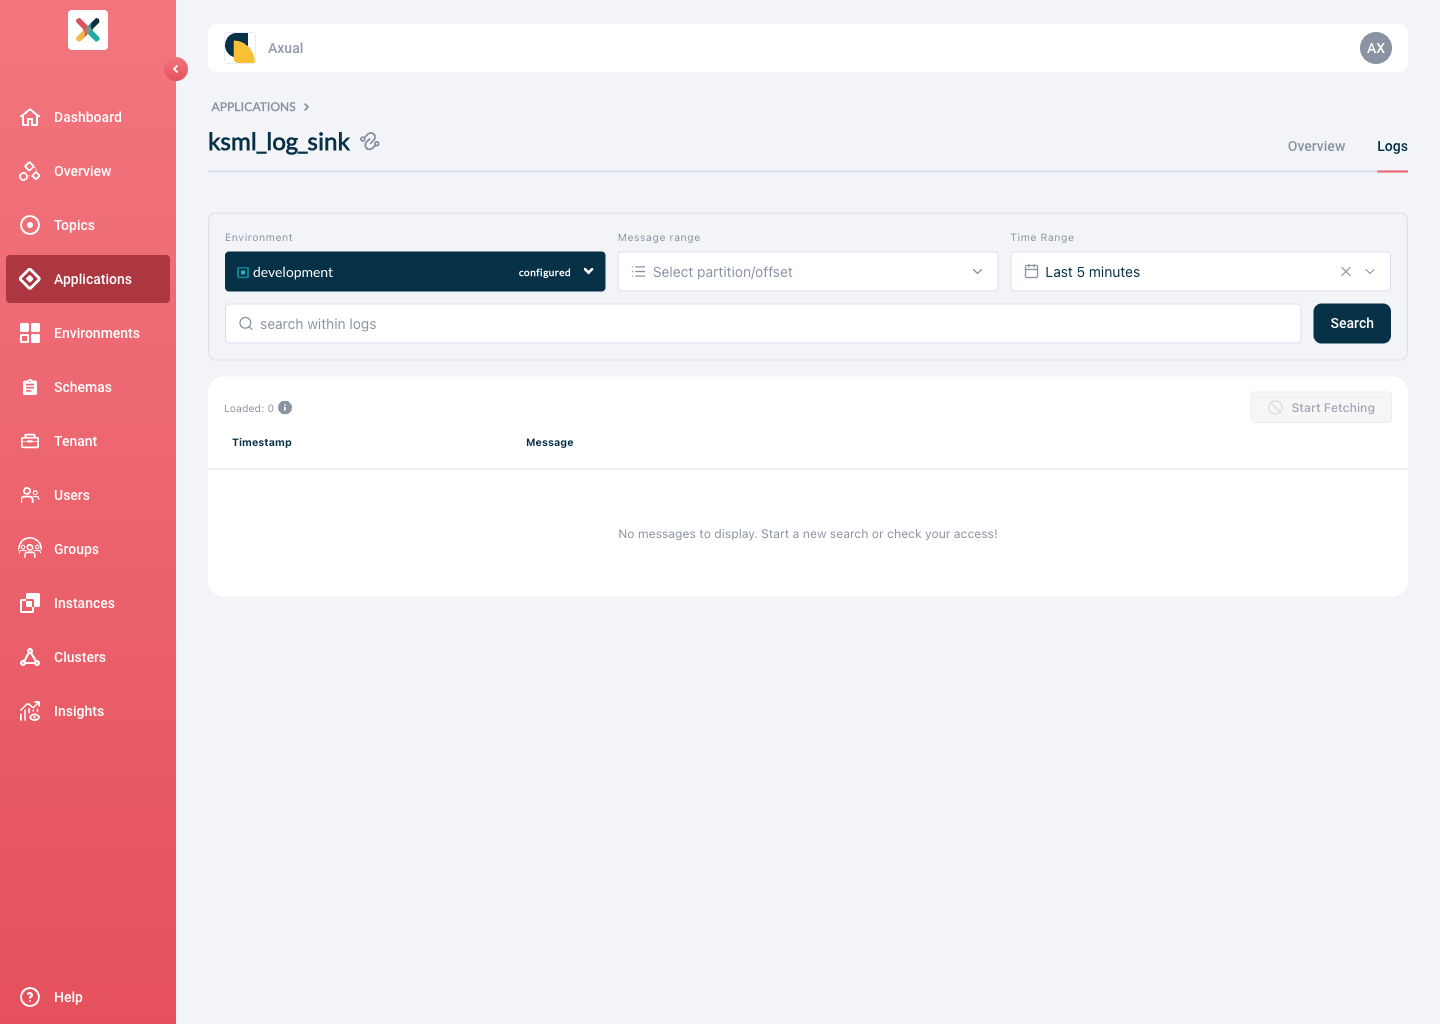
On the Connector page, click on the "Logs" tab. The following screen shows:
-
Click "Search" to search immediately. This returns the logging of the last 5 minutes. To find specific log messages, configure the following parameters:
-
Search string: here, enter the string you would like to search for in logging. Use ' ERROR ' or ' WARN ' (including spaces) to find logging on the
ERRORorWARNlog level respectively. -
Environment: from which environment do you want to see the logging of your connector
-
Message range: limit the search to a partition and offset of the logging topic
-
Time Range: on the Relative time tab, choose a preset such as the last 5 minutes or set your own value; on the Absolute time tab, define the start and end of the time range
-
| Search results are returned in chronological order, with the oldest (log) message first. An improvement to allow control of the search result order is pending implementation. |
For instances which have Granular Browse Permissions enabled, users have to be granted permissions explicitly before they can view connector logging. Please check how to grant permissions to users on the connector-logging- topics.
|
Deleting a connector application
Delete a connector application once it is stopped on every environment:
-
Stop all the Connector Applications on all environments.
-
Follow the docs to remove the application.