How to Deploy the Axual MCP Server
This guide shows you how to prepare the Axual Model Context Protocol (MCP) Server values for one tenant, deploy the chart, and verify that OAuth authentication works end to end.
Type |
How-to guide |
Goal |
Get an Axual MCP Server running and authenticating against one tenant of Axual Governance. |
Audience |
Platform Operator with Helm or Argo CD access to the target namespace. |
When to use |
Use this guide when adding the MCP Server to an installation, once its Keycloak clients exist. |
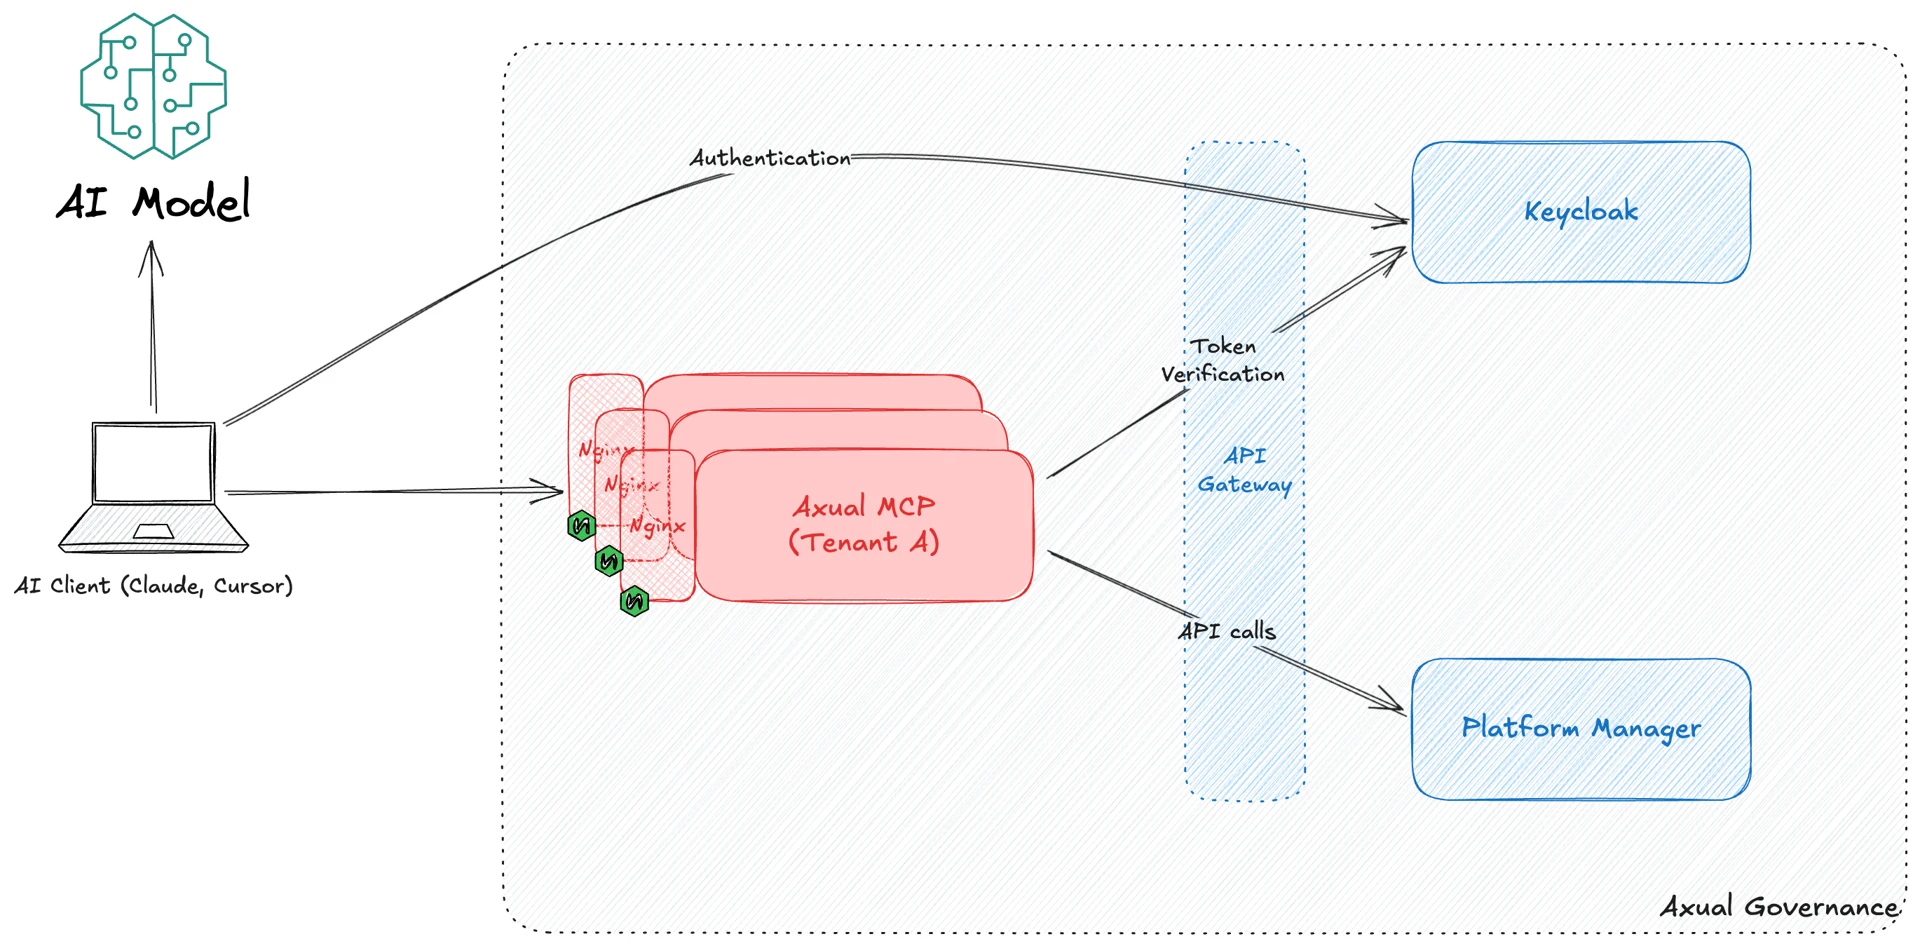
The MCP Server gives an AI model an interface onto the platform: it calls the Axual API to carry out actions a model initiates in a chat conversation. One server serves one tenant, so a multi-tenant governance installation runs one MCP Server per tenant.
Prerequisites
Confirm the following before you begin.
Access and permissions required
You need the following access and permissions:
-
Helm or Argo CD access to the namespace the MCP Server will run in.
-
Permission to create the Ingress and its TLS Secret.
Tools and versions required
You need the following tools:
-
helm>= 3.12, or an Argo CD application pointing at your values.
Resources that must exist before starting
The following must already exist:
-
The two Keycloak clients, and the client secret they produce. See How to Configure Keycloak for the MCP Server.
-
The tenant the server will serve, and the URL its endpoint will be reachable on.
-
A TLS Secret for that hostname. See TLS Secret Formats Reference.
Prepare the values
Decide where the values.yaml will live and, if you deploy through Argo CD, what the application will be called. Then copy the values below and replace every placeholder.
MCP_OAUTH_SERVER_BASE_URL must be the full origin, scheme included, and it must match the redirect URI registered on the mcp-oauth-proxy Keycloak client exactly. Keycloak rejects a redirect URI with no scheme.
Replace every <VALUE> placeholder with your own value before running a command. MCP_OAUTH_CLIENT_SECRET is the secret from the mcp-oauth-proxy client created in the Keycloak guide.
|
# Copy this file and customise it for your environment

replicaCount: 1

image:
  repository: registry.axual.io/public/axual/mcp-axual
  pullPolicy: Always
  # -- Image tag. Omit to use the chart appVersion, which is the version the chart was tested with.
  tag: "<IMAGE_TAG>"

# Ingress configuration
ingress:
  enabled: true
  className: "nginx"
  hosts:
    - host: mcp-tenant1.example.org
      paths:
        - path: /
          pathType: Prefix
  tls:
    - hosts:
        - "mcp-tenant1.example.org"
      secretName: "secret-name"

# Environment variables (non-sensitive)
envSecrets:
  AXUAL_BASE_URL: https://governance.url
  AXUAL_TENANT: tenant1
  MCP_OAUTH_ENABLED: "true"
  MCP_OAUTH_SERVER_BASE_URL: https://mcp-tenant1.example.org
  MCP_OAUTH_AUTHORIZATION_SERVER: https://governance.url/auth/realms/tenant1
  MCP_OAUTH_CLIENT_ID: mcp-oauth-proxy
  MCP_OAUTH_CLIENT_SECRET: <MCP_OAUTH_CLIENT_SECRET>
  MCP_OAUTH_REQUIRED_SCOPES: mcp:user

# Resource limits and requests
resources:
  limits:
    memory: 512Mi
  requests:
    cpu: 250m
    memory: 256Mi
Deploy the chart
Install the chart with the values file you prepared. Under a GitOps workflow, commit the values instead and let the pipeline apply them; see Deployment Strategy.
helm registry login registry.axual.io --username <YOUR_USERNAME>

helm upgrade --install axual-mcp \
  oci://registry.axual.io/<CHART_PATH>/<CHART_NAME> \
  --version <CHART_VERSION> \
  --namespace <NAMESPACE> \
  --create-namespace \
  -f mcp-values.yaml
helm upgrade --install is idempotent, so it is safe to re-run after changing a value.
Keep MCP_OAUTH_CLIENT_SECRET out of the values file on anything but a trial. The chart reads envSecrets into the pod’s environment, so supply the secret from a Kubernetes Secret or the secret store this installation already uses, and leave the placeholder in the file you commit.
Verify the installation
Test the deployment through a client rather than by checking the pod, because a running pod with a wrong OAuth configuration looks healthy and still refuses every request.
Follow Axual MCP Server - User Guide to connect a client and confirm OAuth authentication succeeds.