Deploying Axual Governance on OpenShift
This guide walks you through installing the MySQL database, Keycloak and Vault that Axual Governance needs on OpenShift. It then covers installing Axual Governance itself, onboarding the Kafka cluster you already run, and verifying that a message reaches a topic.
Type |
Tutorial |
Goal |
Have Axual Governance running on OpenShift, managing a Kafka cluster you already had. |
Audience |
Platform Operators evaluating Axual against an existing Kafka cluster on OpenShift, with no prior Axual experience. |
When to use |
Stage 2 of The installation order, on the trial path rather than the full installation. |
Prerequisites
To install Axual Governance in your own infrastructure, you need:
-
Credentials for the Axual Harbor Registry (https://registry.axual.io/)
If you do not have credentials yet, contact Axual Support at support@axual.com. -
A Kubernetes cluster (version 1.24 or above) with an ingress controller, described in Install an Ingress Controller, or an OpenShift cluster (version 4.12 or above)
-
Helm (version 3 or above), and enough familiarity with Kubernetes and Helm charts to read what the commands below do
-
A terminal
-
For the Kafka cluster you are onboarding:
-
Connectivity information (endpoint, port)
-
Security information (certificates, or Simple Authentication and Security Layer (SASL) credentials)
-
Kafka and Apicurio Registry authentication
The prerequisites depend on the type of authentication enabled on Kafka and on Apicurio Registry. Check the prerequisites for your authentication type below.
Kafka authentication
The two supported authentication types need different material, so use the column that matches your brokers:
| Mutual TLS (mTLS) | Simple Authentication and Security Layer (SASL) |
|---|---|
Authenticating to Kafka with mTLS needs the following:
|
Authenticating to Kafka with SASL needs the following:
|
Apicurio Registry authentication
Authentication on the Apicurio Registry interface needs the following information:
| Basic authentication | TLS |
|---|---|
|
|
Axual Governance supports X.509 certificates in PEM format and PKCS8 private keys in PEM format only. The file extension can be anything, for example .crt, .pem, .key or .p8.
|
Installation procedure
The steps below deploy Axual Governance first, then onboard your own Kafka cluster to it. The last steps set up the Self-Service resources that people in your organisation need to start using the platform.
Step 1: Deploying Axual Governance
Deploy the governance layer on OpenShift, against the Apache Kafka cluster you already have.
-
Log in as
kubeadmin, so you have the permissions the installation needsoc login -u kubeadmin -p <your-password> https://api.crc.testing:6443 -
Create a new OpenShift project
oc new-project axual -
Add the OpenShift Helm charts repository, which holds the Axual Governance Helm charts
helm repo add openshift-helm-charts https://charts.openshift.io/ helm repo update -
Persist the credentials you received for the Axual Harbor Registry, so the Helm charts can use them during deployment:
kubectl -n axual \ create secret docker-registry axualdockercred \ --docker-server=registry.axual.io \ --docker-username=<YOUR_EMAIL> \ --docker-password=<YOUR_CLI_SECRET> -
Download the example
axual-governance-openshift.values.yamlClick to open axual-governance-openshift.values.yaml
global:

  # -- The domain of the Kubernetes cluster. The vast majority of Kubernetes clusters use the default value.
  clusterDomain: "<k8sClusterDomain>"

  # -- Globally override the list of ImagePullSecrets provided.
  imagePullSecrets:
    - name: axualdockercred

  # -- Axual Components toggles
  platform-manager:
    enabled: true

  platform-ui:
    enabled: true

  api-gateway:
    enabled: true

  topic-browse:
    enabled: true

## Api GateWay
api-gateway:
  config:
    gateway:
      endpoints:
        platformManager:
          enabled: true
          url: "http://axual-governance-platform-manager"
        organizationManager:
          enabled: true
          url: "http://axual-governance-organization-mgmt"
        topicBrowse:
          enabled: true
          url: "http://axual-governance-topic-browse"
        billing:
          enabled: false
        metricsExposer:
          enabled: false
        platformUi:
          enabled: true
          url: "http://axual-governance-platform-ui"
        keycloak:
          enabled: true
          url: "http://keycloak:8080"

    topic-browse-config-api:
      url: "http://axual-governance-platform-manager/api/stream_configs/{id}/browse-config"
    permissions-api:
      url: "http://axual-governance-platform-manager/api/auth"

    local:
      auth:
        issuerUrlForValidation: https://axual-governance.apps-crc.testing/auth/realms/local
        jwkSetUri: http://keycloak:8080/auth/realms/local/protocol/openid-connect/certs
    sso:
      keycloak:
        advertisedBaseUrl: https://axual-governance.apps-crc.testing
        internalBaseUrl: http://keycloak:8080
        useInsecureTrustManager: true
    logging:
      filter:
        enabled: true

  route:
    enabled: true
    annotations: {}
    labels: {}
    host: "axual-governance.apps-crc.testing"
    path: "/"
    tls:
      termination: "edge"

## Platform Manager
platform-manager:
  # Enable Remote Debug with Platform Manager
  debug:
    enabled: false

  config:
    spring:
      # Spring Datasource
      datasource:
        name: "fluxdb"
        url: "jdbc:mysql://axual-platform-manager-mysql:3306/selfservicedb?useSSL=false&useLegacyDatetimeCode=false&serverTimezone=UTC"
        username: "fluxmaster"
        password: "Passw0rd"
        driver-class-name: "com.mysql.cj.jdbc.Driver"
      jpa.database-platform: "org.hibernate.dialect.MySQLDialect"
      # Flyway Configuration
      flyway:
        locations: "classpath:db/migration/mysql"

    # Axual Platform Manager
    axual:
      api.available.auth.methods: "SSL, SCRAM_SHA_512"
      # Instance Manager Configuration
      instance-api:
        available: false
      # Application Operation Manager Configuration
      operation-manager:
        available: false
      # Connect Configuration
      connect:
        available: false
      # Keycloak Configuration
      organization-manager:
        auth-provider: "keycloak"
        keycloak:
          url: "http://keycloak:8080"
          username: "admin"
          password: "admin"
      # Security Configuration
      security:
        header-based-auth: true # Disable Keycloak and rely on headers passed from API Gateway
    # Governance Vault Configuration
    governance:
      vault:
        enabled: false
        uri: "http://vault:8200"
        path: "governance"
        # Required: change to your roleId for PlatformManager, see step 9 above
        roleId: "744062d7-1d86-3496-bfdc-76f4d7352a2e"
        # Required: change to your secretId for PlatformManager, see step 9 above
        secretId: "634799b5-3ac7-ff6e-071f-a620243318fe"
    # Vault Configuration for Connectors
    vault:
      enabled: false
    # Subscription Management Configuration
    subscription-management:
      enabled: false
    # Server Security
    server:
      ssl:
        enabled: false
      forward-headers-strategy: framework

## Self-Service UI
platform-ui:
  platformManager:
    fqdn: "axual-governance.apps-crc.testing"

  # Window.ENV Configuration
  config:
    mgmtApiUrl: "https://axual-governance.apps-crc.testing/api"
    # this URL needs no ending `/`
    mgmtUiUrl: "https://axual-governance.apps-crc.testing"
    organizationManagerUrl: "https://axual-governance.apps-crc.testing/api/organizations"
    topicBrowseUrl: 'https://axual-governance.apps-crc.testing/api/stream_configs'

    # Feature Flags
    billingEnabled: false
    insightsEnabled: false
    dataClassificationEnabled: false
    connectEnabled: false

    clientId: "self-service"
    clientSecret: "notSecret"
    configurationType: "remote"

    # Stream Browsing
    streamBrowseEnabled: false
    # This is for deciding on SB/CB(false) or TB(true)
    topicBrowseEnabled: true

    # Hide multiple environments
    singleEnvironmentEnabled: true
    organizationShortNameEditEnabled: true

    # Stripe Subscription
    subscriptionEnabled: false

    # Keycloak Configuration
    oidcScopes: "openid profile email"
    responseTypes: "code"
    oidcEndpoint: "https://axual-governance.apps-crc.testing"

    # Wizard Allowed Providers
    enabledKafkaProviders:
      - apache_kafka
The example
axual-governance-openshift.values.yamlassumes you run OpenShift locally to verify the installation. If your OpenShift cluster has a different base URL, replace every occurrence ofhttps://axual-governance.apps-crc.testingwith the URL that applies to your cluster. -
Deploy the MySQL persistent database for Platform Manager.
oc new-app --template=mysql-persistent                                       \
    --param DATABASE_SERVICE_NAME=axual-platform-manager-mysql               \
    --param=MYSQL_DATABASE=selfservicedb                                     \
    --param=MYSQL_USER=fluxmaster                                            \
    --param=MYSQL_PASSWORD=Passw0rd                                          \
    --param=MYSQL_ROOT_PASSWORD=rootpassword
If you change the passwords, update them in axual-governance-openshift.values.yamlas well. -
Download the example
keycloak.yaml, which installs and configures KeycloakClick to open keycloak.yaml
kind: Template apiVersion: template.openshift.io/v1 metadata: name: keycloak annotations: description: An example template for trying out Keycloak on OpenShift iconClass: icon-sso openshift.io/display-name: Keycloak tags: keycloak version: 23.0.3 objects: - apiVersion: v1 kind: Service metadata: annotations: description: The web server's http port. labels: application: '${APPLICATION_NAME}' name: '${APPLICATION_NAME}' spec: ports: - port: 8080 targetPort: 8080 selector: deploymentConfig: '${APPLICATION_NAME}' - apiVersion: v1 id: '${APPLICATION_NAME}' kind: Route metadata: annotations: description: Route for application's service. labels: application: '${APPLICATION_NAME}' name: '${APPLICATION_NAME}' spec: host: '${HOSTNAME}' tls: termination: edge to: name: '${APPLICATION_NAME}' - apiVersion: v1 kind: DeploymentConfig metadata: labels: application: '${APPLICATION_NAME}' name: '${APPLICATION_NAME}' spec: replicas: 1 selector: deploymentConfig: '${APPLICATION_NAME}' strategy: type: Recreate template: metadata: labels: application: '${APPLICATION_NAME}' deploymentConfig: '${APPLICATION_NAME}' name: '${APPLICATION_NAME}' spec: containers: - env: - name: KEYCLOAK_ADMIN value: '${KEYCLOAK_ADMIN}' - name: KEYCLOAK_ADMIN_PASSWORD value: '${KEYCLOAK_ADMIN_PASSWORD}' - name: KC_PROXY value: 'edge' - name: KC_HTTP_RELATIVE_PATH value: '/auth' image: quay.io/keycloak/keycloak:23.0.3 livenessProbe: failureThreshold: 100 httpGet: path: /auth port: 8080 scheme: HTTP initialDelaySeconds: 60 name: '${APPLICATION_NAME}' ports: - containerPort: 8080 protocol: TCP readinessProbe: failureThreshold: 300 httpGet: path: /auth port: 8080 scheme: HTTP initialDelaySeconds: 30 securityContext: privileged: false volumeMounts: - mountPath: /opt/keycloak/data name: empty args: ["start-dev"] volumes: - name: empty emptyDir: {} triggers: - type: ConfigChange parameters: - name: APPLICATION_NAME displayName: Application Name description: The name for the application. value: keycloak required: true - name: KEYCLOAK_ADMIN displayName: Keycloak Administrator Username description: Keycloak Server administrator username generate: expression from: '[a-zA-Z0-9]{8}' required: true - name: KEYCLOAK_ADMIN_PASSWORD displayName: Keycloak Administrator Password description: Keycloak Server administrator password generate: expression from: '[a-zA-Z0-9]{8}' required: true - name: HOSTNAME displayName: Custom Route Hostname description: >- Custom hostname for the service route. Leave blank for default hostname, e.g.: <application-name>-<namespace>.<default-domain-suffix> - name: NAMESPACE displayName: Namespace used for DNS discovery description: >- This namespace is a part of DNS query sent to Kubernetes API. This query allows the DNS_PING protocol to extract cluster members. This parameter might be removed once https://issues.jboss.org/browse/JGRP-2292 is implemented. required: true -
Deploy Keycloak using the
keycloak.yamlyou downloadedoc process -f keycloak.yaml \ -p KEYCLOAK_ADMIN=admin \ -p KEYCLOAK_ADMIN_PASSWORD=admin \ -p NAMESPACE=axual \ | oc create -f - -
Configure a local realm for Axual Governance. First, download the
keycloak-local-realm.jsonfile below.Click to open keycloak-local-realm.json
{ "id": "03220395-8900-49d3-9763-268a528600ca", "realm": "local", "displayName": "Local", "displayNameHtml": "Local", "enabled": true, "registrationAllowed": true, "clients": [ { "id": "3d03c347-f6cc-451b-9671-fce8b7ca3bfe", "clientId": "self-service", "name": "Self Service Client", "description": "Client used by the Self-Service to authenticate users", "rootUrl": "https://axual-governance.apps-crc.testing", "adminUrl": "https://axual-governance.apps-crc.testing", "baseUrl": "", "surrogateAuthRequired": false, "enabled": true, "alwaysDisplayInConsole": false, "clientAuthenticatorType": "client-secret", "redirectUris": [ "*" ], "webOrigins": [ "*" ], "notBefore": 0, "bearerOnly": false, "consentRequired": false, "standardFlowEnabled": true, "implicitFlowEnabled": false, "directAccessGrantsEnabled": true, "serviceAccountsEnabled": false, "publicClient": true, "frontchannelLogout": true, "protocol": "openid-connect", "attributes": { "oidc.ciba.grant.enabled": "false", "post.logout.redirect.uris": "*", "oauth2.device.authorization.grant.enabled": "false", "backchannel.logout.session.required": "true", "backchannel.logout.revoke.offline.tokens": "false" }, "authenticationFlowBindingOverrides": {}, "fullScopeAllowed": true, "nodeReRegistrationTimeout": -1, "protocolMappers": [ { "id": "e2f65234-0851-4c56-aef8-e570571903cc", "name": "TenantShortName Mapper", "protocol": "openid-connect", "protocolMapper": "oidc-usermodel-attribute-mapper", "consentRequired": false, "config": { "introspection.token.claim": "true", "userinfo.token.claim": "true", "user.attribute": "tenant-short-name", "id.token.claim": "true", "access.token.claim": "true", "claim.name": "tenant_short_name", "jsonType.label": "String" } }, { "id": "9c6f38e8-483f-4f2f-bd15-19dc5462e77d", "name": "TenantName Mapper", "protocol": "openid-connect", "protocolMapper": "oidc-usermodel-attribute-mapper", "consentRequired": false, "config": { "introspection.token.claim": "true", "userinfo.token.claim": "true", "user.attribute": "tenant-name", "id.token.claim": "true", "access.token.claim": "true", "claim.name": "tenant_name", "jsonType.label": "String" } } ] } ] } -
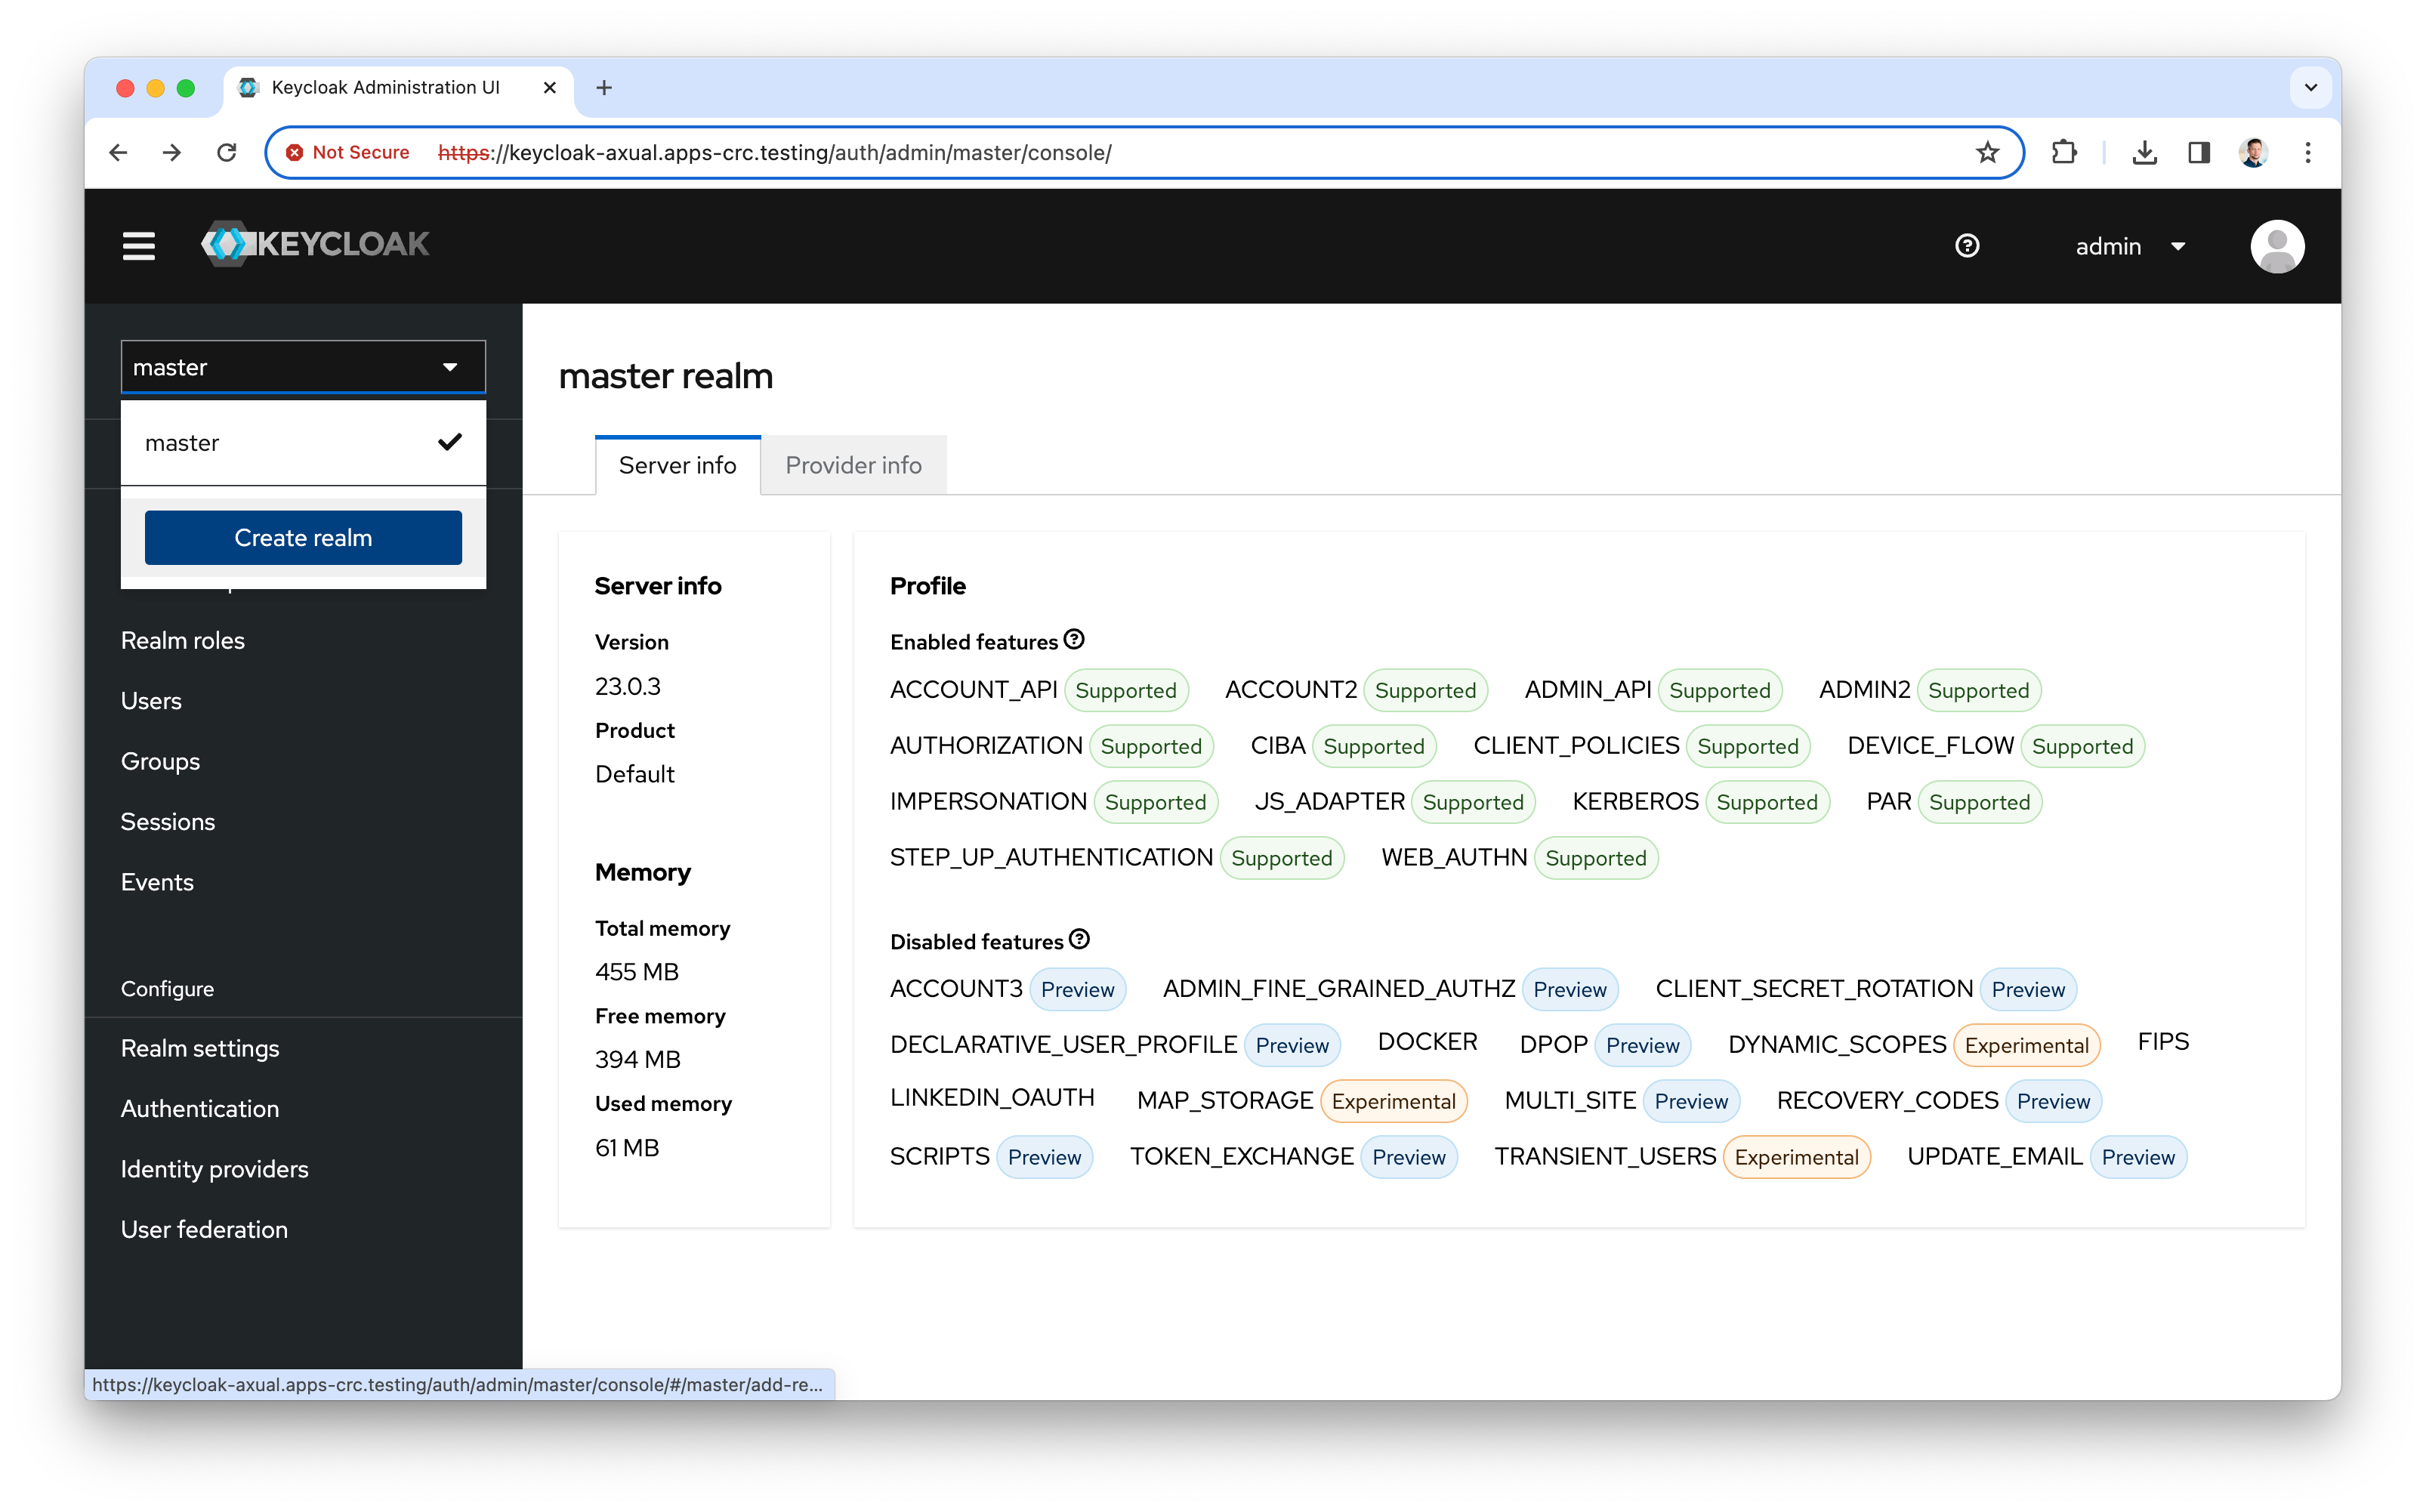
Open the Keycloak admin interface at https://keycloak-axual.apps-crc.testing/auth/admin/master/console/. Use the credentials from the previous step. The following screen appears:
-
Click the dropdown, then Create realm
-
Click Browse, select the
keycloak-local-realm.jsonfile and import it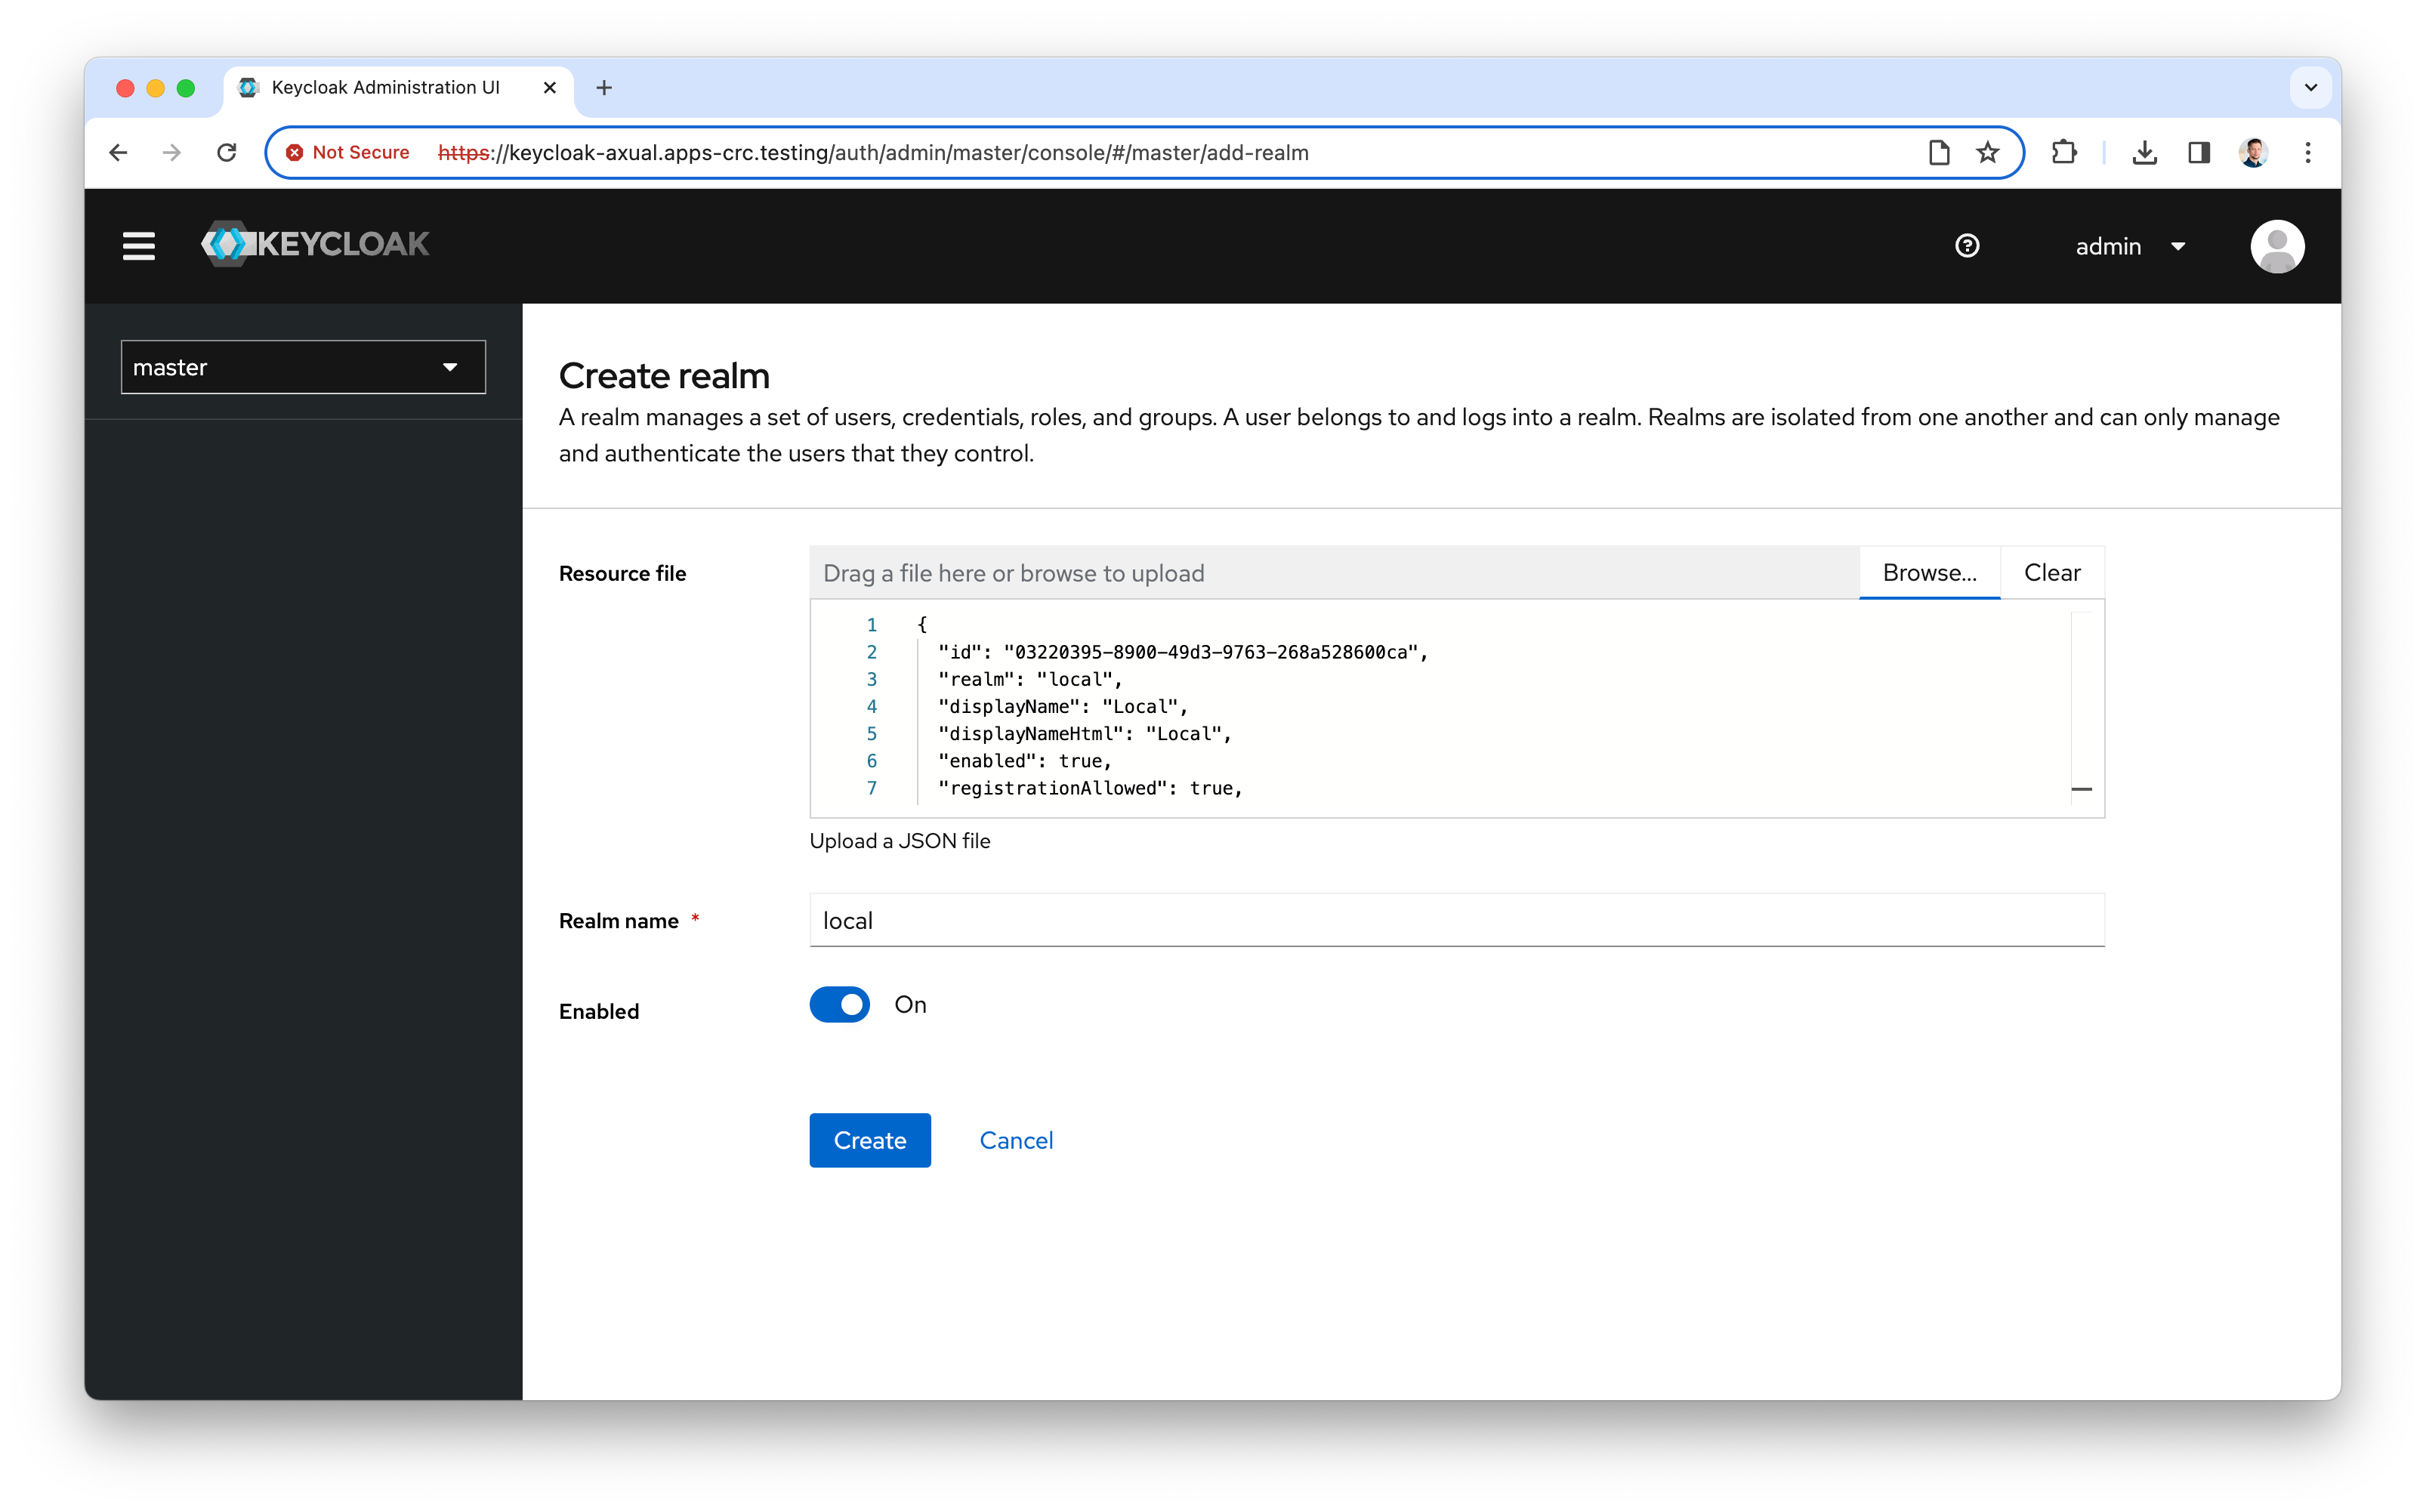
-
Click Create to create the local realm.
-
Deploy HashiCorp Vault
helm upgrade --install vault openshift-helm-charts/vault -
Wait for the pod
vault-0to report ready before you continue with the next steps. -
Install Axual Governance
helm install axual-governance openshift-helm-charts/axual-governance-core --version 1.3.0 -f ./axual-governance-openshift.values.yaml -n axual -
Axual Governance stores the credentials of the Kafka cluster you are onboarding in HashiCorp Vault. The steps below initialise it.
-
Create an alias for the Vault command-line interface (CLI), then initialise Vault. The later steps reuse the alias.
alias v='kubectl -n axual exec --stdin=true vault-0 -- '
v vault operator init -key-shares=1 -key-threshold=1
Keep the values for Unseal Key and Root Token in a safe place. The next steps need them. -
Log in to Vault with the unseal key and root token. Replace
<UNSEAL_KEY>and<ROOT_TOKEN>with the values from the previous step.v vault operator unseal <UNSEAL_KEY> v vault login <ROOT_TOKEN> -
Prepare Vault for the platform. Run the commands below:
v vault secrets enable -path=governance kv-v2
v vault auth enable approle
echo 'path "governance/*" {capabilities = ["read","create","update","delete"]}' | v vault policy write platform-manager -
v vault write auth/approle/role/platform-manager token_policies="platform-manager"
v vault read auth/approle/role/platform-manager/role-id
v vault write -force auth/approle/role/platform-manager/secret-id
Find the
role_idandsecret_idin the output of the command above and store them in a safe place. -
Update the
platform-managerconfiguration inaxual-governance-openshift.values.yamlto use therole_idandsecret_idfrom the previous step. Setvault.enabledtotrueat the same time.platform-manager: config: governance: vault: enabled: true uri: "http://axual-governance-platform-manager-vault:8200" path: "governance" roleId: "<ROLE_ID>" # the `role_id` from the command above secretId: "<SECRET_ID>" # the `secret_id` from the command aboveenabledmust betrue, or Platform Manager does not read the credentials from Vault. -
Apply the changes to the
axual-governance-openshift.values.yamlfile.helm upgrade --install axual-governance openshift-helm-charts/axual-governance-core --version 1.3.0 -f ./axual-governance-openshift.values.yaml -n axual
-
-
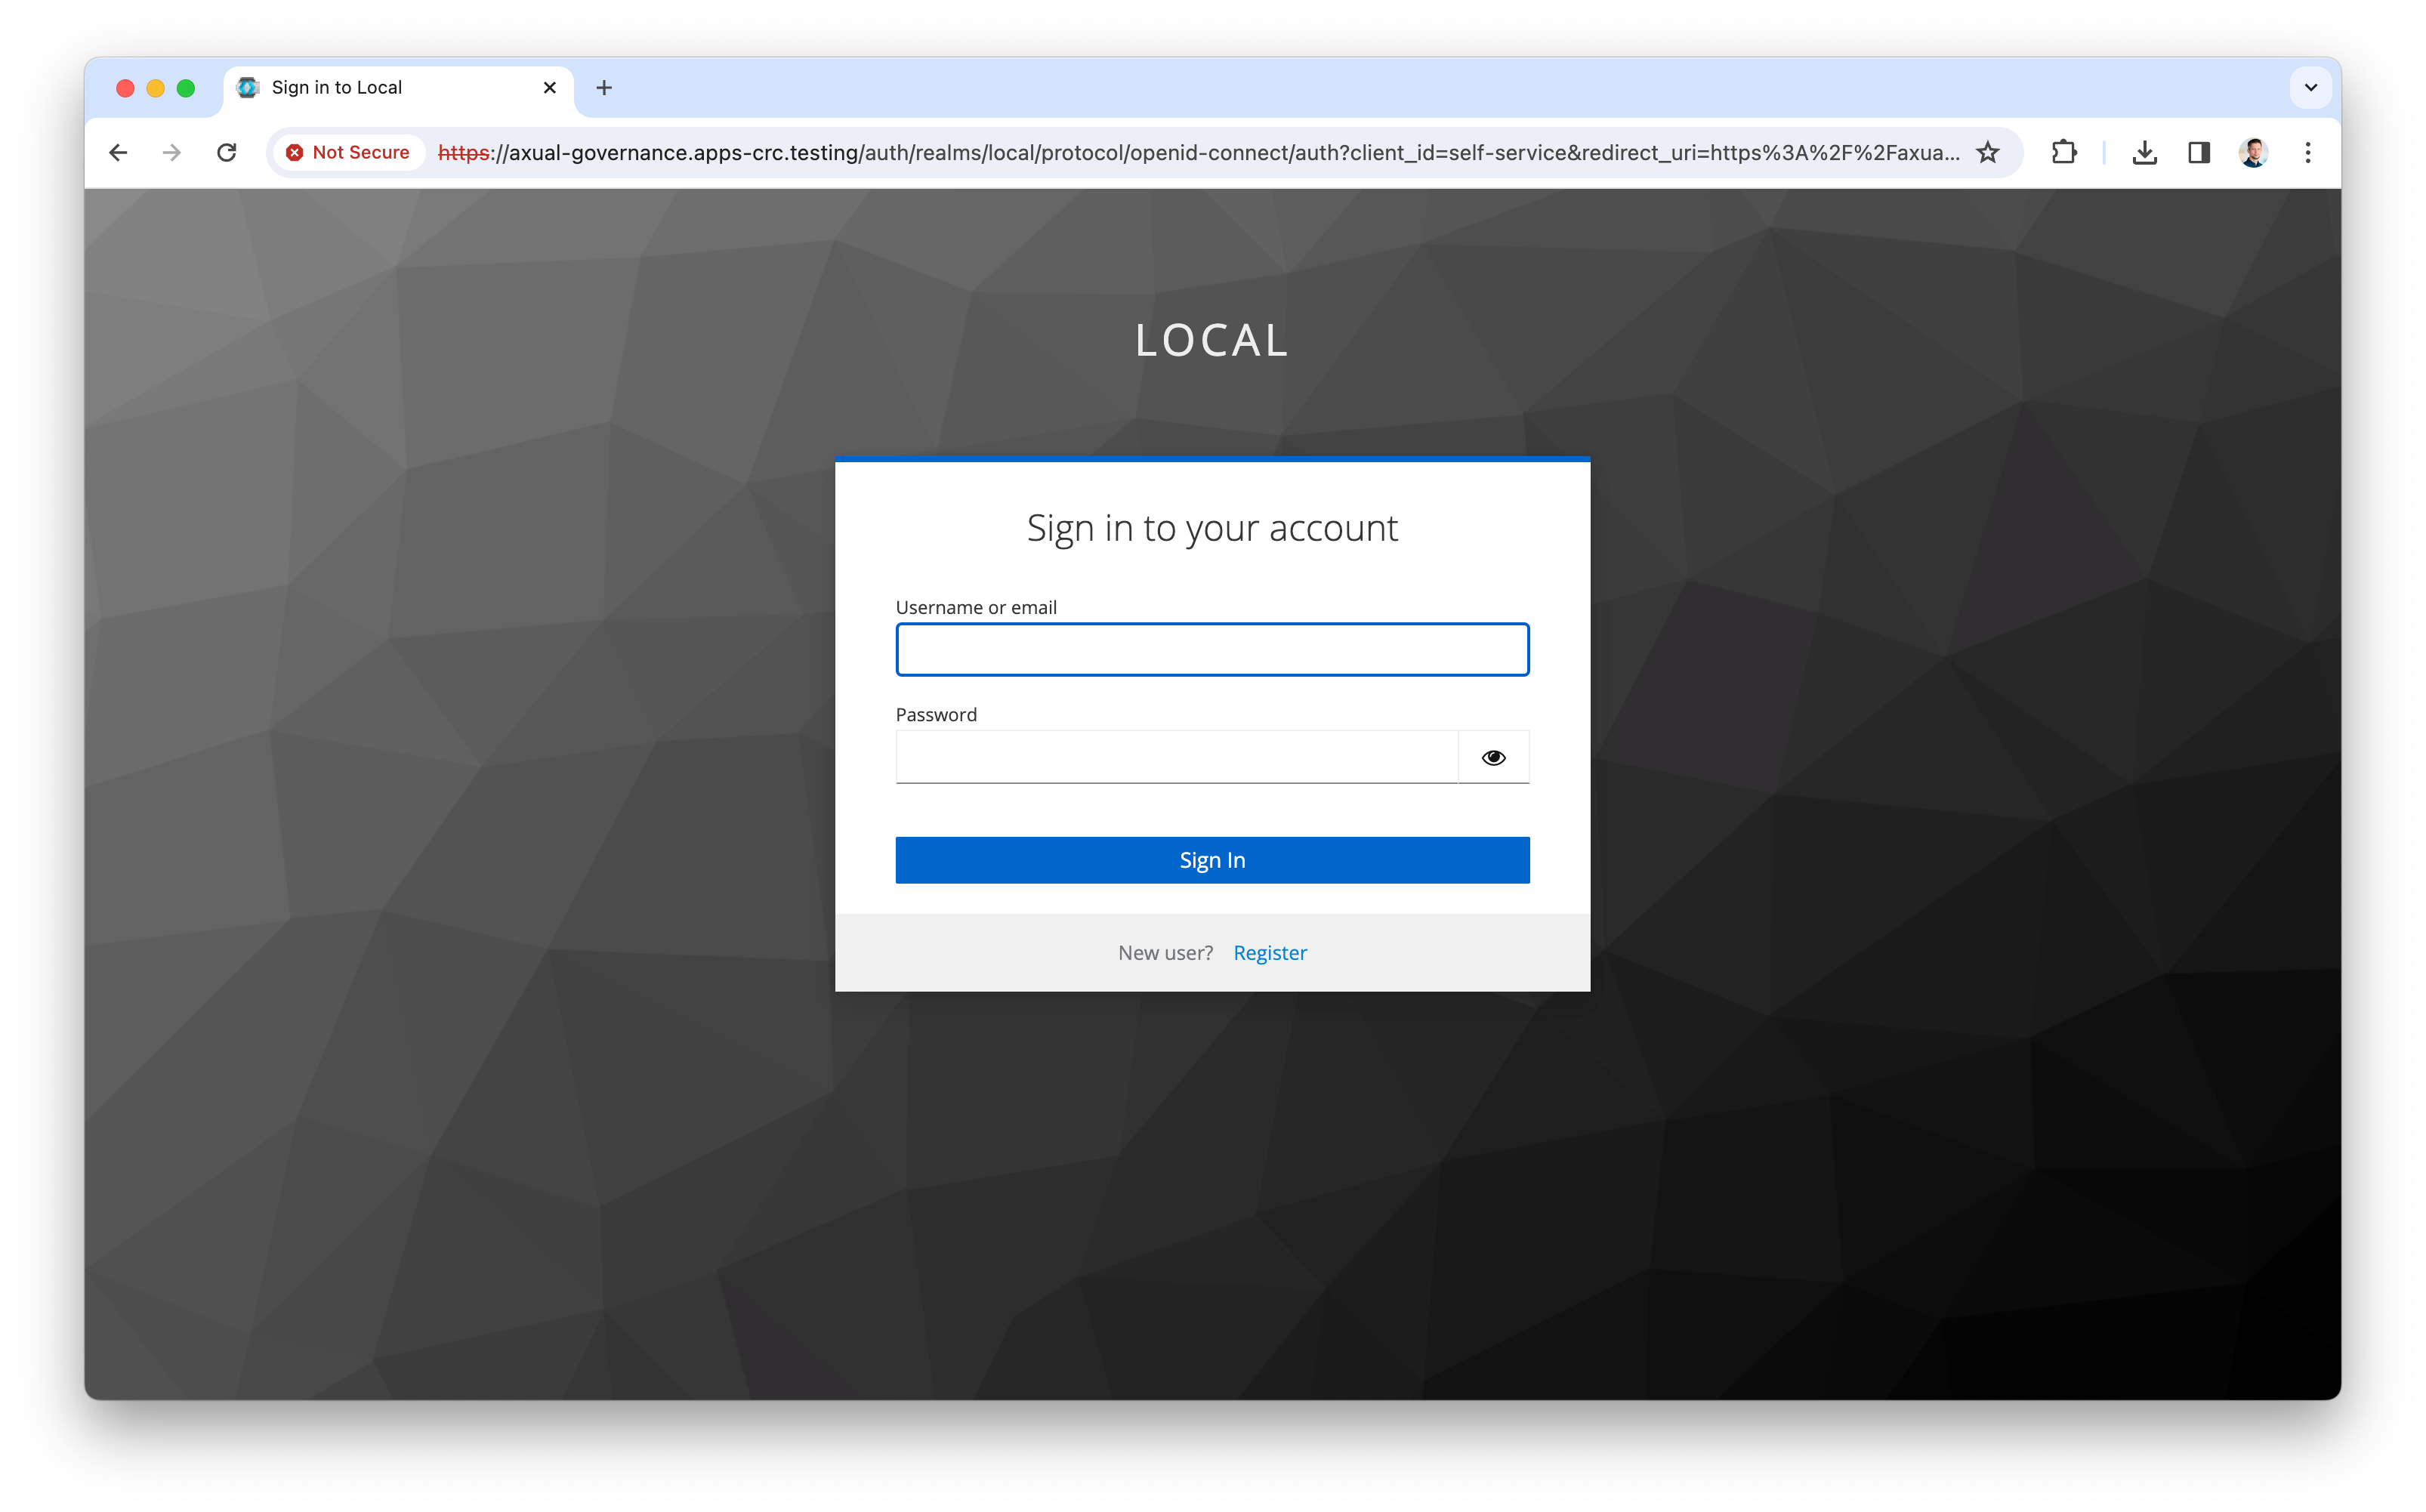
Log in to the Self-Service interface at https://axual-governance.apps-crc.testing/. The following screen appears:
-
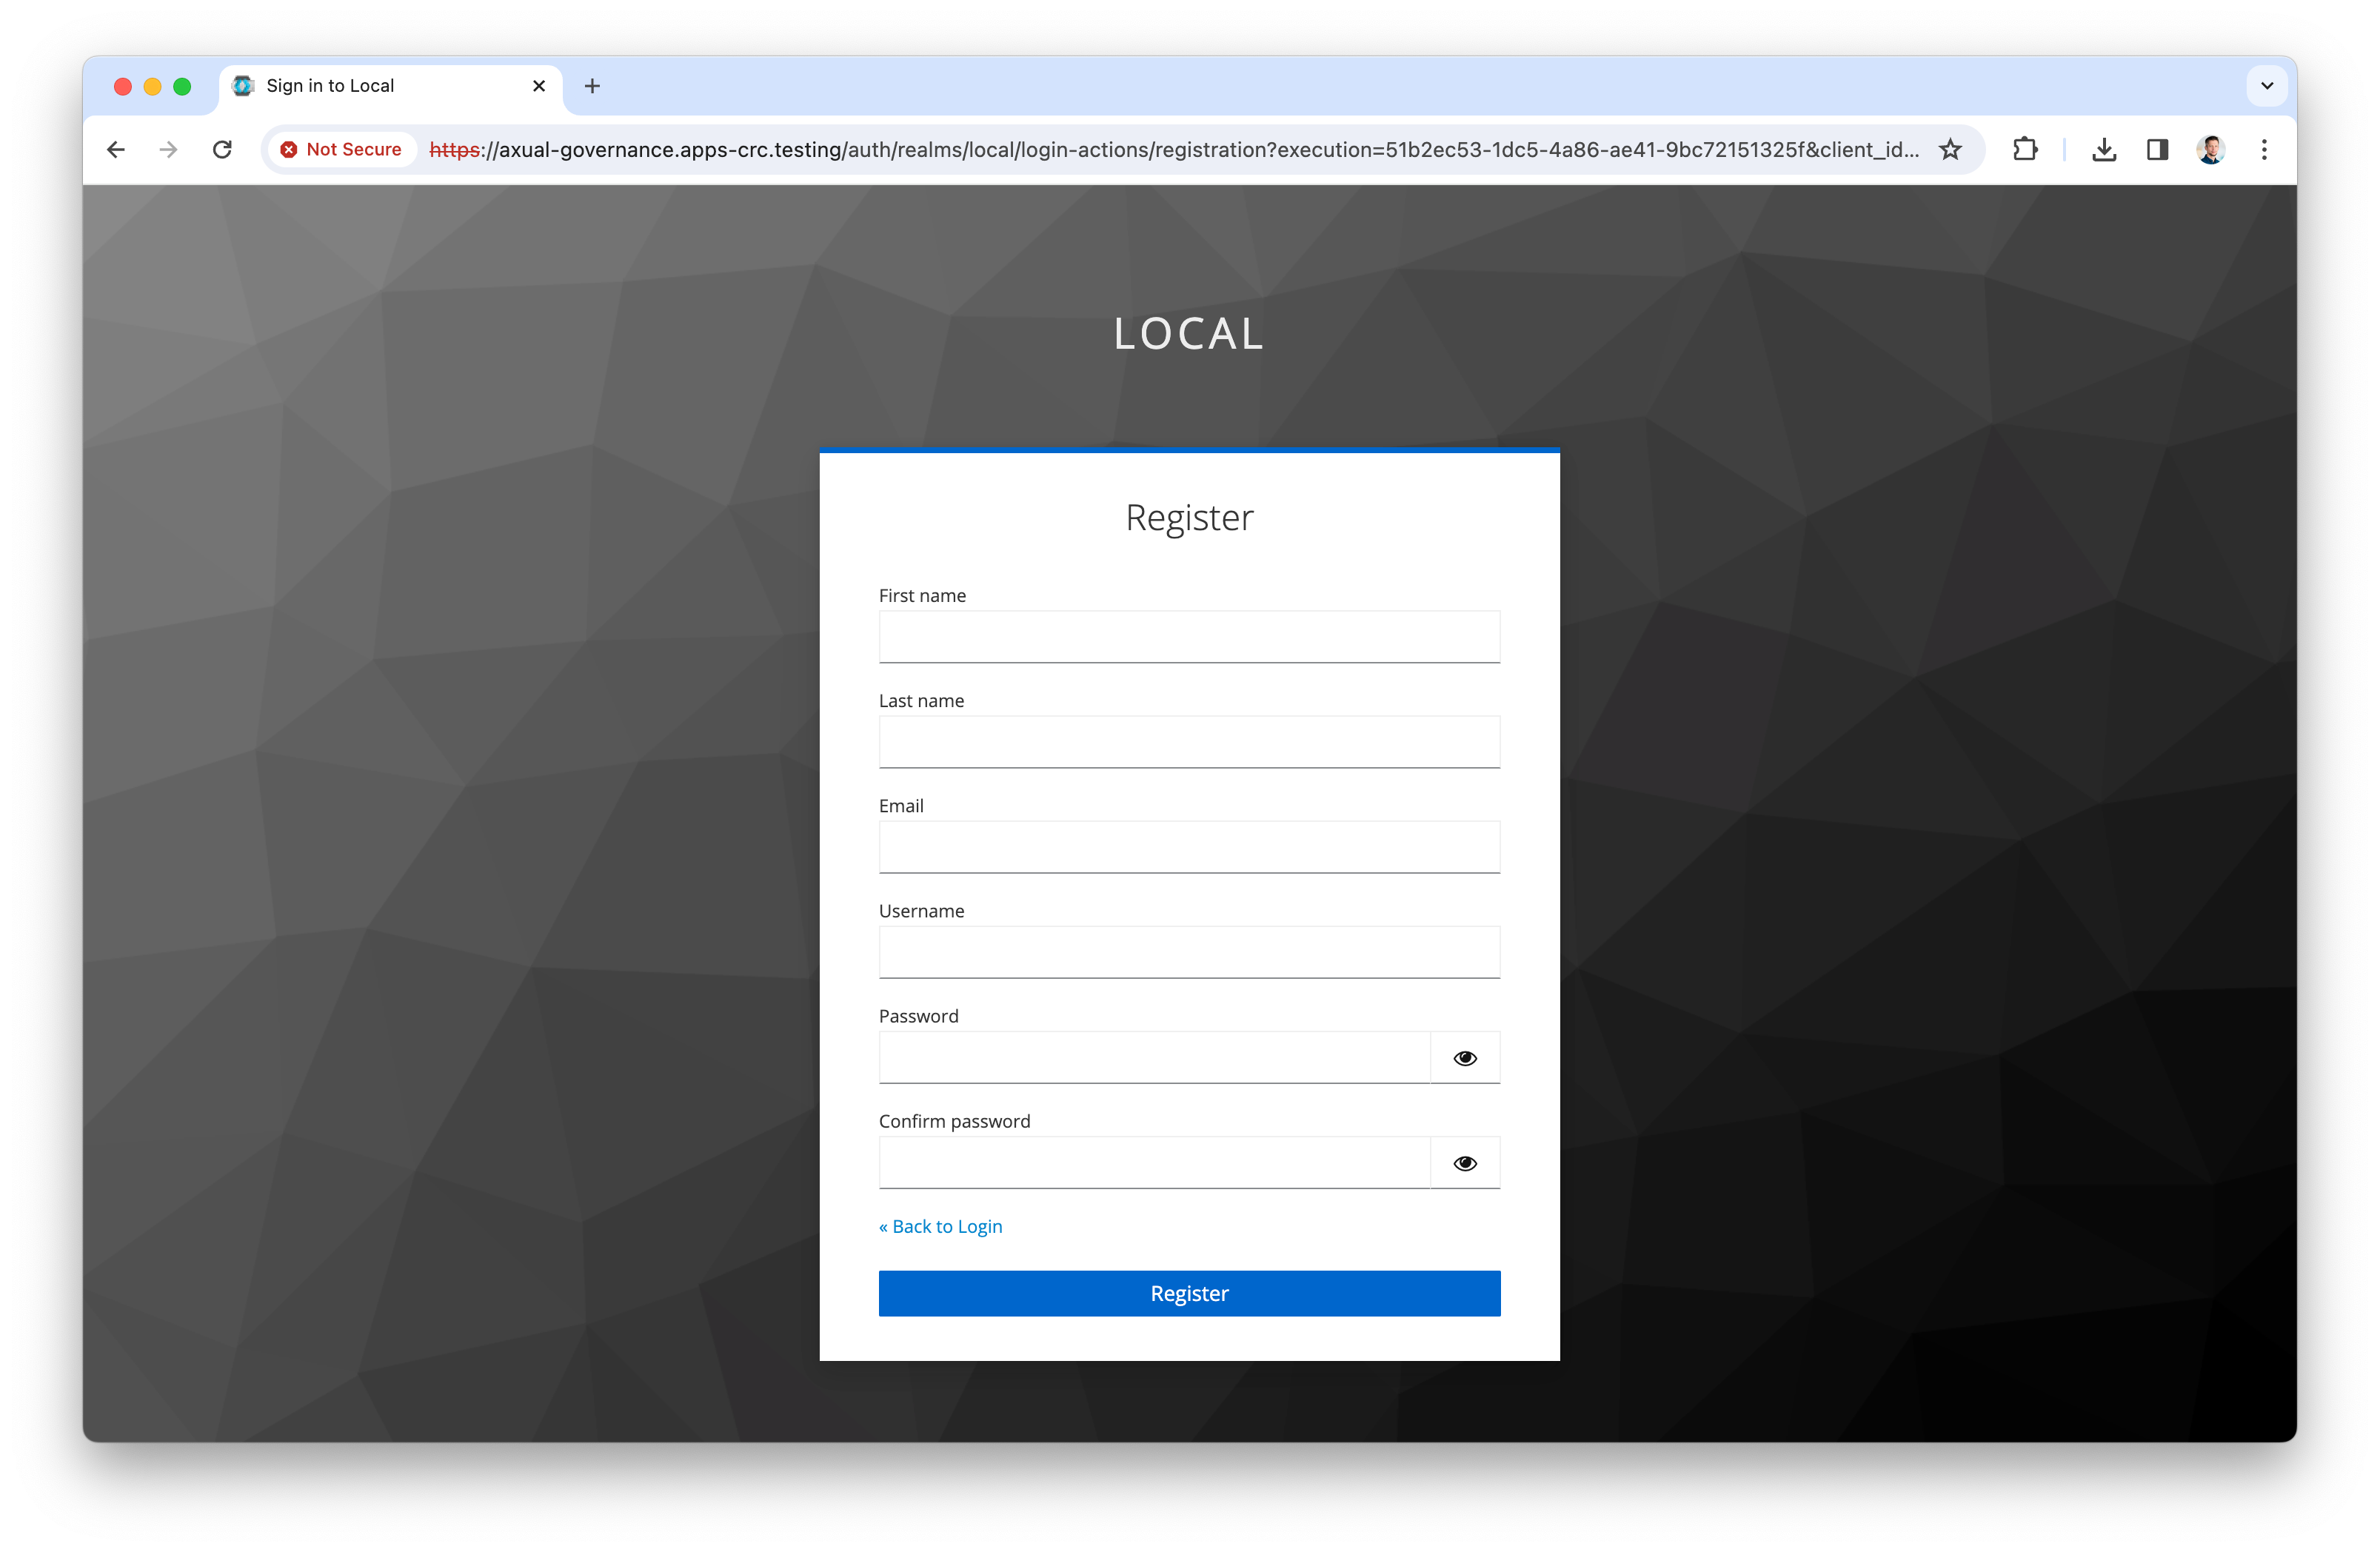
Click Register user to register a tenant admin user. This user has administrative privileges on the platform. The following screen appears:
-
Register the tenant admin on your platform. Enter details for the following fields
-
First name
-
Last name
-
Email
-
Username: you will use this to log in next time
-
Password
-
Confirm password
-
-
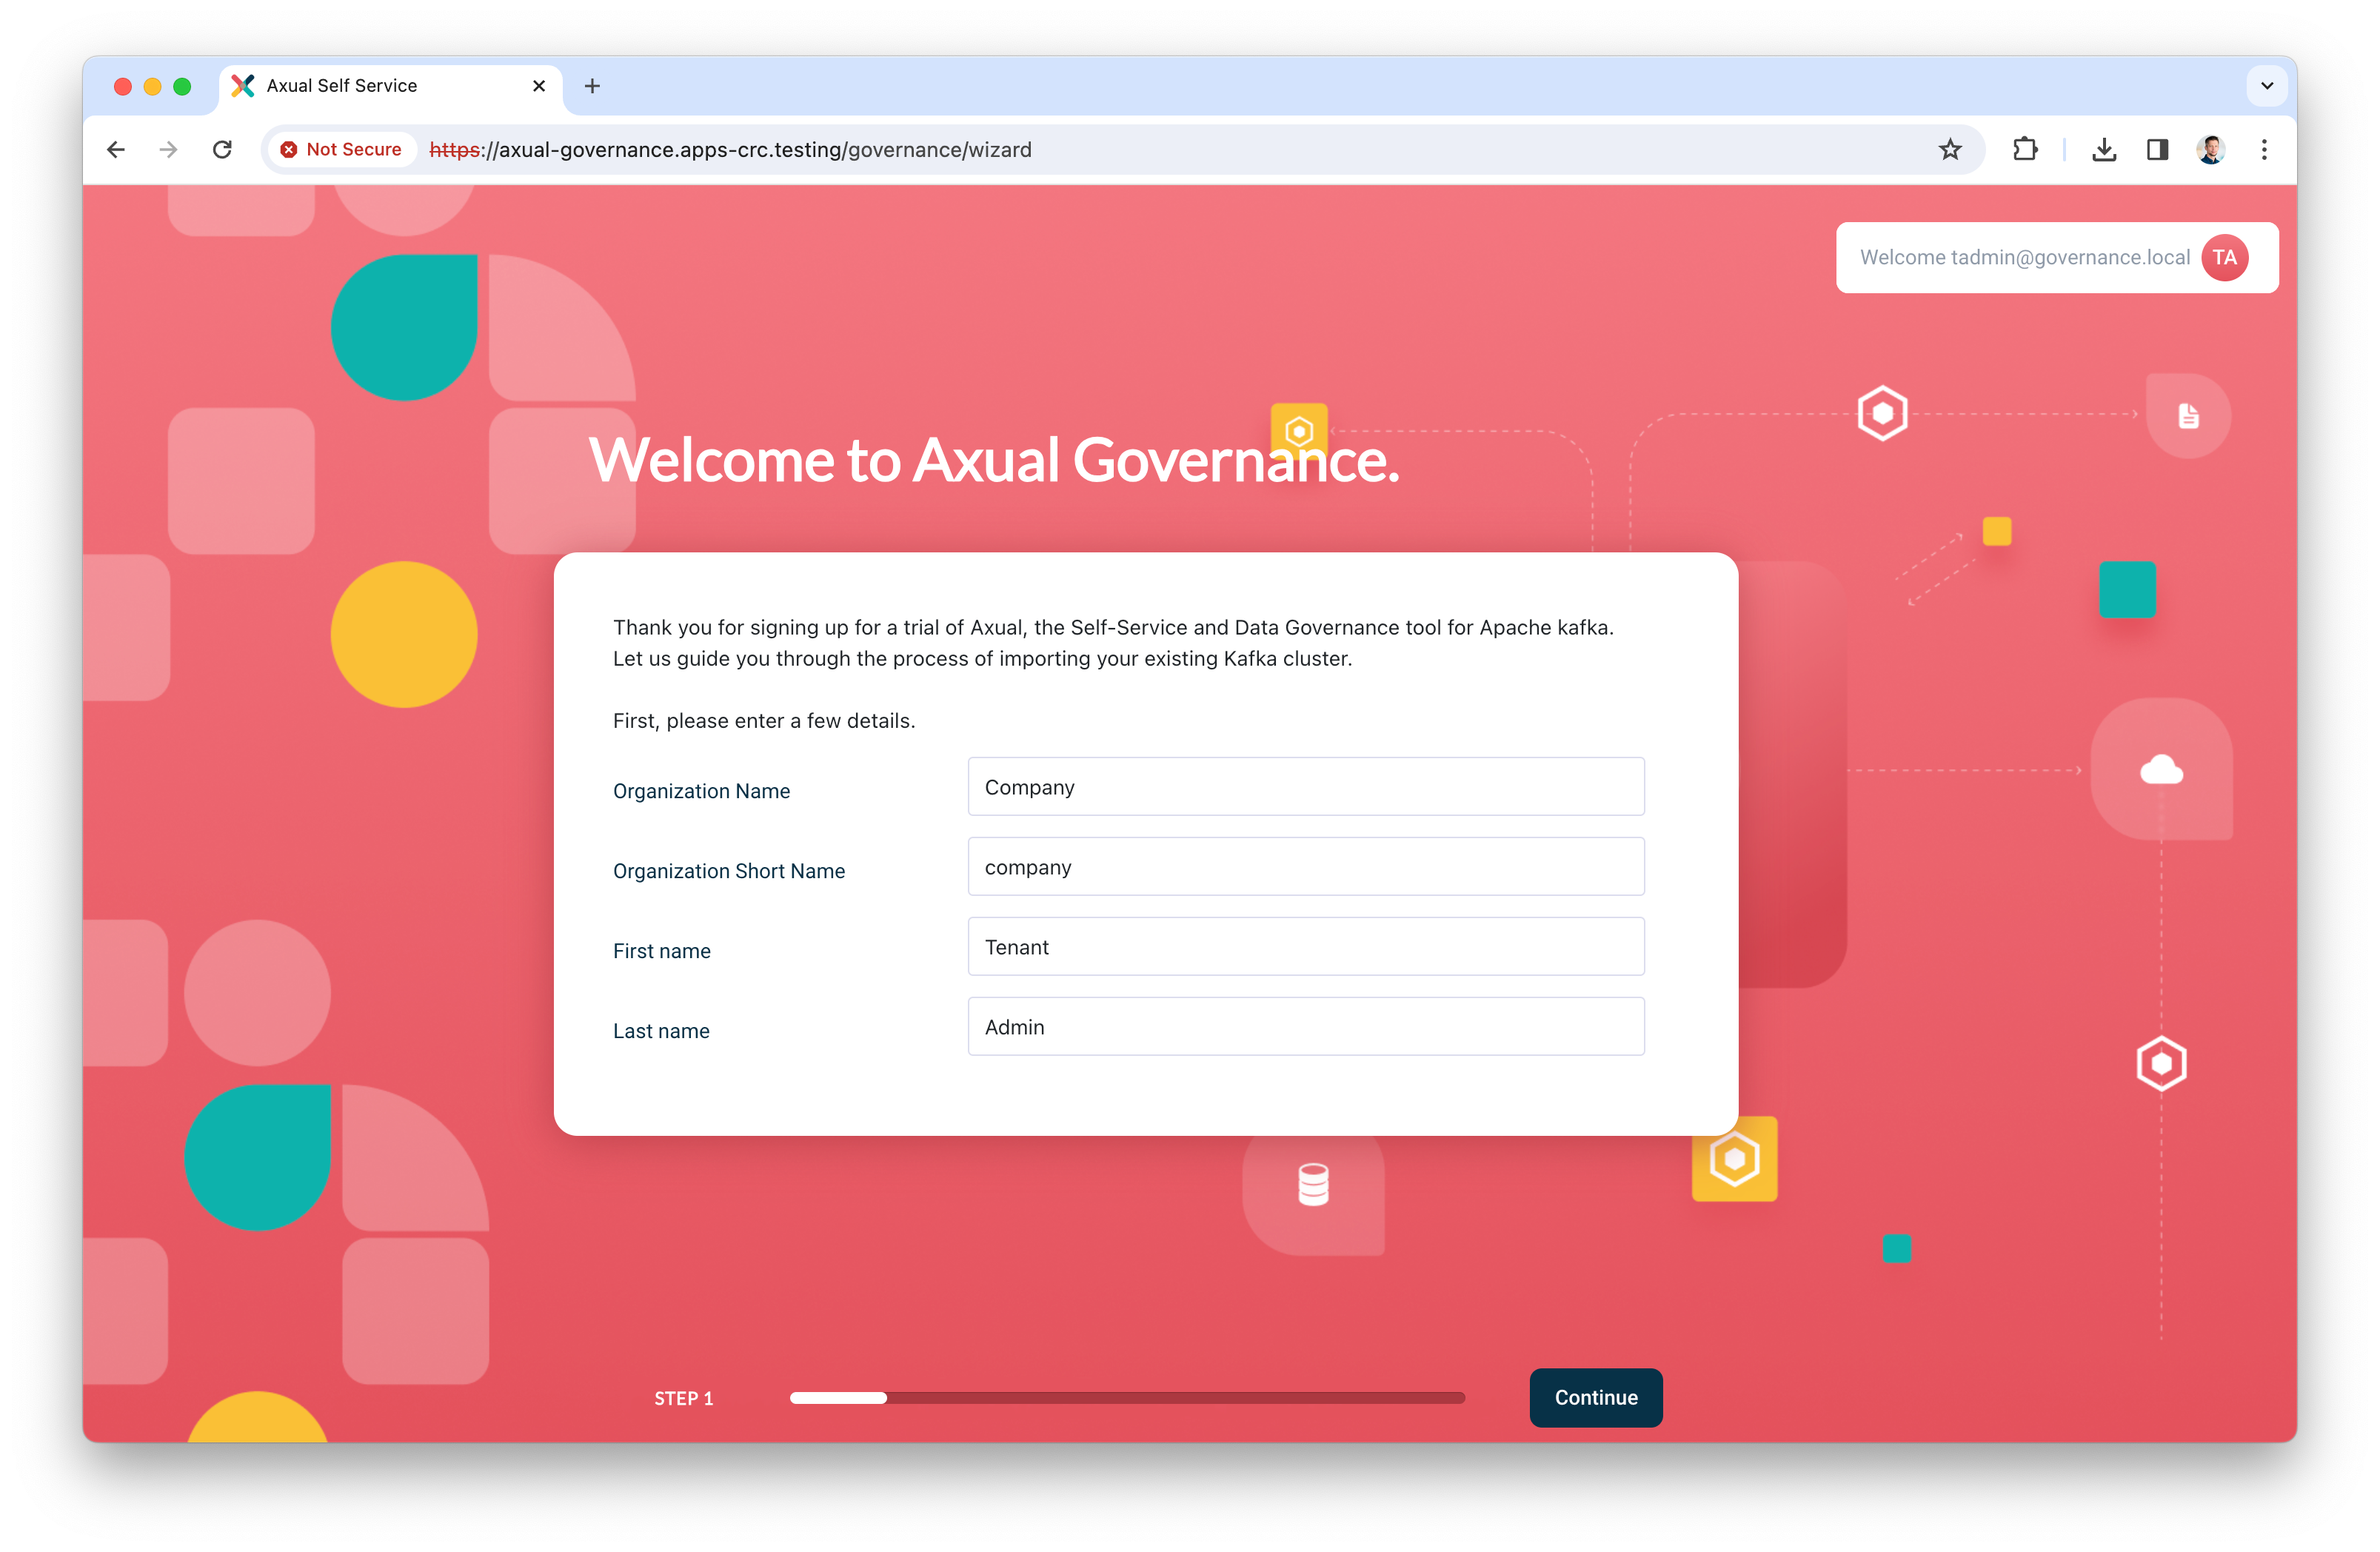
Click Register to add the tenant admin. The following screen appears:
-
Add the details of your organisation and click Continue. Self-Service redirects you to the dashboard.
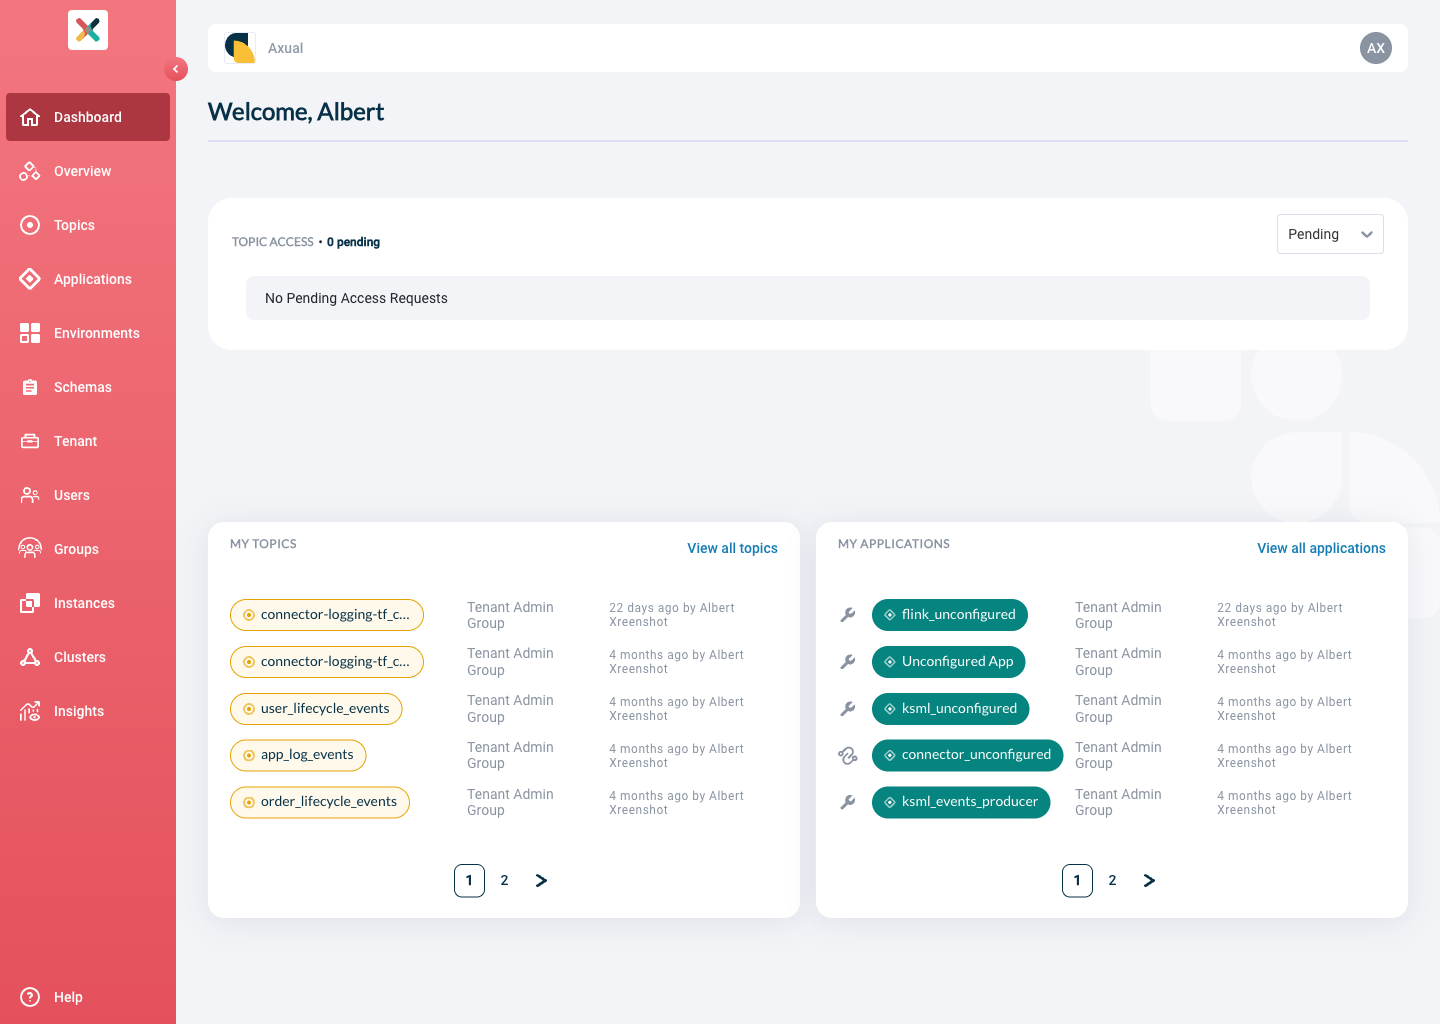
By completing the steps above, you have deployed Axual Governance and prepared Self-Service to log in as a tenant admin.
You can now continue with Step 2: Onboarding your own Kafka cluster.
Step 2: Onboarding your own Kafka cluster
Onboard your own Kafka cluster in Axual Governance. Self-Service can then create and configure topics on that cluster, and authorise applications against it.
| This onboarding procedure supports one case only: onboarding an existing Kafka cluster for new topics and Access Control Lists (ACLs). |
|
Only continue the onboarding when the following prerequisites are met:
|
Onboarding the cluster
Self-Service does not know about your existing Kafka cluster until you register it. These steps create that record.
-
Log in to Self-Service using the tenant admin credentials.
-
Expand the menu to see all items.
-
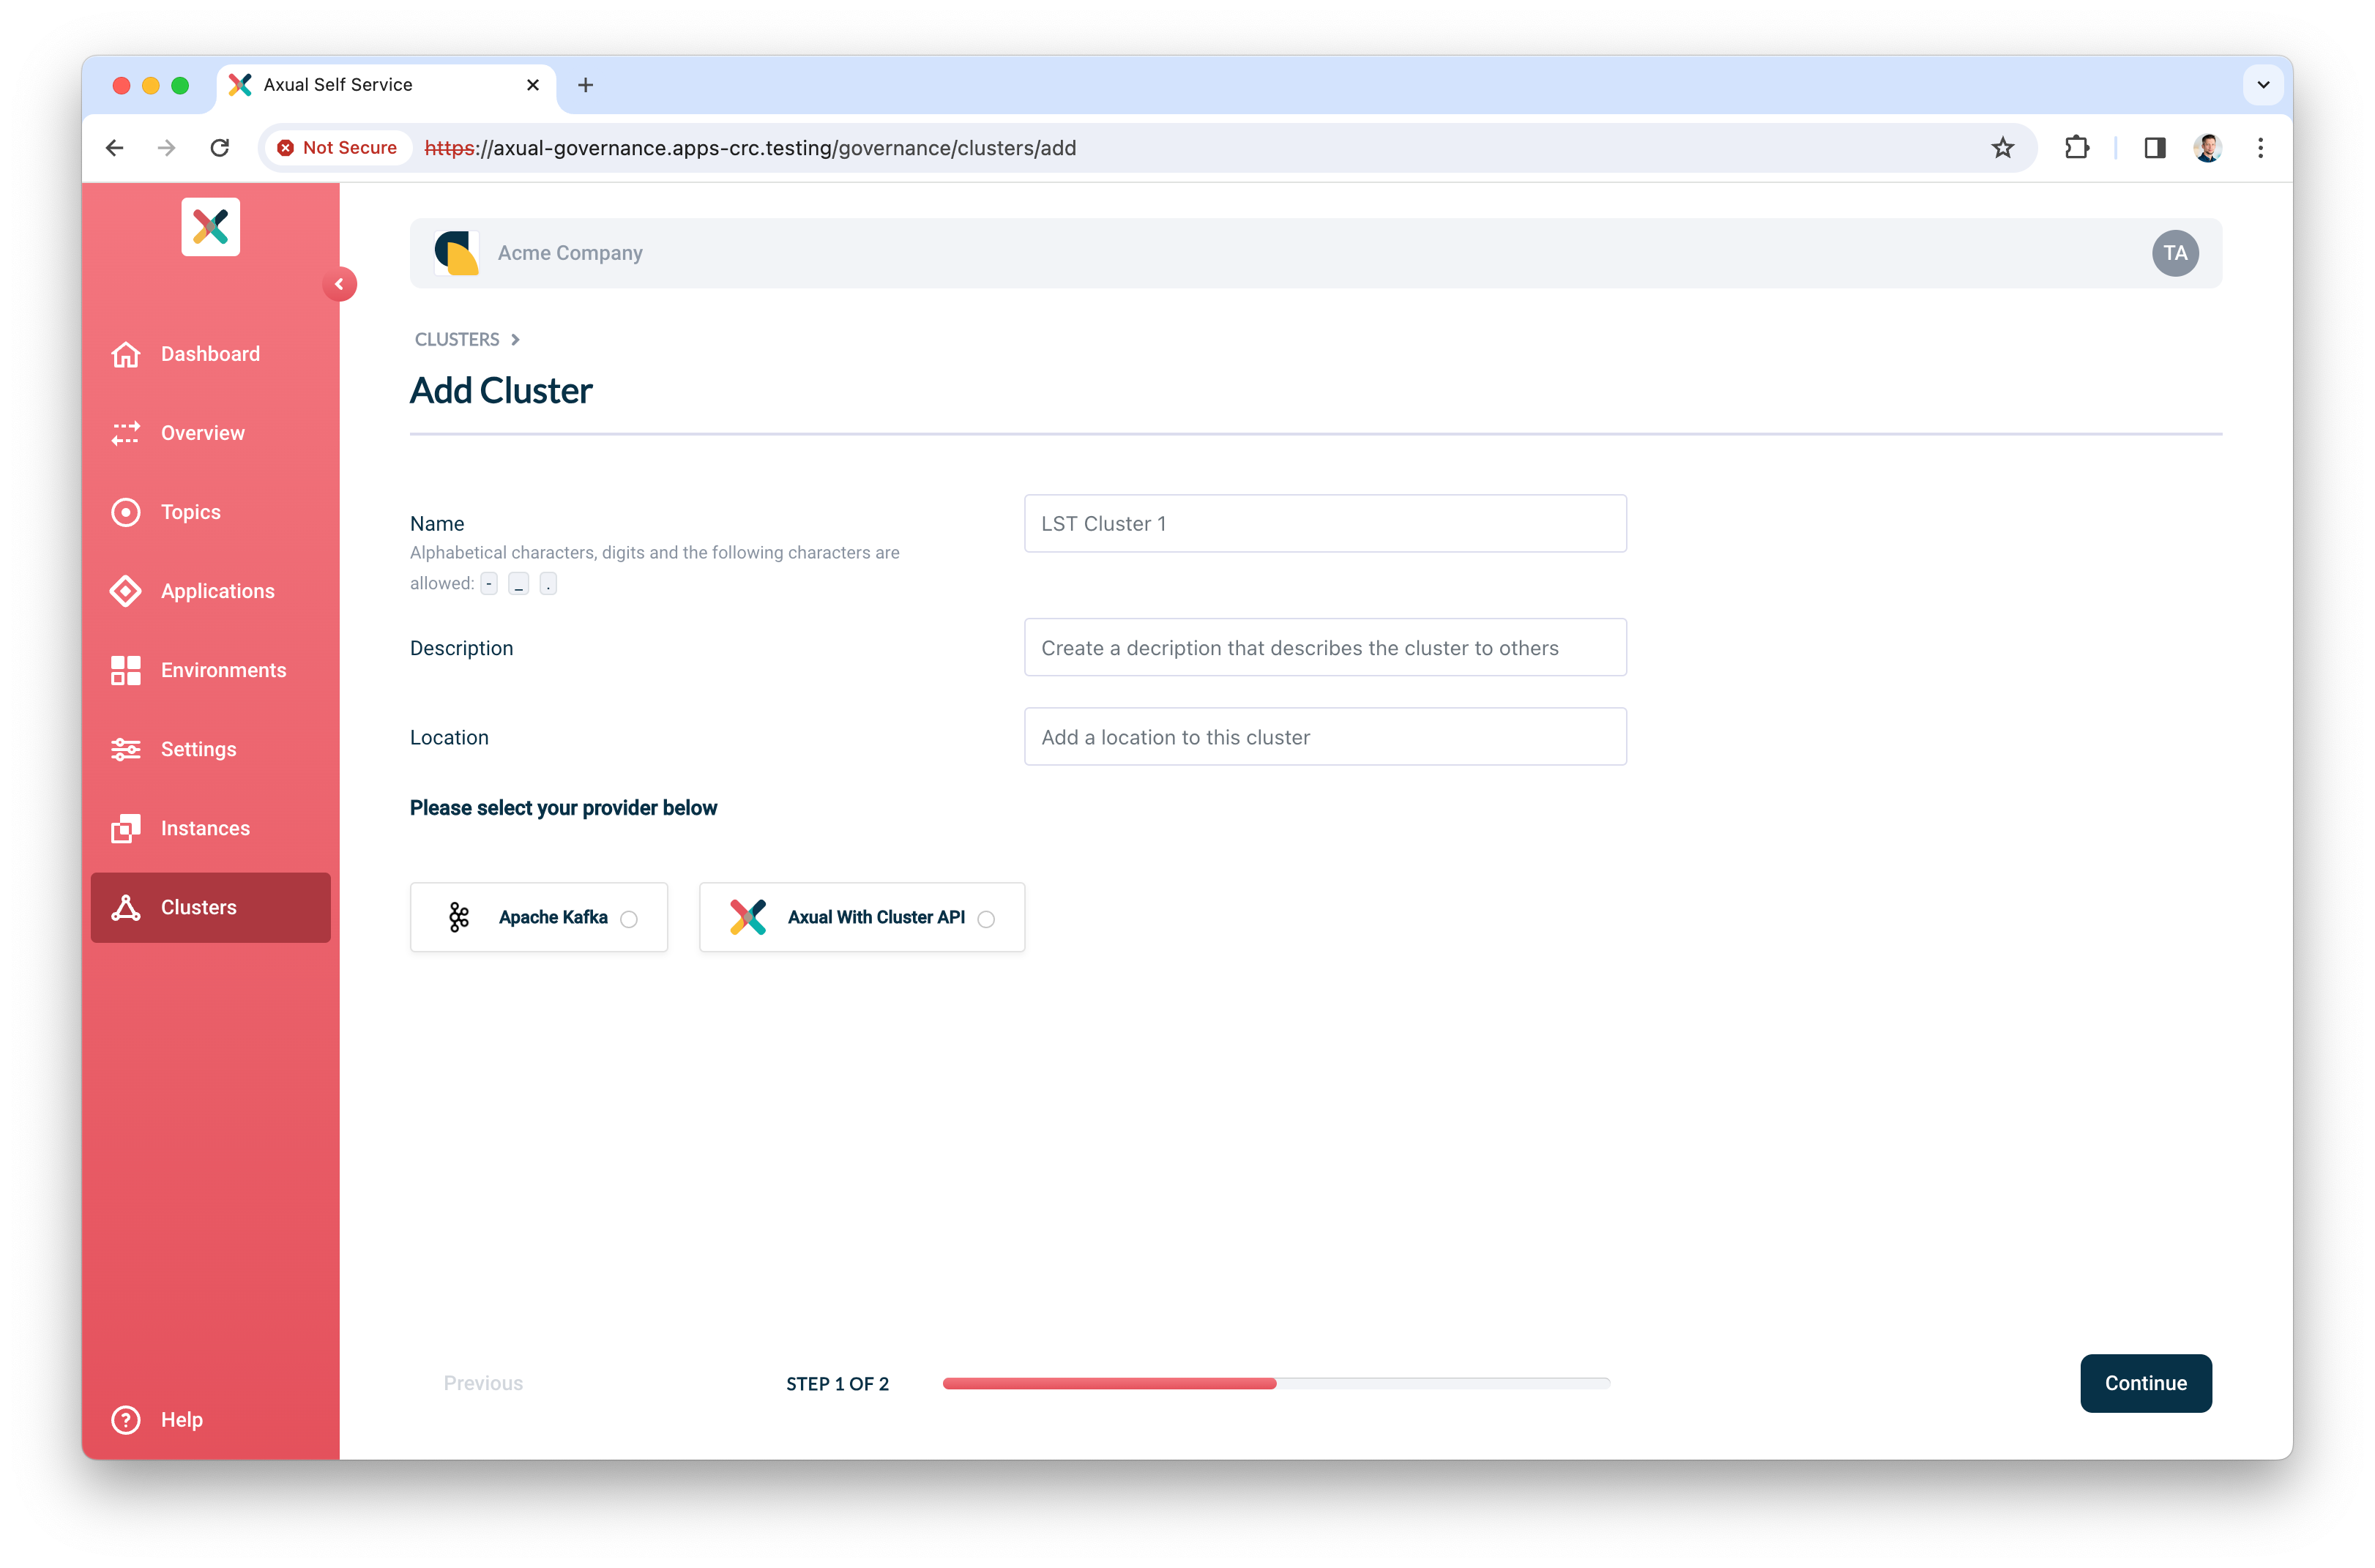
Click Clusters, followed by Add cluster. The following screen appears:
-
Fill in the following information for your cluster:
-
Name: the name you refer to the cluster by
-
Description: a description of this cluster, for example
dev -
Location: extra metadata that helps you recognise it
-
-
Select
Apache Kafkaas the provider. -
Click Continue.
-
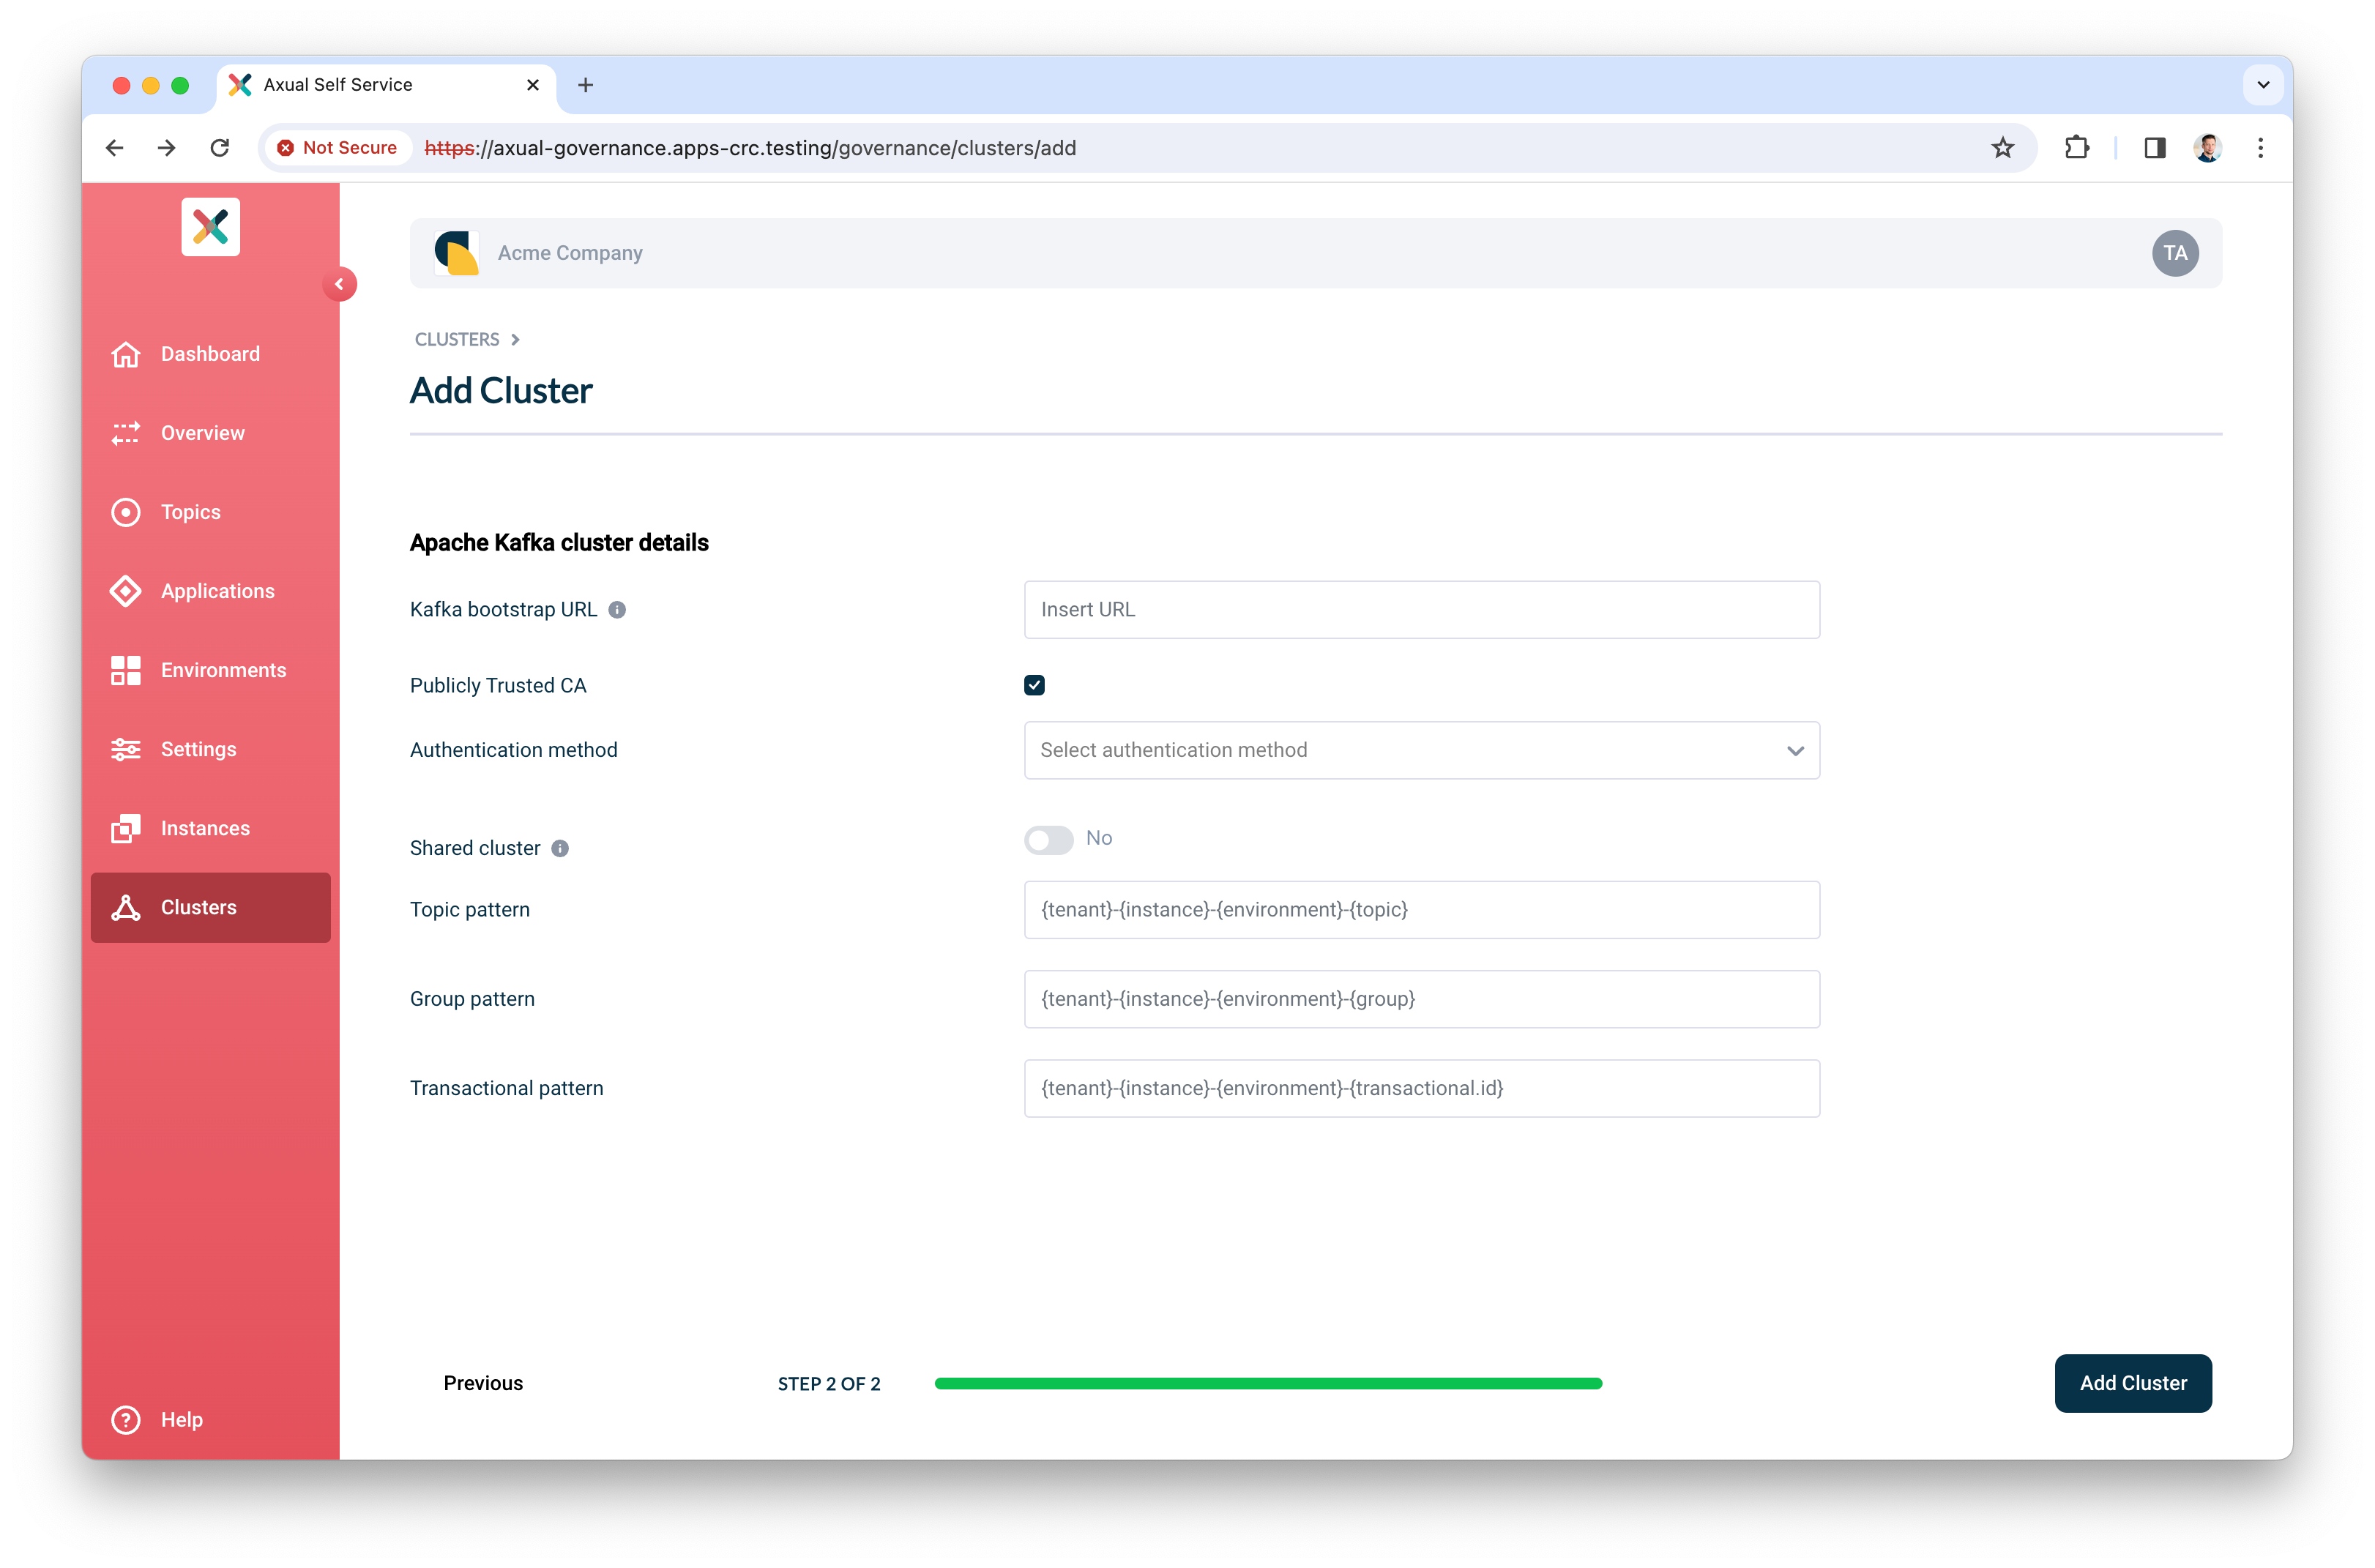
Provide the following information:
-
Kafka bootstrap URL: the URL and port on which Platform Manager reaches the brokers
-
Publicly Trusted CA: select this when the CA of the brokers is publicly trusted, otherwise provide the CA (PEM)
-
CA (PEM): the PEM file of the CA certificate that signed the broker certificate
-
-
Choose your authentication method.
-
For TLS, provide the Certificate (PEM) and associated Private Key which Platform Manager uses to authenticate to the brokers
-
For SASL:
-
Select the SASL mechanism (
PLAIN,SCRAM_SHA_256andSCRAM_SHA_512are supported) -
Provide the Username and Password
-
-
-
Click Verify to check the details you entered. Continue when the verify action returns "Broker connection verified".
-
Leave Shared cluster as it is.
-
Set the SSL Authentication Mode to
certificate. -
Use the following patterns for multi-environment support, described in Topic, Consumer Group and Transactional ID Patterns:
-
Topic pattern:
{tenant}-{instance}-{environment}-{topic} -
Consumer Group pattern:
{tenant}-{instance}-{environment}-{group} -
Transactional ID pattern:
{tenant}-{instance}-{environment}-\{transactional.id\}
-
-
Click Add cluster to save the information.
Preparing Self-Service
Topics and Applications exist in Environments, so an environment has to exist before anyone can use Self-Service. Follow the steps in Create the Instance, then Schema Registry Configuration, then Create the Environment. Use the cluster you onboarded in the previous step.
You have now concluded the first time setup of Self-Service for topic management. Before you invite anyone in the organisation to start using it, complete Step 3: Functional verification.
Step 3: Functional verification
The platform is installed and your cluster is onboarded. This step proves the two work together, by moving a message through a topic you create.
In this step you:
-
create a topic using the Self-Service interface
-
authorise an application to produce data to it
-
produce messages to the topic you created
-
verify the messages have arrived on the topic
Creating and configuring a topic
Follow Create the Topic to create a test topic named mytopic in the environment you set up.
Creating and authorising the application
Follow Create the Application to create and authorise a producer application.
When selecting the Application type, use Custom, followed by Java.
|
The application is ready and authorised to produce. Complete the verification by producing data on the topic.
Producing some data
The kcat command-line tool produces data to the topic.
-
Install
kcaton your machine. See the kcat installation instructions. -
Create a file named
kcat.confwith the following contents:# Bootstrap server URL and port bootstrap.servers=bootstrap.servers.url:port security.protocol=SSL # For ssl.key.location and ssl.certificate.location, use the private key and certificate of the app (PEM) # It is the same certificate you uploaded when you created and authorised the application above ssl.key.location=clients-ca.key ssl.certificate.location=clients-ca.crt # For ssl.ca.location, use the certificate of the CA which signed the broker's certificate ssl.ca.location=cluster-ca.crt -
Produce some messages to the topic with the following command:
echo "Test message contents" | kcat -F kcat.conf -m 60 -P -t loc-test-mytopic -k "Test key"

# If you are unsure what the topic name is, list the topics
kcat -F kcat.conf -L -m 60 | grep topic
-m 60raises the metadata timeout to 60 seconds, which a local cluster usually needs.Use the topic name that matches the pattern. The example above produces a message to topic mytopicin environmenttest, instanceloc. -
A successful run prints no errors. The final verification happens in Self-Service, in the next section.
Verification
The last verification step happens in Self-Service, using Topic Browse and search.
-
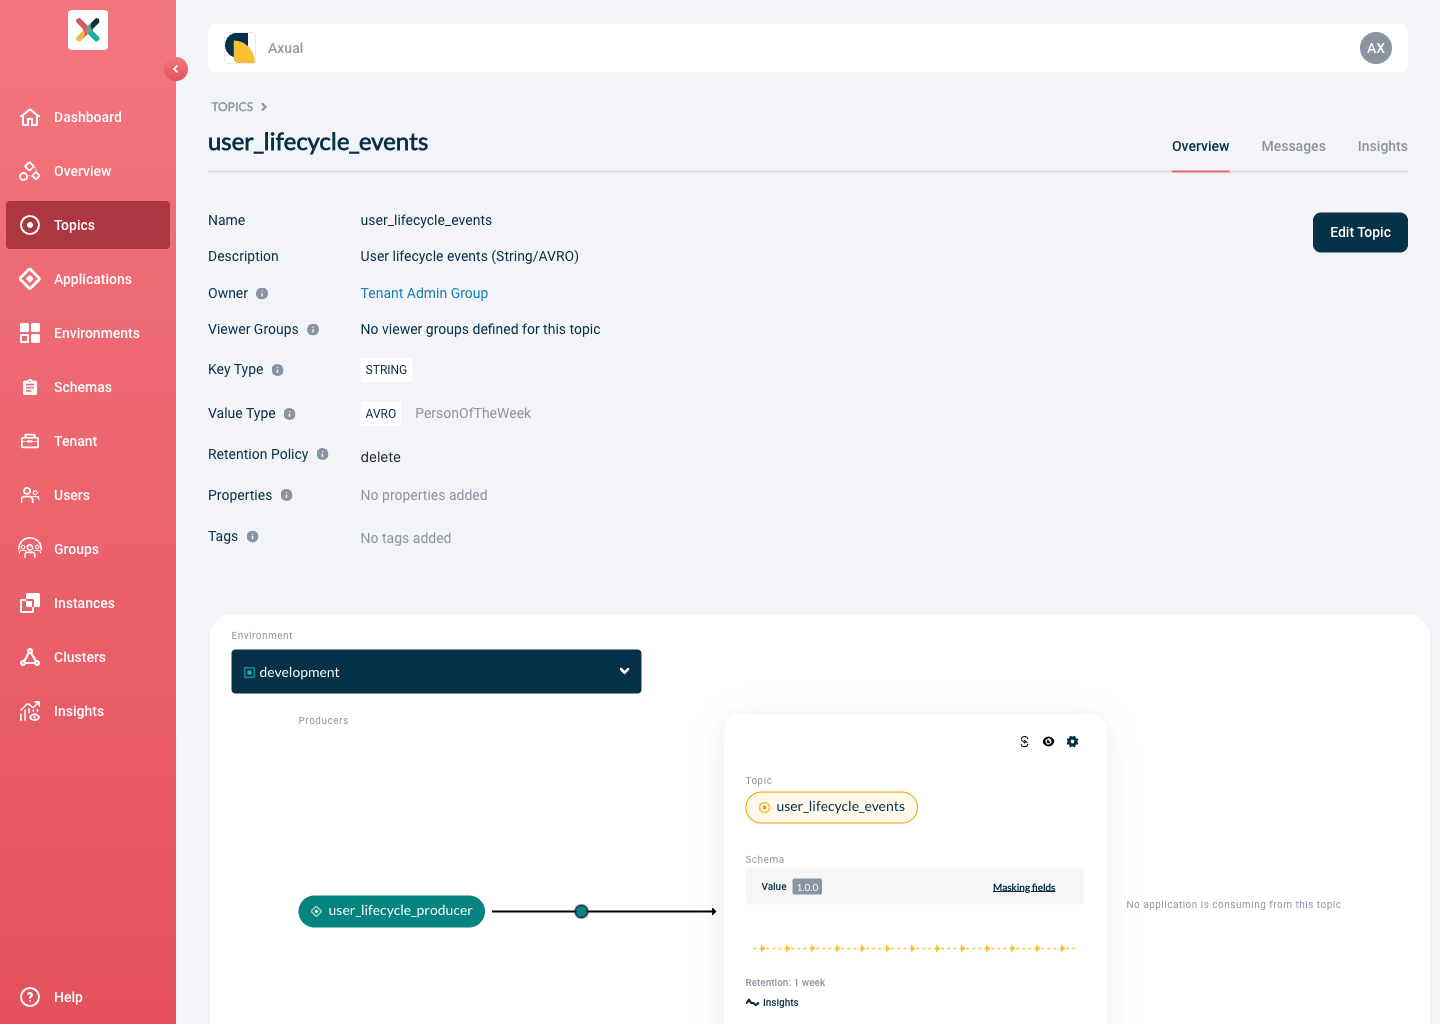
Find the topic in Self-Service and open its detail page.
-
Click the Messages tab.
-
Click Search to accept the default search options and browse the messages on the topic. When the configuration is correct, the messages appear below the search controls.
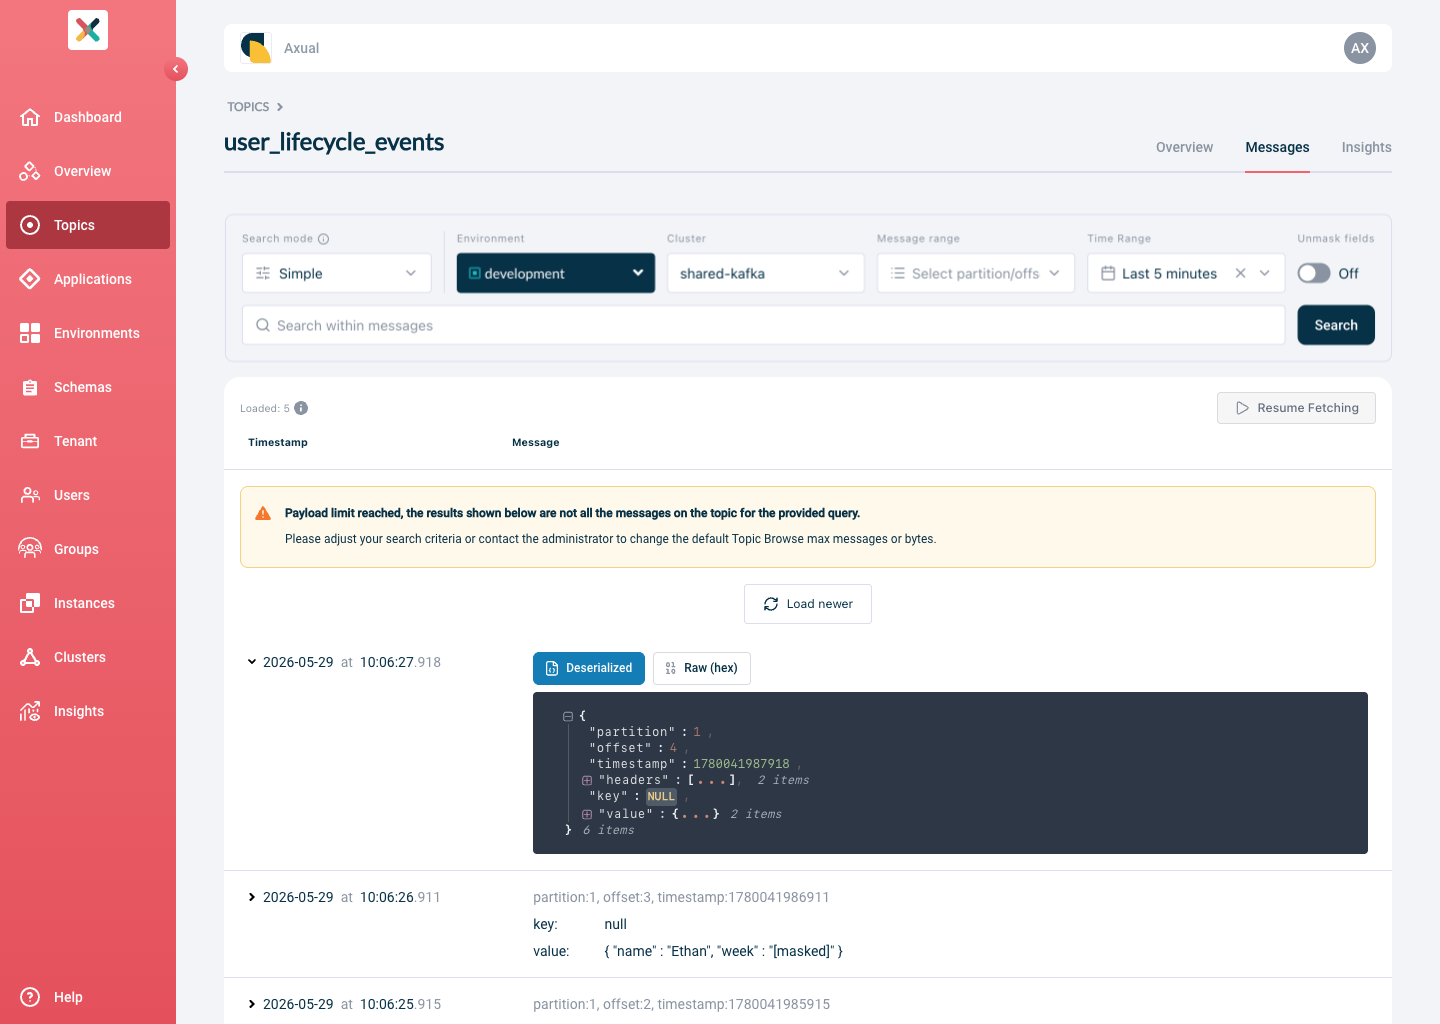
Click a row to expand it and show the details of that message.
Conclusion and Next steps
You have now concluded the first time setup of Self-Service for topic management on OpenShift, and you have verified the integration between Axual Governance and your Kafka cluster.
Preparing for a production-like setup
A production-like setup needs more advanced configuration of the platform. That falls outside this guide. See Install Axual Governance.
Need support?
To raise a support request for your trial, go to the Axual Support portal and select Additional, then Product trial questions.