Tenant
Editing a Tenant Profile
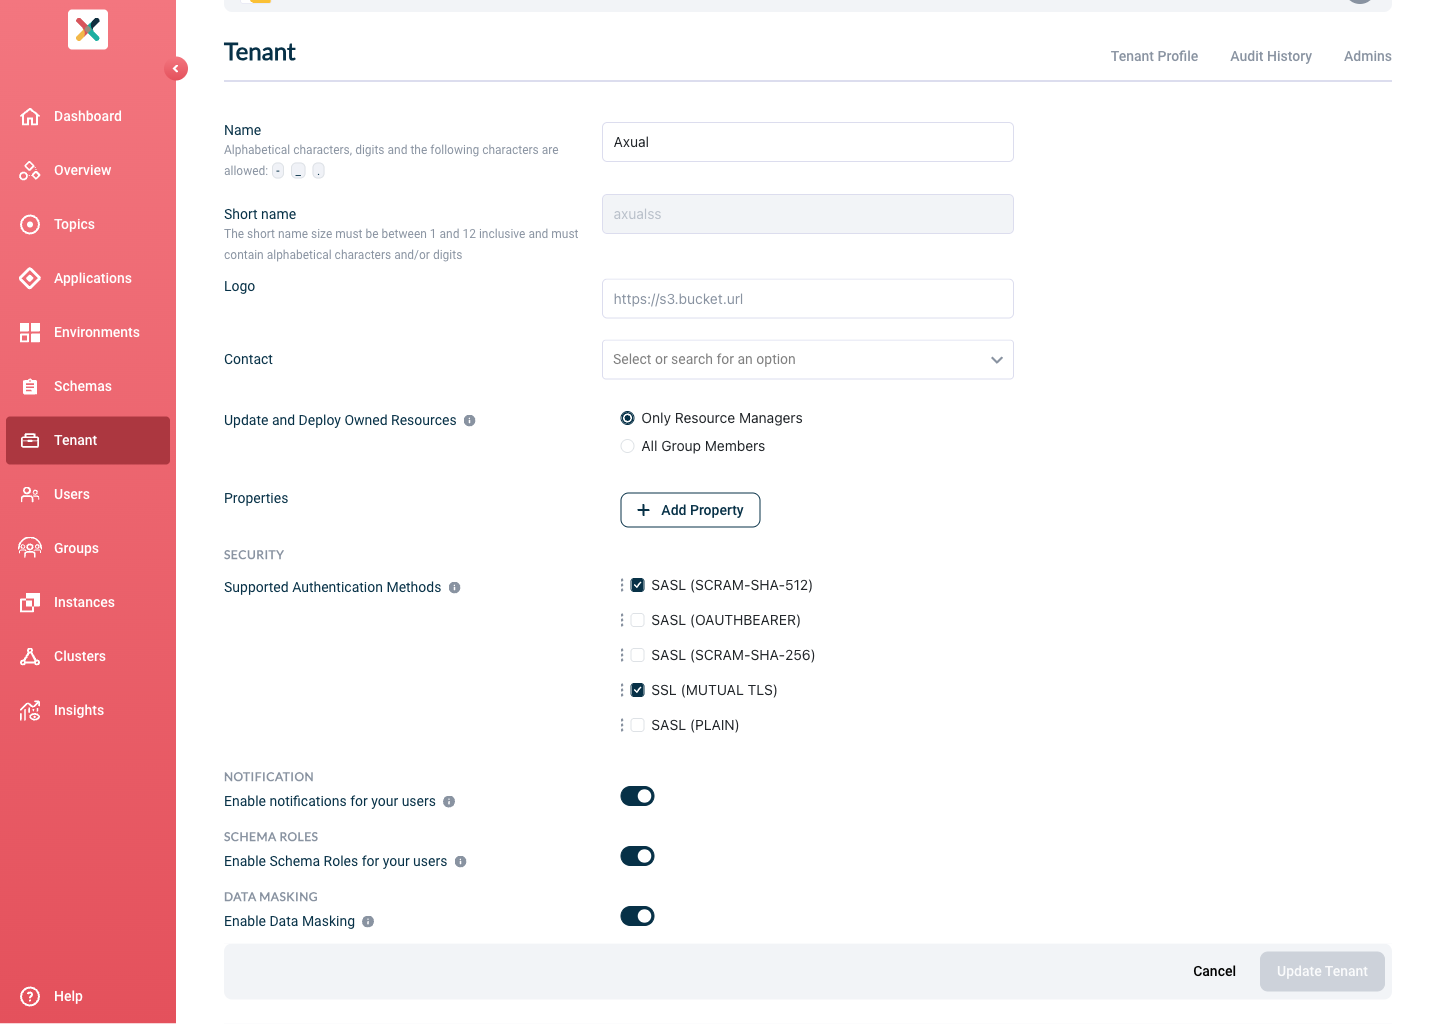
From the Tenant page, Tenant Admins can update the tenant profile.
The following Tenant settings can be modified:
-
Name: shown in the Self Service UI on top
-
Logo: fully qualified URL to a company logo, which will be displayed in the Self Service UI on top. If no URL is specified, a default icon will show.
-
Properties: a collection of key/value combinations, tenant-specific settings.
-
Security: Authentication Methods supported for the tenant.
-
Notification: By default, notifications are disabled. If enabled, users will receive emails about various events related to their Applications and Topics.
| Tenant Shortname cannot be modified/updated after tenant creation |
Update and Deploy Owned Resources
This setting determines who is allowed to modify and deploy their Resources.
Two options are supported:
By default, All Group Members of the Owning group is allowed to modify and deploy their Resources.
If the Tenant Admin wants to limit to only selected member fo the Owning group,
he can select the Only Resource Managers option.
In case Only Resource Managers is selected,
follow this guide
to configure the Resource Managers of each Groups
|
Enable Schema Roles
-
Go to the Tenant’s detail page
-
Click the Edit Tenant Profile button
-
Toggle Enable Schema Roles for your users
-
Click Update Tenant
| By default, enforcing schema roles is disabled. If enabled, only users with the SCHEMA_ADMIN or SCHEMA_AUTHOR role can create or delete any schema or schema version. |
Enable Data Masking
| This setting is only available when the Operator has enabled Data Masking. |
-
Go to the Tenant’s detail page
-
Click the Edit Tenant Profile button
-
Toggle Enable Data Masking
-
Click Update Tenant
| By default, the Data Masking feature is disabled. If enabled, it allows users to manage masking fields. |
Admins Tab
The Admins tab provides an overview of all users who have been granted administrative privileges within your tenant. This centralized view allows tenant administrators to quickly see who has elevated permissions and what specific roles they hold.
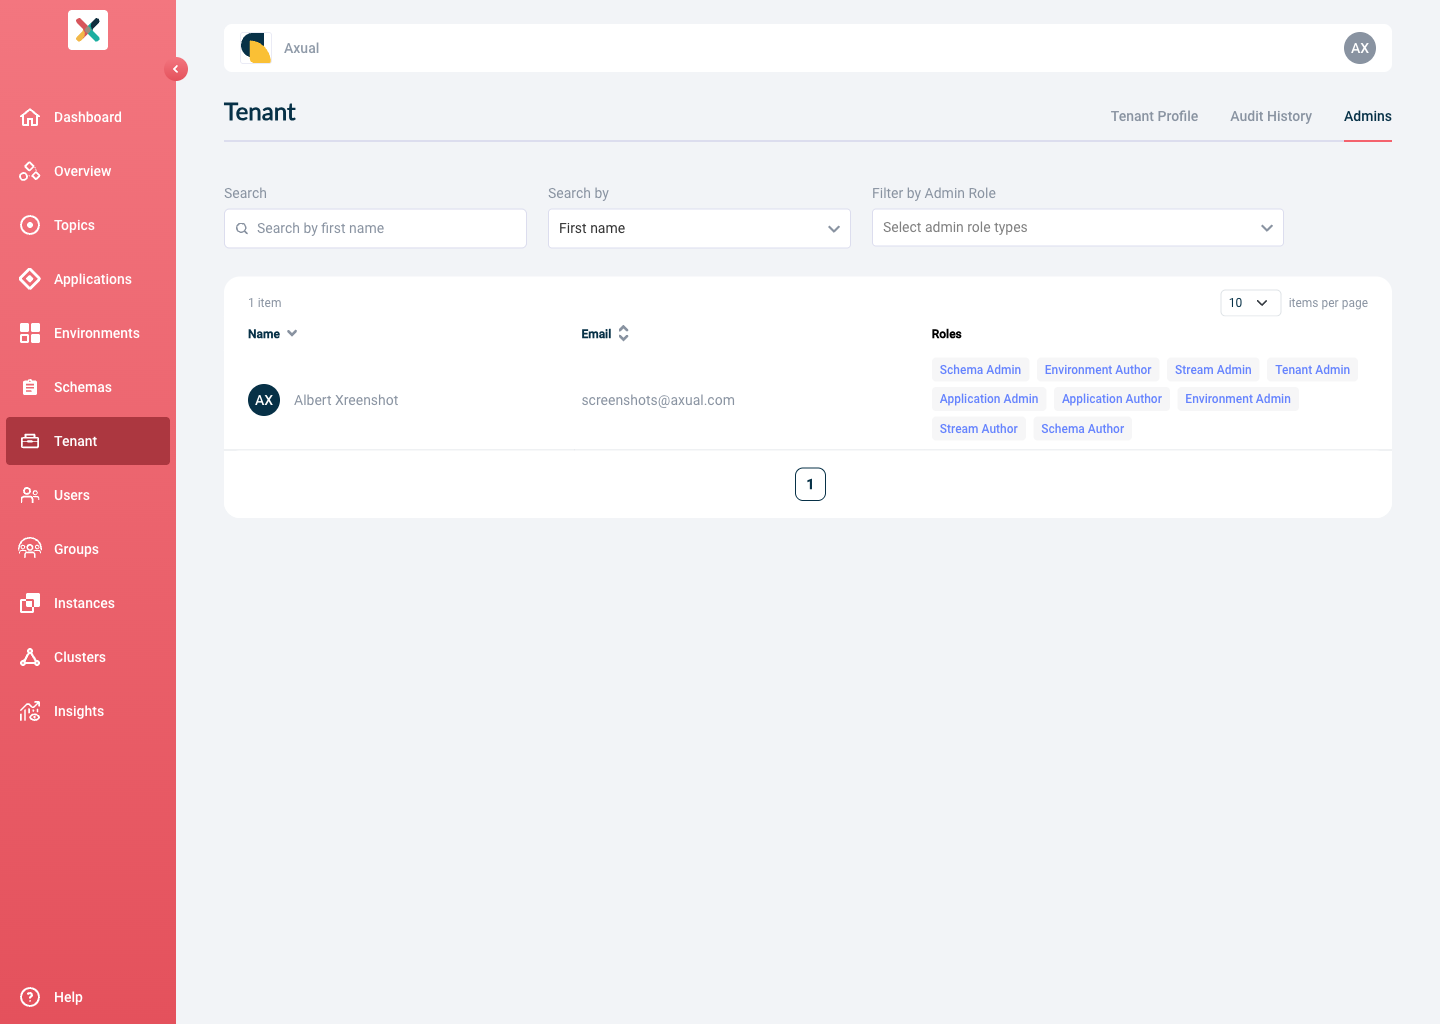
The tab provides the following features:
-
Search: Search for admins by their first name, last name and email
-
Sort by: Sort the list by first name
-
Filter by Admin Role: Filter users by specific admin role types to quickly find users with particular permissions
| A user can have multiple administrative roles assigned simultaneously. |
Group Management
Self-Service supports two complementary group management settings: Axual Group Management and IAM Group Management.
Both can be active simultaneously, enabling a controlled migration from one to the other. At least one setting (Axual or IAM) must always be enabled.
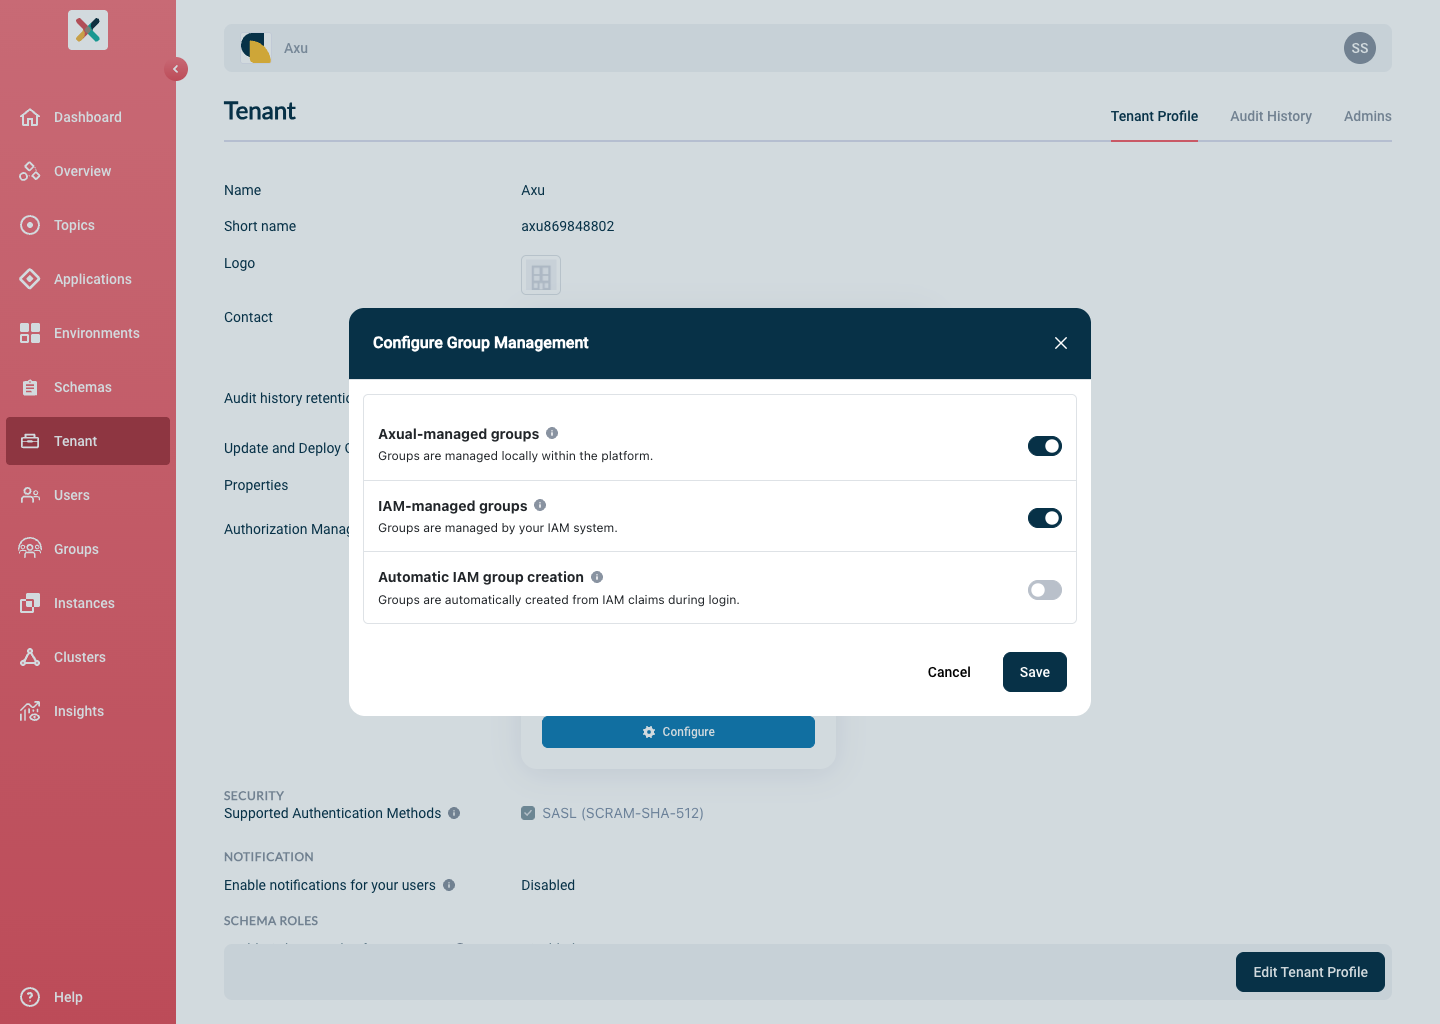
Axual Group Management (Default)
When Axual-managed groups enabled, group membership is recorded and maintained in Self-Service. Tenant Admins and Group Managers control who belongs to each group.
IAM Group Management
Tenant Admins can enable IAM Group Management to allow group membership to be resolved from the user’s Identity Provider (IdP) instead of — or in addition to — Self-Service’s own group records.
When IAM-managed groups enabled, groups with an IAM Reference have their membership determined by the groups claim in the user’s JWT.
For guidance on configuring your Identity Provider and Keycloak to include the groups claim, see IAM Group Configuration
| For migration instructions, see Migrating to IAM Group Management |
Automatic IAM Group Creation
This setting is only active when IAM Group Management is enabled.
When enabled, Self-Service automatically creates a new IAM group for any unknown group found in the user’s groups claim at login time. The new group’s IAM Reference and initial name are set to the claim value (typically a UUID).
The user who triggered the creation is automatically assigned as the Group Manager of the new group.
The Tenant Admin or a Group Manager receives a notification to rename the group to a human-readable value. See Notifications for details on notification events.
| Enable Automatic IAM Group Creation only after existing groups have been converted to IAM groups. Enabling it earlier may result in duplicate groups: if a group already exists in Self-Service without an IAM Reference, it will not be recognized as the matching IdP group, and a second group will be created automatically. |
Enabling or Disabling Group Management Settings
To change group management modes:
-
Go to the Tenant Overview page
-
Click Configure under Group Management
-
Toggle Axual Group Management or IAM Group Management on or off
-
Optionally toggle Automatic IAM Group Creation (available only when IAM Group Management is enabled)
-
Click Save button
| At least one group management mode must remain enabled at all times. |
Migrating to IAM Group Management
Self-Service supports a hybrid mode where both Axual Group Management and IAM Group Management are active simultaneously. Use hybrid mode to migrate in a controlled, reversible way — group by group — before fully switching to IAM-managed groups.
Prerequisites
Before starting the migration, ensure:
-
Your Identity Provider is configured to include the
groupsclaim in the JWT. Each value is typically the UUID of the group in your IdP. -
Every existing Axual group has a corresponding group in your IdP whose identifier you know.
-
Keycloak is configured to map the IdP
groupsclaim into the Keycloak token.
See IAM Group Configuration for setup details.
Step-by-step Migration
Follow these steps to migrate group membership management from Axual-managed groups to IAM-managed groups:
-
Enable IAM Group Management (Keep Axual Group Management enabled)
Do not enable Automatic IAM Group Creation at this point. Enabling before all existing groups are converted may create duplicates: Self-Service will not recognize a group without an IAM Reference as the matching IdP group and will create a second one automatically. -
Verify access after each conversion: Have affected users log in and confirm they can access the resources owned by the converted group. Membership is now resolved live from their JWT on every request — if the
groupsclaim is missing or incorrect, the user will have no access to that group’s resources. -
Enable Automatic IAM Group Creation (optional): Once all existing groups are converted, you may enable Automatic IAM Group Creation. New groups found in a user’s JWT that do not yet exist in Self-Service will be created automatically on login.
-
Disable Axual Group Management: Once all necessary groups are IAM-managed and access is verified, disable Axual Group Management.
After disabling Axual Group Management, it is no longer possible to add or remove members from IAM groups within Self-Service. Group membership is exclusively controlled by your Identity Provider. Axual-managed groups (if any remain) will no longer grant access to their resources.
Migration is complete. Group membership is now fully controlled by your Identity Provider; Self-Service no longer manages member records.
| Migration applies at the tenant level. All instances of a tenant are migrated together. It is not possible to migrate one instance independently. |
Rollback
If the Axual Group Management setting is enabled, individual IAM groups can be reverted to Axual-managed at any time using the Convert to Axual Group button. This re-enables local member management for that group.
How Group Membership is Resolved for IAM and Axual Groups
Self-Service resolves group membership based on the group type, active management settings, and the user’s authentication source at the time of each request.
-
IAM Group: group with an IAM Reference set
-
Axual Group: group with no IAM Reference
| Group type | IAM Group Mgmt | Axual Group Mgmt | Auth source | Result |
|---|---|---|---|---|
IAM group |
Enabled |
Either |
SSO |
Resolved from JWT |
IAM group |
Disabled |
Enabled |
SSO |
|
Axual group |
Enabled |
Enabled |
SSO |
Resolved from local membership. |
Axual group |
Enabled |
Disabled |
SSO |
User not considered a member of this group. |
Any |
Disabled |
Enabled |
SSO |
Local membership only. |
Any |
Either |
Either |
Local |
Local membership only. JWT |
Authentication Methods available for a Tenant
There are multiple authentication methods that applications can use to authenticate to Kafka. The methods available to a tenant are set up by the Operator. The possible methods are:
-
SASL (SCRAM_SHA_256)
-
SASL (SCRAM_SHA_512)
-
SASL (OAUTH_BEARER)
-
SSL (Mutual TLS)