Configure Apicurio
This page outlines the configuration values for Apicurio Registry v3, keyed apicurio-registry-v3 in the Axual Streaming Helm chart.
|
Apicurio Registry v2 is still supported in Looking for the deprecated Apicurio Registry v2 configuration? See Configure Apicurio (v2, deprecated). |
About Apicurio Registry
Apicurio Registry is a runtime server system that stores a specific set of artifacts as files.
Apicurio Configuration
When configuring Apicurio in an Axual Streaming chart installation,
you can refer to the following basic configuration and examples
to build your own values.yaml file.
For more details and advanced configuration, please refer to the Apicurio Documentation.
Enable Apicurio Registry
The first step is to enable Apicurio Registry v3. To do so, ensure that global.apicurio-registry-v3.enabled is set to true (it is off by default); this deploys Apicurio Registry v3.
Basic Apicurio Configuration
Apicurio Schema Registry is configured and deployed by the Axual Streaming Charts. Below you can see a configuration example where Apicurio deployment stores content on a Kafka topic and uses Keycloak for authentication and authorisation:
Click to open apicurio-values.yaml
global:
  apicurio-registry-v3:
    enabled: true

apicurio-registry-v3:
  logLevel: INFO

  # In Apicurio v3 the web UI runs as its own container.
  # `registryApiUrl` is REQUIRED: it is the public HTTPS URL the browser uses to reach the API.
  # Do NOT use localhost - this URL is resolved by the user's browser, not by the container.
  ui:
    config:
      registryApiUrl: "https://apicurio.<domain>/apis/registry/v3"

  # Application configuration, injected as an application.properties file.
  # Apicurio v3 uses the `apicurio.*` property prefix (v2 used `registry.*`).
  config:
    apicurio.auth.anonymous-read-access.enabled: "true"
    apicurio.auth.role-based-authorization: "true"
    apicurio.auth.owner-only-authorization: "true"
    apicurio.auth.admin-override.enabled: "true"

  # The configuration related to authentication and authorization of users to the registry.
  # Note: security.authentication.enabled must be enabled for any other authentication feature to work.
  security:
    authentication:
      enabled: true
      basicAuthEnabled: true

      # Attributes required for Apicurio to access the Keycloak instance
      keycloak:
        authUrl: "https://apicurio-keycloak.<domain>/auth"
        realm: "<realm>" # Typically it is set to apicurio
        webClientId: "apicurio-web"
        webRedirectUrl: "https://apicurio.<domain>"

  # Kafka storage. Apicurio v3 uses three topics (journal, snapshots, events) instead of the
  # single compacted topic used by v2. All three are created by the init container below,
  # together with the ACLs for the Apicurio principal.
  kafka:
    # -- Kafka bootstrap servers
    bootstrapServers: "cluster01-kafka-bootstrap:9093"
    # -- KafkaSQL journal topic (typically _{tenant}-{instance}-journal)
    journalTopic: "_<tenant-short-name>-<instance-short-name>-journal"
    # -- KafkaSQL snapshots topic (typically _{tenant}-{instance}-snapshots)
    snapshotsTopic: "_<tenant-short-name>-<instance-short-name>-snapshots"
    # -- Registry events topic (typically _{tenant}-{instance}-events)
    eventsTopic: "_<tenant-short-name>-<instance-short-name>-events"
    # -- Override group prefix to give access to (typically {tenant}.{instance}.apicurio)
    # groupPatternOverride: ""

  tls:
    # -- Existing server Keypair secret name
    serverKeypairSecretName: "server-cert-secret" # Server cert generated from Cert-Manager. Ensure a Kafka superUser matches the DNS of this certificate
    # -- Existing client Keypair secret name
    clientKeypairSecretName: "client-cert-secret" # Client cert generated from Cert-Manager with the right DNS
    # -- Existing truststore secret name
    truststoreCaSecretName: "my-external-ca" # The CA secret used by Cert-Manager to create the previous two certificates

  kafkaInitContainer:
    # -- The principal common name used to produce and consume from the schema topics (should match the one on APICURIO_KAFKASQL_SSL_KEYSTORE_LOCATION)
    # If Kafka is configured to validate ACLs over the full principal chain, please provide the principal chain as this example: [0] CN=Root CA, [1] CN=Intermediate CA, [3] CN=schema-registry
    # Otherwise, just provide the common name prefixed with `CN:`
    apicurioPrincipal: "CN=Apicurio Client"
    # -- Replication factor of the journal, snapshots and events topics
    replicationFactor: "3"
    # -- min.isr of the journal, snapshots and events topics
    minIsr: "2"
    tls:
      # -- Existing Keypair secret name
      keypairSecretName: "server-cert-secret"
      # -- Existing Keypair key name
      keypairSecretKeyName: "tls.key"
      # -- Existing Keypair certificate name
      keypairSecretCertName: "tls.crt"
      # -- Existing Truststore secret name
      truststoreCaSecretName: "my-external-ca"
      # -- Existing Truststore certificate name
      truststoreCaSecretCertName: "ca.crt"

  # Apicurio v3 splits the ingress in two: `backend` serves the API (/apis) and `ui` serves the web UI (/).
  # They can share the same hostname.
  ingress:
    backend:
      # -- Enable creation of the backend Ingress resource (serves /apis).
      enabled: true
      # -- The name of the IngressClass cluster resource.
      # NOTE: "nginx" refers to the community ingress-nginx controller, deprecated March 2026.
      # Axual has migrated to a supported enterprise-grade ingress controller.
      # Update className and annotations to match the ingress controller in your cluster.
      className: "nginx"
      annotations:
        nginx.ingress.kubernetes.io/force-ssl-redirect: "true"
      # -- The fully qualified domain name of a network host.
      host: "apicurio.<domain>"
      tls:
        - hosts:
            - "apicurio.<domain>"
          # This field is required to set the correct certificates on the ingress. Generated from Cert-Manager as well
          secretName: "apicurio-ingress-cert-secret"
    ui:
      # -- Enable creation of the UI Ingress resource (serves /).
      enabled: true
      className: "nginx"
      annotations:
        nginx.ingress.kubernetes.io/force-ssl-redirect: "true"
      host: "apicurio.<domain>"
      tls:
        - hosts:
            - "apicurio.<domain>"
          secretName: "apicurio-ingress-cert-secret"

  apicurioKeycloakMysql:
    enabled: true
    image:
      repository: bitnamilegacy/mysql
    nameOverride: "apicurio-kc-mysql"
    auth:
      rootPassword: "rootpassword"
      database: "apicurio-kc-db"
      username: "keycloak"
      password: "Passw0rd1!"
    primary:
      resources:
        requests:
          cpu: 250m
          memory: 200Mi
        limits:
          memory: 500Mi


  apicurioKeycloak:
    enabled: true
    # -- Required when running Apicurio Keycloak on the same k8s cluster as Governance Keycloak
    nameOverride: "apicurio-keycloak"
    realm: "apicurio"
    # -- Keycloak proxy configuration (required since Keycloak 25.0.1 when running behind an ingress)
    proxy:
      mode: xforwarded
      http:
        enabled: true
    autoscaling:
      enabled: false
    database:
      vendor: "mysql"
      hostname: "streaming-apicurio-kc-mysql"
      database: "apicurio-kc-db"
      port: "3306"
      username: "keycloak"
      password: "Passw0rd1!"
    # -- By default, we are importing the Apicurio realm used to Authenticate Admin access
    args: [ 'start', '--import-realm' ]
    extraVolumes: |
      - name: keycloak-init-realm
        configMap:
          name: streaming-apicurio-registry-keycloak-realm

    extraVolumeMounts: |
      - name: keycloak-init-realm
        mountPath: "/opt/keycloak/data/import"
        readOnly: true

    extraEnv: |
      - name: KEYCLOAK_ADMIN
        value: "admin"
      - name: KEYCLOAK_ADMIN_PASSWORD
        value: "admin123"
      - name: JAVA_OPTS_APPEND
        value: -Djgroups.dns.query={{ template "keycloak.serviceDnsName" . }}
      - name: KC_HTTP_ENABLED
        value: "true"
      - name: KC_HOSTNAME_STRICT
        value: "false"

    ingress:
      enabled: true
      # NOTE: "nginx" refers to the community ingress-nginx controller, deprecated March 2026.
      # Axual has migrated to a supported enterprise-grade ingress controller.
      # Update className and annotations to match the ingress controller in your cluster.
      className: "nginx"
      annotations:
        nginx.ingress.kubernetes.io/backend-protocol: "HTTP"
      rules:
        - # -- The fully qualified domain name of a network host.
          host: "apicurio-keycloak.<domain>"
          paths:
            - # -- Matched against the path of an incoming request.
              path: "/auth"
              # -- Determines the interpretation of the Path matching.
              # Can be one of the following values: `Exact`, `Prefix`, `ImplementationSpecific`.
              pathType: "ImplementationSpecific"
      tls:
        - hosts:
            - "apicurio-keycloak.<domain>"
          # This field is required in order to set the correct certificates to ingress. Generated from Cert-Manager as well
          secretName: "keycloak-ingress-cert-secret"
    resources:
      requests:
        cpu: 450m
        memory: 200Mi
      limits:
memory: 700Mi| Apicurio must use a client certificate whose identity matches the DNS in the server certificate. In different case, Apicurio wont be able to get the required ACLs. |
Ensure that the apicurio.<domain> has the correct ca in the certificate via openssl s_client -showcerts -verify 5 -connect apicurio.<domain>:443 -servername apicurio.<domain> < /dev/null
|
At this point of the installation, xref:self-service/instance-management.adoc#apicurio-keycloak-support can be used to setup the Schema Registry to an existing instance. Then also try to create a schema and produce/consume some data with it via a Java application.
| The following section can be used for additional configuration or for more details for a specific section. |
Additional details in Apicurio Registry configuration
Apicurio Registry Image Configuration
You have the flexibility to override global values by specifying image configurations. This allows you to customize image-related parameters for Apicurio Registry while maintaining a default global configuration.
You can configure it in the following way:
apicurio-registry-v3:

  image:
    registry: "registry.axual.io"
    repository: "apicurio/apicurio-registry"
    tag: "3.3.0.Ax1"
    pullPolicy: "Always"
  imagePullSecrets:
    - name: [your-docker-credentials]

  # In Apicurio v3 the web UI runs as a separate container with its own image.
  # The image tag above is shared by both the registry and the UI containers.
  ui:
    image:
      registry: "registry.axual.io/docker.io"
repository: "apicurio/apicurio-registry-ui"| This step is not required for the basic configuration of Apicurio Schema Registry |
Kafka init container
Apicurio Registry v3 requires an init container to create the journal, snapshots and events topics and their ACLs in the Kafka cluster. For init container, we need to specify:
-
The
apicurioPrincipalis the principal common name identifying the client-certificate used by Apicurio Registry to produce and consume from the schema topics. We might need to use the SSL chain to identify the principal or the CN, depending on how the Kafka installation is configured -
The
replicationFactoris the replication factor of the topics used to store schemas -
The
minIsris the minimum in-sync replicas of the topics used to store schemas -
The
tlsSecrets needed to connect to the Kafka cluster; we suggest to re-use the Kafka cluster secrets-
The
keypairSecretNameis the name of the existing keypair secret containing the keypair used for TLS -
The
keypairSecretKeyNameis the key name within the secret containing the private key for TLS -
The
keypairSecretCertNameis the certificate name within the secret containing the public key for TLS -
The
truststoreCaSecretNameis the name of the existing secret containing the truststore for CA certificates -
The
truststoreCaSecretCertNameis the certificate name within the secret containing the CA certificates for truststore
-
-
The
resourcesis the resource requirements for the Kafka init container
If Kafka is configured to validate ACLs over the full principal chain, please provide the principal chain as this example: [0] CN=Root CA, [1] CN=Intermediate CA, [3] CN=schema-registry. Otherwise, just provide the common name prefixed with CN:.
|
You can configure it in the following way:
apicurio-registry-v3:

  kafkaInitContainer:
    apicurioPrincipal: "[0] CN=Dummy Root, [1] CN=Dummy Intermediate, [2] CN=Apicurio Registry"
    replicationFactor: "3"
    minIsr: "2"
    tls:
      keypairSecretName: "brokers-keystore"
      keypairSecretKeyName: "brokers-keystore.key.name"
      keypairSecretCertName: "brokers-keystore.crt.name"
      truststoreCaSecretName: "brokers-truststore"
      truststoreCaSecretCertName: "brokers-truststore.crt.name"
    resources: {}
Kafka Configuration
The Kafka configuration section is crucial for establishing communication between the Apicurio Registry and the Kafka cluster. These configurations are used by both the Kafka init container and the Apicurio Registry container. You can define Kafka configuration in the following way.
-
The
bootstrapServersis the list of Kafka bootstrap servers used by both the Kafka init container and the Apicurio Registry container. -
The
journalTopic,snapshotsTopicandeventsTopicare the fully resolved names of the three topics Apicurio v3 uses to store schemas and configuration (typically{tenant}-{instance}-journal,{tenant}-{instance}-snapshotsand_{tenant}-{instance}-events) -
The
groupPatternOverrideis the group prefix to give access to (typically{tenant}.{instance}.apicurio)
Here is an example:
apicurio-registry-v3:

  kafka:
    bootstrapServers: "[kafka-bootstrap-server]:[kafka-boostrap-server-port]"
    journalTopic: "_{tenant}-{instance}-journal"
    snapshotsTopic: "_{tenant}-{instance}-snapshots"
    eventsTopic: "_{tenant}-{instance}-events"
    groupPatternOverride: "{tenant}.{instance}.apicurio"
TLS Configuration
When using TLS, you will need to specify secrets containing the PEM certificates for keystore generation:
-
Server keypair
-
Client keypair
-
Truststore
| To enable Basic Authentication, ensure that Apicurio’s truststore contains the required Certificate Authority (CA) for Keycloak. |
apicurio-registry-v3:

  tls:
  # -- Existing server Keypair secret name
  serverKeypairSecretName: "[apicurio-registry-server-certificates]"
  # -- Existing client Keypair secret name
  clientKeypairSecretName: "[apicurio-registry-client-certificates]"
  # -- Existing truststore secret name
  truststoreCaSecretName: "[apicurio-registry-ca-certificates]"
For more information on the secrets defined above, refer to TLS secrets.
Web UI configuration
In Apicurio v3 the web UI is served by a separate container, which needs to know the public URL of the registry API.
ui.config.registryApiUrl is required: set it to the public HTTPS URL that browsers use to reach the API (for example https://apicurio.<domain>/apis/registry/v3). Do not use localhost — this URL is resolved by the user’s browser, not by the container.
apicurio-registry-v3:

  ui:
    config:
      # -- REQUIRED: public HTTPS URL the browser uses to reach the registry API
      registryApiUrl: "https://apicurio.<domain>/apis/registry/v3"
      # -- Authentication type: "oidc" or "none"
      authType: "oidc"
Ingress routing reference
Apicurio v3 exposes its API and its web UI on separate ports of a single Kubernetes Service, and the chart splits the ingress accordingly: ingress.backend serves the API and ingress.ui serves the UI. They are path-separated (/apis vs /), so they can share one hostname.
Use the table below when configuring an external ingress, gateway, or OpenShift Route in front of Apicurio: each row is one entrypoint, with the target Service port and the path it must serve. All entrypoints route to the same Service, named after the chart’s fullname — typically <release-name>-apicurio-registry-v3 (overridable with nameOverride / fullnameOverride).
| Ingress (values key) | Path | Target Service port | Serves |
|---|---|---|---|
|
|
|
Registry REST API — |
|
|
|
Apicurio web console (static UI container) |
|
as configured, for example |
|
Auth Proxy sidecar (JWT + Basic Auth). Only when |
|
When the Auth Proxy is enabled, route client and Governance (Platform Manager) traffic through |
Application Configuration
Apicurio Registry is a Quarkus application. In a Quarkus application, you can define various configuration properties in the application.properties files.
What is present under config in the yml file, gets injected in a ConfigMap and mounted as an application.properties file.
Apicurio v3 uses the apicurio. property prefix (Apicurio v2 used registry.).
|
Boolean values need
to be wrapped between double-quotes to be properly translated into the |
The configuration options allow you to fine-tune the behavior of the Apicurio Registry. You can customize the configurations according to your requirements, as shown in the example below.
apicurio-registry-v3:

  config:
    apicurio.ccompat.use-canonical-hash: "true"
    apicurio.ccompat.legacy-id-mode.enabled: "false"
    apicurio.auth.anonymous-read-access.enabled: "false"
    apicurio.auth.role-based-authorization: "true"
    apicurio.auth.owner-only-authorization: "true"
    apicurio.auth.admin-override.enabled: "true"
In production environments, it is highly recommended to set apicurio.auth.anonymous-read-access.enabled to "false" and use authenticated read access via the sr-readonly role.
|
Changing Authentication mechanism and permissions
Out-of-the-box Apicurio supports different settings for Authentication, see more in the official documentation.
By default, we have configured Apicurio to run without authentication. Any anonymous user can create, view, and delete artifacts.
apicurio-registry-v3:

  apicurioKeycloakMysql:
    enabled: false

  apicurioKeycloak:
    enabled: false
For production installation we advise to
-
Enable RBAC Authentication
-
Enable HTTP Basic Authentication
-
Enable Authenticated Read access (available from version 2026.1) or Anonymous read-only access
Anonymous Read vs Authenticated Read (sr-readonly)
Before version 2026.1, non-Kafka Streams applications (like standard producers and consumers) typically relied on Anonymous Read access to fetch schemas from Apicurio.
From version 2026.1, Axual Platform supports Authenticated Read using the sr-readonly role:
-
Anonymous Read: Easy to set up but less secure. Requires
apicurio.auth.anonymous-read-access.enabled: "true". -
Authenticated Read (
sr-readonly): More secure as it requires valid credentials. The Platform Manager automatically assigns thesr-readonlyrole to non-Kafka Streams applications. This allows you to setapicurio.auth.anonymous-read-access.enabled: "false", ensuring only identified applications can access your schemas.
We recommend migrating to Authenticated Read for all production environments. For more details on how to generate credentials, see Generating Schema Registry Credentials. For more details on how to configure this during an upgrade, see the Upgrade Guide.
Production Authentication Configuration
To enable Apicurio’s Authentication, you will need to have a running Keycloak properly configured with realm, clients, and users.
As part of our Apicurio Helm Charts, we provide Keycloak and MySQL.
Enable MySQL datastore for Keycloak
To configure the Keycloak server to store data in a MySQL database, you need to provide the database configuration.
Here is an example of how you can configure the MySQL for Keycloak.
apicurio-registry-v3:

  apicurioKeycloakMysql:
    enabled: true
    fullnameOverride: "apicurio-kc-mysql"
    auth:
      rootPassword: "[root-password]"
      database: "[keycloak-db-name]"
      username: "[keycloak-db-username]"
      password: "[keycloak-db-password]"
Since we are using the Bitnami MySQL helm charts,
we suggest looking at the MySQL public documentation
to have a complete list of configurations.
Enable Keycloak
Once you have configured the Keycloak MySQL, you can configure the Keycloak to import the Apicurio realm provided in the Streaming Charts.
Here is an example of how you can configure the Keycloak to enable Apicurio Authentication.
The className: "nginx" value in the example below refers to the community ingress-nginx controller, which was deprecated in March 2026. Axual has migrated to a supported, enterprise-grade ingress controller. Update this value to match the ingress class configured in your cluster.
|
apicurio-registry-v3:

  apicurioKeycloak:
    # -- Required when running Apicurio Keycloak on the same k8s cluster as Governance Keycloak
    nameOverride: "apicurio-keycloak"
    enabled: true
    # -- By default, we are importing the Apicurio realm used to Authenticate Admin access
    args: [ 'start', '--import-realm' ]
    realm: "apicurio"
    # -- Required since Keycloak 25.0.1 when running behind an ingress
    proxy:
      mode: xforwarded
      http:
        enabled: true
    autoscaling:
      enabled: false
    database:
      vendor: "mysql"
      hostname: "apicurio-kc-mysql"
      database: "[keycloak-db-name]"
      port: "3306"
      username: "[keycloak-db-username]"
      password: "[keycloak-db-password]"

      extraVolumes: |
        - name: keycloak-init-realm
          configMap:
            name: "[apicurio-full-name]-keycloak-realm"

      extraVolumeMounts: |
        - name: keycloak-init-realm
          mountPath: "/opt/keycloak/data/import"
          readOnly: true

      extraEnv: |
        - name: KEYCLOAK_ADMIN
          value: "admin"
        - name: KEYCLOAK_ADMIN_PASSWORD
          value: "admin123"
        - name: JAVA_OPTS_APPEND
          value: -Djgroups.dns.query={{ template "keycloak.serviceDnsName" . }}
        - name: KC_HTTP_ENABLED
          value: "true"
        - name: KC_HOSTNAME_STRICT
          value: "false"

    ingress:
      enabled: true
      className: "nginx"
      rules:
        - # -- The fully qualified domain name of a network host.
          host: "[apicurio-keycloak-host]"
          paths:
            - # -- Matched against the path of an incoming request.
              path: "/auth"
              # -- Determines the interpretation of the Path matching.
              # Can be one of the following values: `Exact`, `Prefix`, `ImplementationSpecific`.
              pathType: "ImplementationSpecific"
      tls: [ ]
Since we are using the Codecentric KeycloakX helm charts,
we suggest looking at the KeycloakX public documentation
to have a complete list of configurations.
Enable Apicurio Authentication
Once you have configured the Keycloak MySQL and Keycloak, you can now configure the Apicurio to interact with the Keycloak to perform Authentication.
Here is an example of how you can configure the Apicurio Authentication.
apicurio-registry-v3:

  # The configuration related to authentication and authorization of users to the registry
  # Note: In order for any other authentication feature to work,
  # security.authentication.enabled needs to be enabled
  security:
    authentication:
      enabled: true
      basicAuthEnabled: true

      # Attributes that are required for Apicurio to access the Keycloak instance
      # in case the security.authentication.enabled is enabled and
      # security.authentication.basicAuthEnabled is enabled
      keycloak:
        authUrl: "https://[apicurio-keycloak-host]/auth"
        realm: "apicurio"
        webClientId: "apicurio-web"
        webRedirectUrl: "https://[apicurio-host]"
Enable OAuth for Apicurio client connections
Apicurio Registry does not support multiple authentication methods simultaneously — it can be configured for either OAuth or Basic Auth, but not both at once. Auth Proxy is a sidecar container that solves this limitation by sitting in front of Apicurio and handling both JWT validation (OAuth) and Basic Auth itself. When enabled, all traffic to the Registry including client connections and Governance (Platform Manager) calls is routed through the Auth Proxy.
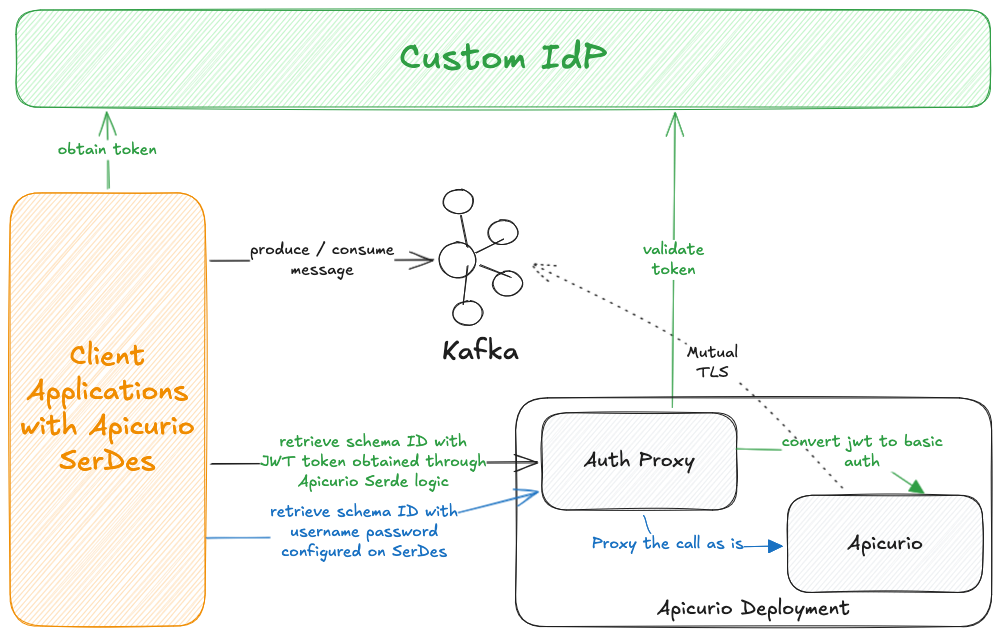
The diagram above illustrates the two supported authentication flows: green arrows represent the OAuth (JWT) flow, and blue arrows represent the BasicAuth flow.
When Auth Proxy is enabled, route client connections through the Auth Proxy’s own ingress (authProxy.ingress).
The Apicurio UI authenticates against the Apicurio Keycloak, which the Auth Proxy does not validate, so the UI must reach the backend directly: expose it through the ingress.ui (and ingress.backend) ingresses on a separate hostname.
See Auth Proxy Ingress and Backend and UI Ingress.
|
To enable Auth Proxy, set authProxy.enabled to true and configure the config and secrets sections.
Auth Proxy Configuration
The config section defines the OAuth provider settings. It is mounted as the Auth Proxy’s application.yml.
apicurio-registry-v3:
  authProxy:
    enabled: true
    # -- Port the Auth Proxy listens on. Must differ from the Apicurio backend (8081) and UI (8080).
    port: 8082
    config:
      server:
        port: 8082
      auth-proxy:
        valid-issuer-uri: "https://[apicurio-keycloak-host]/auth/realms/[realm]" (1)
        jwks-endpoint-uri: "https://[apicurio-keycloak-host]/auth/realms/[realm]/protocol/openid-connect/certs" (2)
        client-id: "" (3)
backend-service: "http://localhost:8081" (4)-
Issuer URI used to validate JWT tokens
-
JWKS endpoint used to fetch public keys for JWT signature verification
-
Expected client ID / audience matched on the incoming JWT tokens
-
Backend Apicurio Registry service in the same pod (defaults to
http://localhost:8081)
Auth Proxy Secrets
The secrets section contains sensitive values and is mounted as /config/secrets/secrets.yml.
The salt ensures:
-
The same username always produces the same secret (deterministic), so the backend can authenticate consistently
-
Without knowing the salt, you can’t guess/reproduce the secret
apicurio-registry-v3:
  authProxy:
    secrets:
      auth-proxy:
        client-secret-salt: "[change-me]"
client-secret-algorithm: HmacSHA256 (1)-
(Optional) defaults to
HmacSHA256
Change the client-secret-salt value for every environment. Do not reuse the default value in production.
|
Alternatively, you can reference an existing Kubernetes Secret instead of inlining the values.
The Secret must contain a key named secrets.yml.
apicurio-registry-v3:
  authProxy:
    existingSecretName: "[your-existing-secret-name]"
Auth Proxy Ingress
When the Auth Proxy is enabled, it is the entry point for all client connections and Governance (Platform Manager) calls. Expose it with its own ingress via authProxy.ingress.
Give this ingress the same hostname your clients already use to reach the registry — that is, the hostname ingress.backend served before the Auth Proxy was enabled (for example apicurio.<domain>). Because the Auth Proxy now answers at that address, existing clients and Governance keep working without changing their endpoint, and ingress.backend moves to a new hostname reserved for the UI (see Backend and UI Ingress).
apicurio-registry-v3:
  authProxy:
    ingress:
      enabled: true
      className: nginx
      hosts:
        # -- Reuse the address clients already use (previously ingress.backend's host)
        - host: "apicurio.<domain>"
          paths:
            - path: "/"
              pathType: "ImplementationSpecific"
      tls:
        - secretName: "[your-secret-name]"
          hosts:
            - "apicurio.<domain>"
Backend and UI Ingress
Apicurio v3 exposes two ingresses: ingress.backend serves the registry API (/apis) and ingress.ui serves the web UI (/). Use the same hostname for the two ingresses.
When the Auth Proxy is enabled, all client and Governance traffic goes through the Auth Proxy ingress, and ingress.backend + ingress.ui are used only by the Apicurio web UI: the browser loads the UI from ingress.ui (/) and calls the registry API through ingress.backend (/apis). These UI calls must bypass the Auth Proxy, because the UI authenticates against the Apicurio Keycloak, whose tokens the Auth Proxy does not validate.
Because the Auth Proxy has taken over the clients' original hostname (see Auth Proxy Ingress), move ingress.backend and ingress.ui to a separate hostname dedicated to UI access — for example apicurio-without-auth-proxy.<domain> — and:
-
Keep
ingress.backendandingress.uion that hostname (they are path-separated, so they can share it). -
Point
ui.config.registryApiUrlat the same hostname, for examplehttps://apicurio-without-auth-proxy.<domain>/apis/registry/v3. -
Allow that hostname on the Keycloak
apicurio-webclient (see below).
apicurio-registry-v3:
  ingress:
    backend:
      enabled: true
      className: nginx
      # -- Dedicated UI-only hostname; clients use the Auth Proxy ingress instead
      host: "apicurio-without-auth-proxy.<domain>"
      tls:
        - secretName: "[your-secret-name]"
          hosts:
            - "apicurio-without-auth-proxy.<domain>"
    ui:
      enabled: true
      className: nginx
      host: "apicurio-without-auth-proxy.<domain>"
      tls:
        - secretName: "[your-secret-name]"
          hosts:
            - "apicurio-without-auth-proxy.<domain>"
  ui:
    config:
      # -- The UI's public API URL — the UI host, not the Auth Proxy host
      registryApiUrl: "https://apicurio-without-auth-proxy.<domain>/apis/registry/v3"
  security:
    authentication:
      keycloak:
        # -- "Apicurio UI URL" — the UI host, not the Auth Proxy host
        webRedirectUrl: "https://apicurio-without-auth-proxy.<domain>"
The UI hostname must be allowed on the Keycloak apicurio-web client (the webClientId), or login succeeds but every API call returns 401. This is a Keycloak client setting, not a chart value — in the admin console open Clients → apicurio-web → Settings and set:
Valid redirect URIs:  https://apicurio-without-auth-proxy.<domain>/*
Web origins:          https://apicurio-without-auth-proxy.<domain>
ingressWithoutAuthProxy from Apicurio v2 has been removed; the split ingress.backend + ingress.ui covers the same use case.
|
Once the Auth Proxy and its ingresses are deployed, enable OAuth as a client authentication method on the Instance. See Client Authentication support for an Instance.