Migrating from Legacy Schema Registry to Apicurio Schema Registry
Overview
This section guides you on how to do the data (schemas) migration from Axual Legacy registry to Apicurio registry. In terms of backward compatibility, Apicurio supports all the Confluent compatible SerDe through it’s CCompat APIs. The schema IDs will also be preserved during the migration process. So the transition is going to be transparent to the client applications.
High-level Migration Steps
-
Enable and configure Apicurio Schema Registry (Keycloak/security, Kafka and TLS).
-
Stop new schema registrations on the source. To maintain the consistency of schemas, no stream modification related operation should be performed during the migration. The recommended way is to remove the Schema Registry URL in Self-Service so that no new schemas can be registered between the export and the final cut-over. If that cannot be guaranteed, plan an unavailability window. Please contact Axual team for more information.
-
Prepare the keystore and truststore used by the export and validation tools.
-
Using the export tool (explained below), configure and export the subjects and versions of the Legacy Schema Registry. The output will be a zip file.
-
Import the exported zip file into the designated Apicurio Schema Registry using Apicurio Schema Registry’s
/admin/importendpoint (explained below). -
Run the validation tool (explained below) to make sure all the schemas are migrated in good order.
-
Once the validation has been done, the Instance Manager can be pointed to the Apicurio Schema Registry and confirm if it can write to Apicurio Schema Registry through Self Service.
-
Point Discovery Service to Apicurio Schema Registry so that applications will start to discover it on subsequent lookups.
-
Verify the migration by applying a stream that uses Avro key/value schemas.
-
Decommission Legacy Schema Registry once all the applications are migrated to Apicurio Schema Registry. (See note below)
|
For the applications which are not under the support of Discovery Service, Inform the operators upfront as those might require a switch to Apicurio Schema Registry within a closer timeline of post migration. It may not be a harm to use the Legacy Schema Registry for a short period of time as long as there are no new “stream modifications“ being performed on the streams those applications are using. |
Detailed Migration Steps
Out of the above list of steps, some are detailed with technical information below.
Step 1 - Enable and Configure Apicurio (Helm)
First of all, you need to enable Apicurio. To do this you need to add the following in your Helm charts:
global:
  instance:
    apicurio:
      enabled:
        true
Apicurio Schema Registry authenticates against Keycloak and reads/writes schemas from Kafka over TLS, so a few additional chart values are required. The values below use placeholders; refer to the Apicurio Registry Helm chart reference for the full list of options.
A Keycloak realm with the appropriate clients, roles and users must exist before enabling authentication. See Apicurio Keycloak Realm for how to create it.
Security (Keycloak / Basic Auth):
security:
  authentication:
    enabled: true
    basicAuthEnabled: true
  keycloak:
    authUrl: "https://<apicurio-keycloak-host>/auth"
    realm: "<realm>"
    webClientId: "apicurio-web"
    webRedirectUrl: "https://<apicurio-host>/ui"
Kafka and TLS (reuse the certificates and bootstrap configuration of the Legacy Schema Registry):
kafka:
  bootstrapServers: "SSL://<kafka-bootstrap>:<port>"
  schemasTopic: "<fully resolved name of the schemas topic>"
  groupPatternOverride: "apicurio-registry-"
tls:
  clientKeypairSecretName: <client keypair secret>
  serverKeypairSecretName: <server keypair secret>
  truststoreCaSecretName: <truststore CA secret>
The kafkaInitContainer creates the schemas topic and grants the Apicurio principal access to it:
kafkaInitContainer:
  apicurioPrincipal: "<principal common name matching the client certificate>"
  replicationFactor: "3"
  minIsr: "2"
  tls:
    keypairSecretName: "<keypair secret>"
    keypairSecretKeyName: "<keypair key name>"
    keypairSecretCertName: "<keypair certificate name>"
    truststoreCaSecretName: "<truststore CA secret>"
truststoreCaSecretCertName: "ca.crt"|
The |
Step 2 - Preparing the Keystore and Truststore
The export tool (Step 4) and the validation tool (Step 6) authenticate to the registries over mTLS and therefore need a keystore and a truststore in JKS format.
The schema-migration-integrity-checker repository
provides a helper script (bin/keystore.sh) to generate them. Place the certificate and key files (the CA of the Legacy
Schema Registry, the Let’s Encrypt root CA, the client certificate and the client key) in the same directory and run the
script. It produces a keystore.jks and a truststore.jks.
The keystore must contain the client certificate and key used by the Legacy Schema Registry. The truststore must contain
both the CA of the Legacy Schema Registry and the Let’s Encrypt root CA (ISRG Root X1), so that the tools can validate
the certificate chains of both registries.
|
Before running the export, stop new schema registrations on the source by removing the Schema Registry URL in Self-Service (or by planning an unavailability window). No new schemas should be registered between the export and the final cut-over, otherwise schema IDs may diverge between the two registries. Make sure all certificates and configuration are ready in advance so this interruption is kept as short as possible. |
Step 3 - Exporting Schemas from a mTLS enabled Confluent Registry
When the Schema Registry clients needs to be authenticated through mTLS, following additional client properties can be passed into the export runner. Make sure that you use valid certificates corresponding to the Schema Registry instance.
java -jar <jar file name>.jar <legacy schema registry base URL> --client-props \
schema.registry.ssl.key.password=<key password> \
schema.registry.ssl.keystore.location=<keystore location> \
schema.registry.ssl.keystore.password=<keystore password> \
schema.registry.ssl.truststore.location=<trust store location> \
schema.registry.ssl.truststore.password=<trust store password>|
Please use a Java 11 or higher to run the above command |
In case mTLS is not configured in the interested instance, you can simply drop the additional properties in the above command.
Step 4 - Importing Into Apicurio Schema Registry
You can import your data into Apicurio Schema Registry using the following curl.
|
Make sure that Apicurio installation is a fresh one with no schemas were uploaded. This is important because when migration is happening, any schema ID range need to be available in Apicurio end to accommodate the schema IDs from the Legacy Schema Registry export zip. |
curl -X POST "https://<hostname of Apicurio Schema Registry>:<port of Apicurio Schema Registry>/apis/registry/v2/admin/import" \
  -H "Accept: application/json" -H "Content-Type: application/zip" \
  -H "Authorization: Basic <base64 value of Keycloak Apicurio clientId:clientSecret>" \
  --data-binary @<exported zip file>.zip
Step 5 - Validating the Schema Integrity
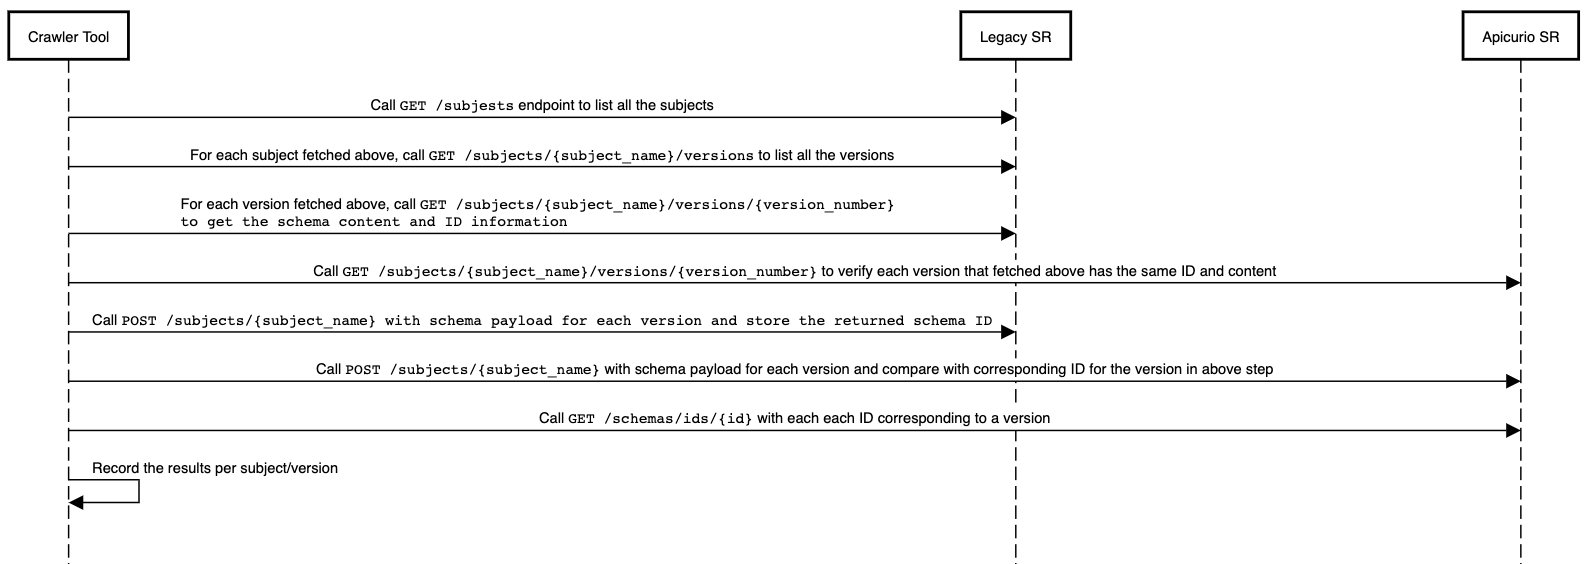
It is important to cross validate the schema registry content once the migration has performed. This can be done using a python tool. Following is an illustration of how the tool is validating the schemas between two schema registries
This tool supports various configuration options related to mTLS.
  -h, --help            show this help message and exit
  -o ORIGIN_URL, --origin-url ORIGIN_URL
                        origin schema registry url (default: None)
  -oc ORIGIN_CERT, --origin-cert ORIGIN_CERT
                        origin schema registry certificate PEM (default: None)
  -ok ORIGIN_KEY, --origin-key ORIGIN_KEY
                        origin schema registry key PEM (default: None)
  -otr ORIGIN_TRUST, --origin-trust ORIGIN_TRUST
                        origin schema registry trust PEM (default: None)
  -t TARGET_URL, --target-url TARGET_URL
                        target schema registry url (default: None)
  -tc TARGET_CERT, --target-cert TARGET_CERT
                        target schema registry certificate PEM (default: None)
  -tk TARGET_KEY, --target-key TARGET_KEY
                        target schema registry key PEM (default: None)
  -ttr TARGET_TRUST, --target-trust TARGET_TRUST
                        target schema registry trust PEM (default: None)
following is an example of how it can be run in a setup which has both Legacy Schema Registry and Apicurio Schema Registry enabled with mTLS.
python checker.py -o https://legacy.<domain>:25000/subjects/ \
  -t https://apicurio.<domain>:21500/apis/ccompat/v6/subjects/ \
  -otr tls/legacy_trust_cert.pem \
  -oc tls/example_cert.cer \
  -ok tls/example_key.pkcs8 \
  -ttr tls/apicurio_trust_cert.pem \
  -tc tls/example_cert.cer \
  -tk tls/example_key.pkcs8
Step 6 - Pointing Instance Manager to Apicurio Schema Registry (Helm)
Once everything is verified in the previous step, You can set the Apicurio Schema Registry URL in the Instance Manager configuration as below. This will enable schema writes from Self-Service UI to Apicurio instead of Legacy Schema Registry master.
platform:
  instance:
    instanceapi:
      schemaRegistryMasterHostOverride: <hostname of Apicurio Schema Registry>
      schemaRegistryMasterPortOverride: <port of Apicurio Schema Registry>
      schemaRegistryMasterContextPathOverride: "/apis/ccompat/v6"
      schemaRegistryMasterUsernameOverride: <Client ID of Apicurio Keycloak API Client>
      schemaRegistryMasterPasswordOverride: <Client ID secret of Apicurio Keycloak API Client>
      schemaRegistryMasterAuthEnabled: true
Step 7 - Pointing Discovery Service to Apicurio Schema Registry (Helm)
Now the schema writing is configured in the previous step, It is time to point the schema reads to Apicurio Schema Registry. To do this, you need to configure the Discovery Service as below
platform:
  instance:
    discoveryapi:
      generateDiscoveryConfig:
        schemaRegistryOverride: "https://<hostname of Apicurio Schema Registry>:<port of Apicurio Schema Registry>/apis/ccompat/v6"
Step 8 - Verifying the Migration
Once the Instance Manager and Discovery Service point to Apicurio Schema Registry, verify that schema writes work end to end. Create a new stream and apply it with both the key and the value using the Avro schema type. If the apply succeeds, the registry is serving reads and writes correctly. Afterwards, remove the stream and its configuration so that no test artifacts are left behind.
Step 9 - Decommissioning the Legacy Schema Registry (Helm)
After the migration has been verified and all applications resolve schemas from Apicurio Schema Registry, the Legacy Schema Registry can be scaled down. Disable it in your Helm values and sync/upgrade with pruning enabled so the old components are removed:
axual-schema-registry:
enabled: false|
Plan a follow-up to remove the leftover Legacy Schema Registry configuration from your Helm values once you are confident the migration is stable (for example, a week later). Since the components are already scaled down, this cleanup does not require a further sync. |
Rollback Procedures
The rollback process might slightly differ depending on which stage the migration is at. Refer to High-level Migration Steps
Q: What if instance manager is not able to write to Apicurio Schema Registry?
A: Instance Manager can be simply pointed back to Legacy Schema Registry and restart the process with a fresh Apicurio Schema Registry installation including fresh data topic in Kafka (Due to potential ID clashes from existing data).
Q: What if client applications are having problems communicating with Apicurio Schema Registry?
A: If the client application was using a subject version which was available in Legacy Schema Registry, applications need to point to Legacy Schema Registry either through Discovery Service or manual steps. If the subject version is not present, those streams need to be re applied from Self Service. Latter will need an Instance Manager switch to Legacy Schema Registry (It is best to disallow all topic apply(s) during this process and only allow critically required ones). Once the issue is rectified, it’ll require a fresh Apicurio Schema Registry installation including fresh data topics in Kafka (Due to potential ID clashes from existing data).
Important Notes
Non-Conforming Avro Schemas in Legacy Schema Registry During Migration
There can be rare chances that some schema which doesn’t conform to the Avro specification is available in Legacy Schema Registry. The reason is that the Legacy Schema Registry is using Avro 1.8 schema parser compared to Apicurio Schema Registry’s Avro 1.11+ schema parser. As there were more validations added in newer schema parser versions, a schema which passed the validation (still doesn’t conform to Avro specification) can fail on Apicurio Schema Registry. This failure should be reported by the "Schema Integrity Checker" tool with an error.

You can also do a check on the Apicurio Schema Registry end to verify this issue through a manual API call as well as logs.

In such a situation, the advice is to fix such schemas with corrected (conforming Avro specifications) in the Legacy Schema Registry and then attempt the import. There is a likely chance that such schemas were already corrected with new versions as client applications (producers/consumers) might have already complained about it.