Unresolved include directive in modules/ROOT/pages/_attributes.adoc - include::../_attributes.adoc[]
Installing Axual-Connect v3.1.0
Enable Vault
"Vault" is a distributed secret store.
Axual-Connect runs customer’s programs for them, but they are still required to supply a client-certificate.
We store the customer certificates safely inside Vault.
We’ll begin by enabling vault in your existing platform installation of the axual-stable/platform helm-chart.
-
If you already have a
values.yamlfile which you used to deploy theaxual-stable/platformhelm-chart, then we’ll update it. Otherwise, create a file calledvalues.yamlin your working directory.values.yamlglobal: mgmt: vault: enabled: trueThe Vault server certificates for the local deployment have SANs matching the
service-name,service-name.namespace,pod-name.internal-service-name, andlocahost.
On a production environment you will have to add a SAN matching theload-balanceraddress. -
Issue a
helm upgradecommand usingvalues.yamlas the input file to deploy Vault.helm upgrade --install -n kafka platform axual-stable/platform -f values.yamlAlternatively, you can override a specific property with the
--setoptionhelm upgrade --install -n kafka platform axual-stable/platform \ --set global.mgmt.vault.enabled=true -
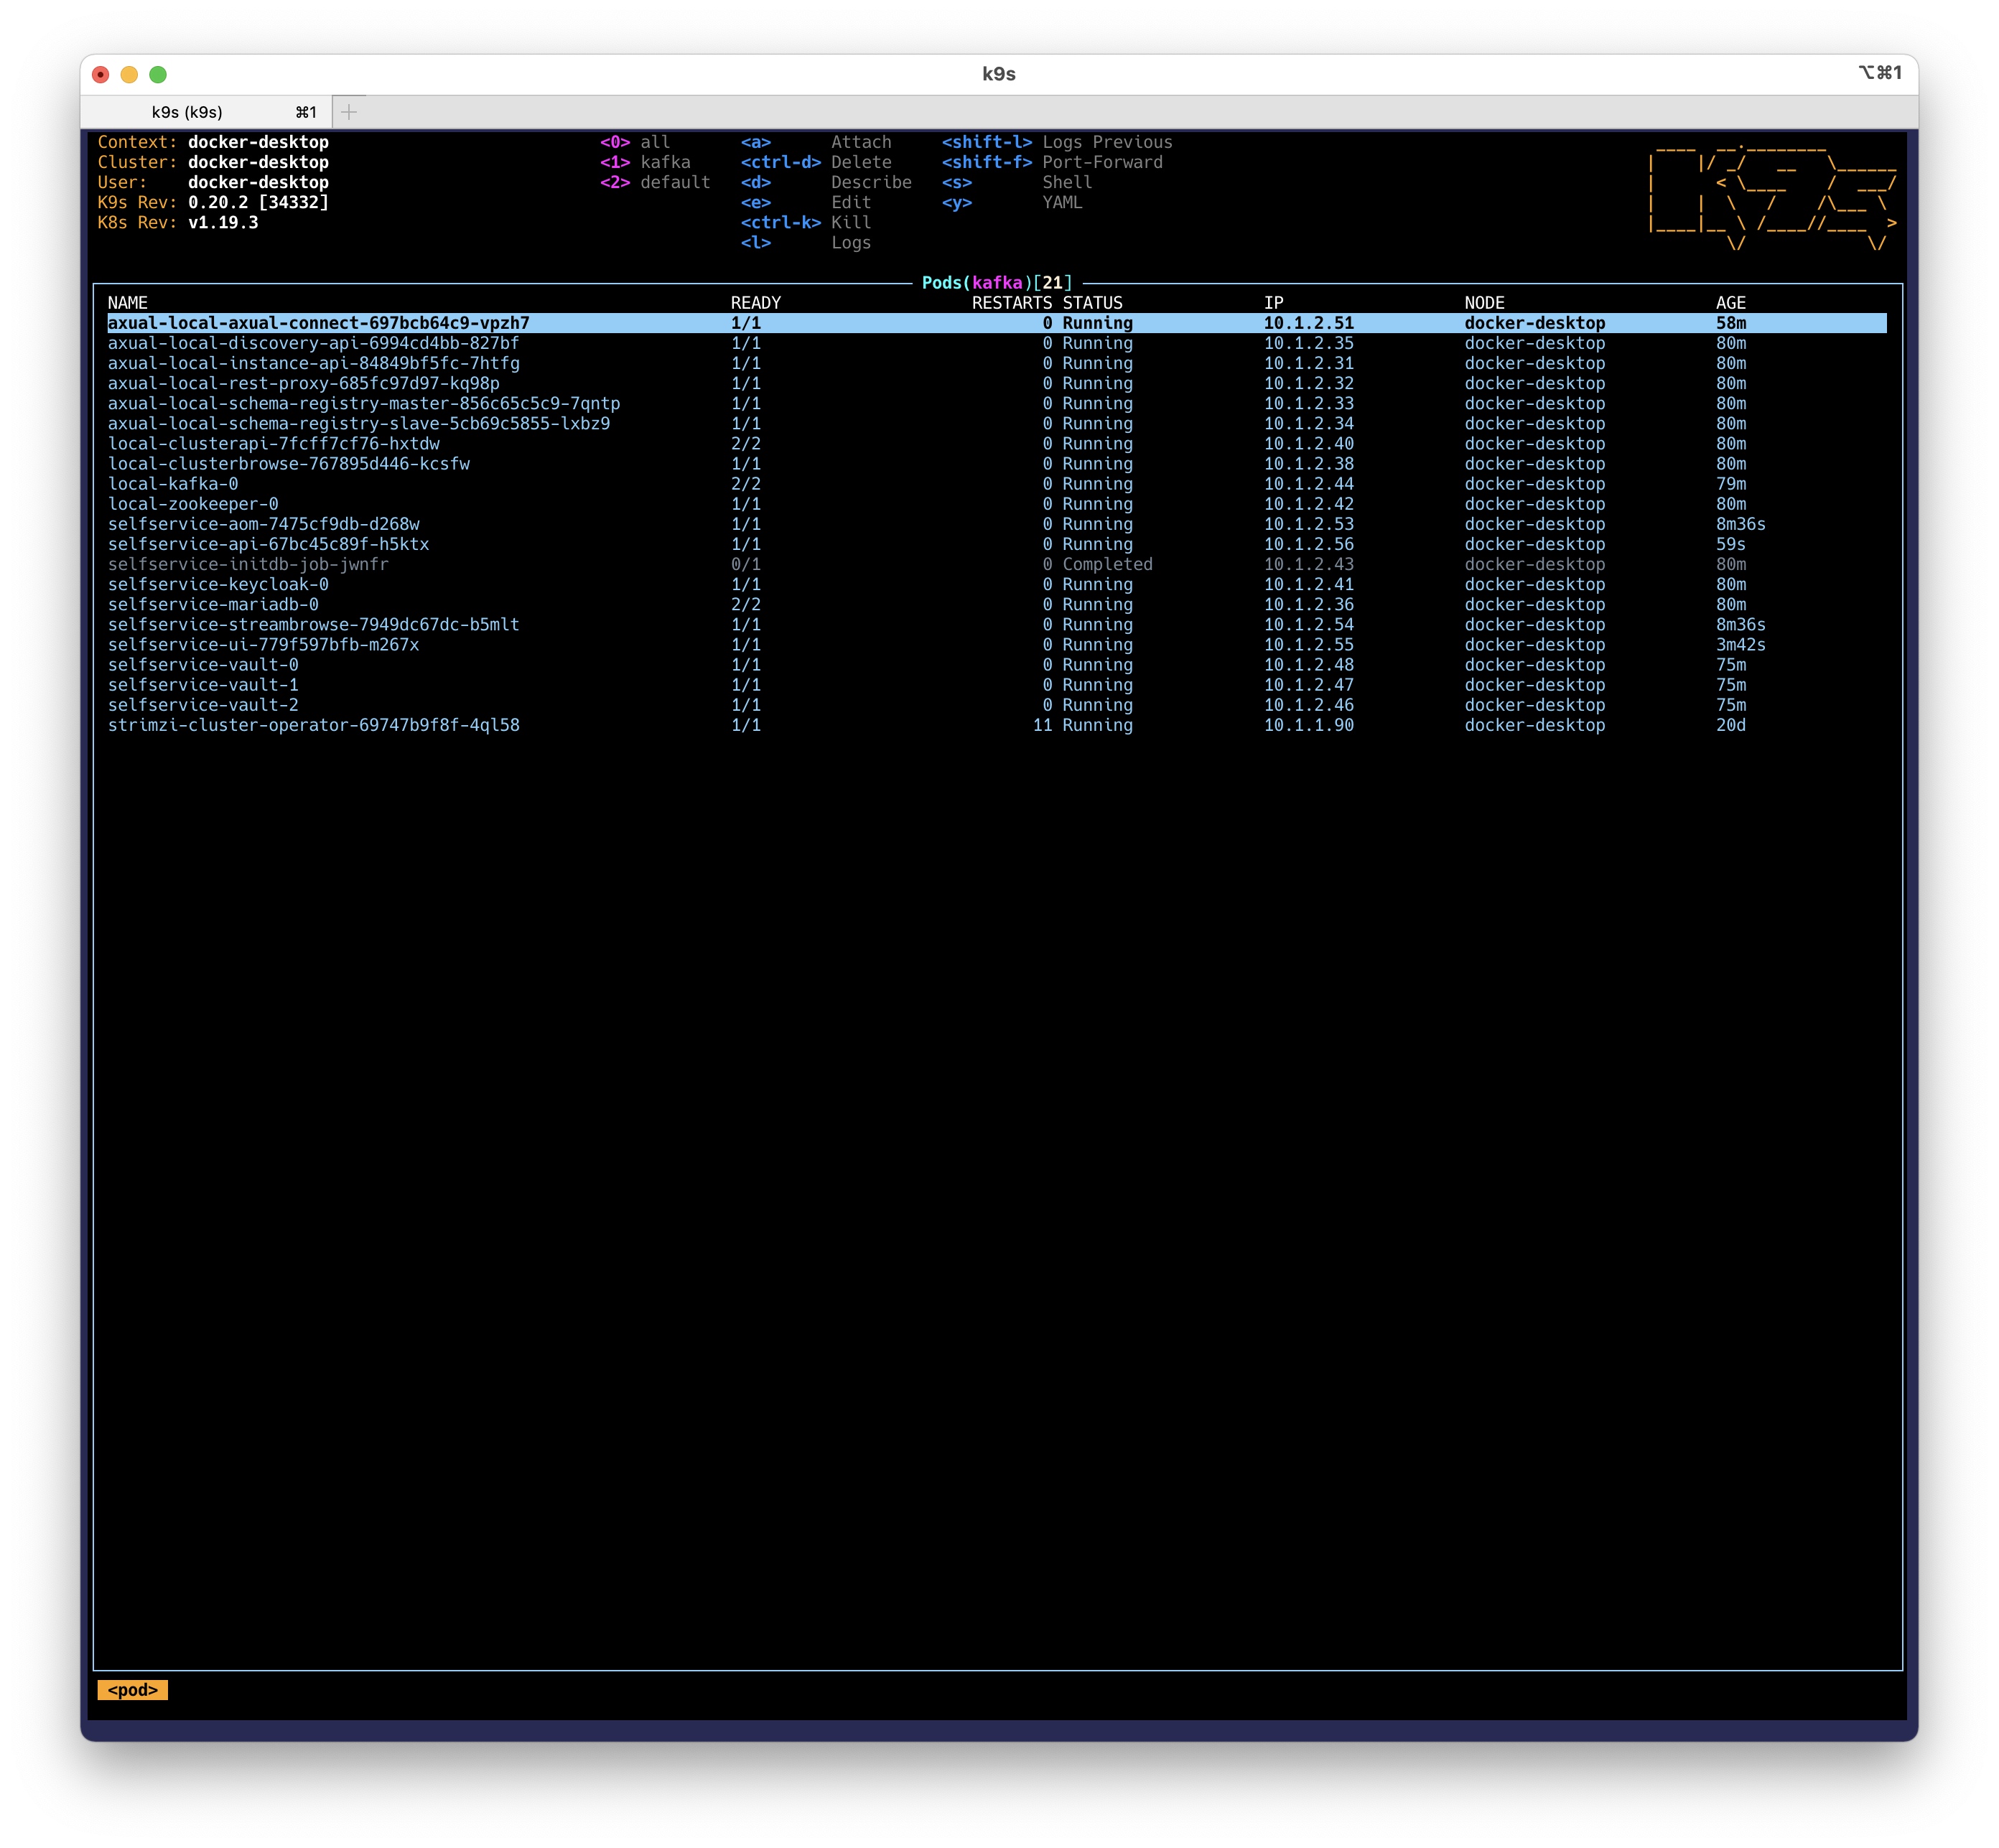
Use k9s to confirm that the 3 vault pods have been created.

Initialize and Unseal the Vault cluster
A leader must be chosen in oder to initialize the Vault.
We’ll select the first pod.
This pod’s name is further referred to as selfservice-vault-0.
Initialize and Unseal the Vault on the selfservice-vault-0 pod:
-
Open a shell inside the first vault pod (
selfservice-vault-0), viak9s → Shell, or:kubectl -n kafka exec -it selfservice-vault-0 -- /bin/sh -
In order to initialize the vault, a root token and one or more shared keys have to be created.
-
KS ("key shares"): The number of issued keys which can unseal Vault (Local: 1 – Prod: 3)
-
KT ("key threshold"): The minimum amount of keys required to unseal Vault (Local: 1 – Prod: 2)
In the example below, KS = 1 and KT = 1
vault operator init -key-shares=1 -key-threshold=1Keep the root token and key-shares in a safe place (like a password manager).
You’ll need them to unseal and access Vault after every restart of the vault cluster.
-
-
Unseal vault-node
selfservice-vault-0using the[Unseal-Key]you created in the previous step.vault operator unseal [Unseal-Key] -
Exit the
selfservice-vault-0pod.exit -
Repeat step 1, 3 and 4 (skip step 2) to unseal the rest of the vault nodes, i.e. the second (
selfservice-vault-1) and third node (selfservice-vault-2).You’ll have to unseal all nodes every time you reinstall the platform.
-
Enable "key-value version 2" on the
connectorspath:-
Open a shell inside the first vault pod (
selfservice-vault-0), viak9s → Shell, or:kubectl -n kafka exec -it selfservice-vault-0 -- /bin/sh -
Login using the root token and enable key-value version 2 on the
connectorspath.
Replace the root token on the first line:vault login paste-the-rootToken vault secrets enable -path=connectors kv-v2 vault auth enable approle -
Exit the
selfservice-vault-0pod.exit
-
You have successfully initialized and unsealed the Vault cluster!
Enable the Vault UI
The Vault operator-commands were issued within a docker container. For the next steps, we’ll use Vault's CLI ("command line interface") within a web-browser. To access the Vault UI you have to port-forward a vault pod.
-
Port-forward port 8200 on the leader node (
selfservice-vault-0) usingk9s → port-forward, or:kubectl port-forward pod/selfservice-vault-0 8200:8200 -n kafka -
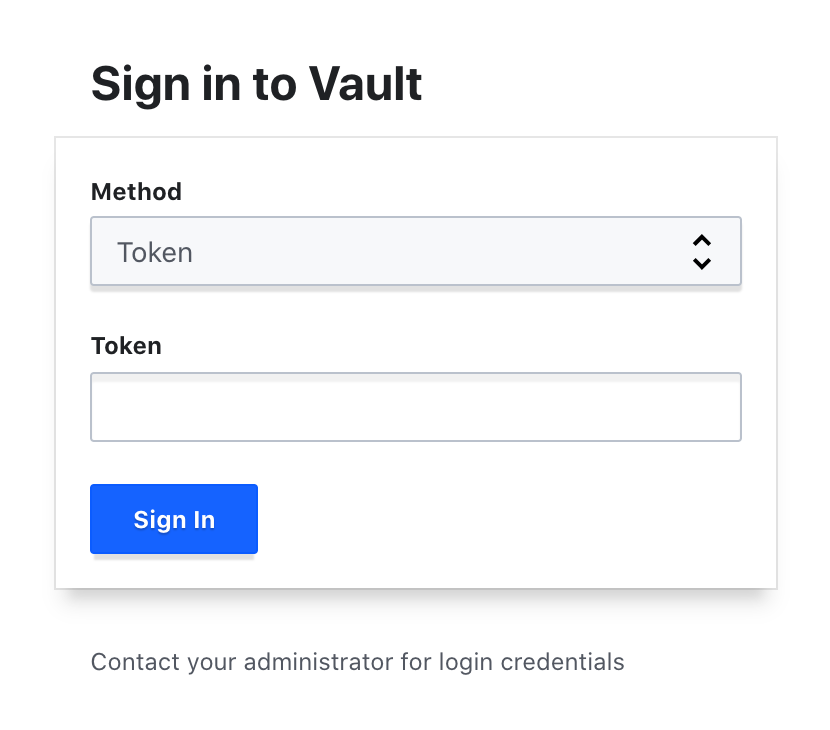
Go to https://localhost:8200/ui in your web-browser.
Chrome doesn’t trust self-signed certificates. In order to bypass this measure, type:
thisisunsafeYou should see the following login screen:
-
Paste the root token and click "Sign in".
If the vault is not unsealed yet, you’ll need to supply the shared keys, as well.
Creating policies within Vault
We’ll use the web-browser UI and CLI to define policies (create, read, update) within Vault in order to authorize Axual-Connect and the Self-Service to manage the connector certificates.
Create a Vault Policy for Management-API
-
Open the policy creation menu by going to "Policies" >> "Create ACL policy".
-
Create a policy named
mgmt-apiwith the following body:path "connectors/*" {capabilities= ["read", "create", "update","delete"]}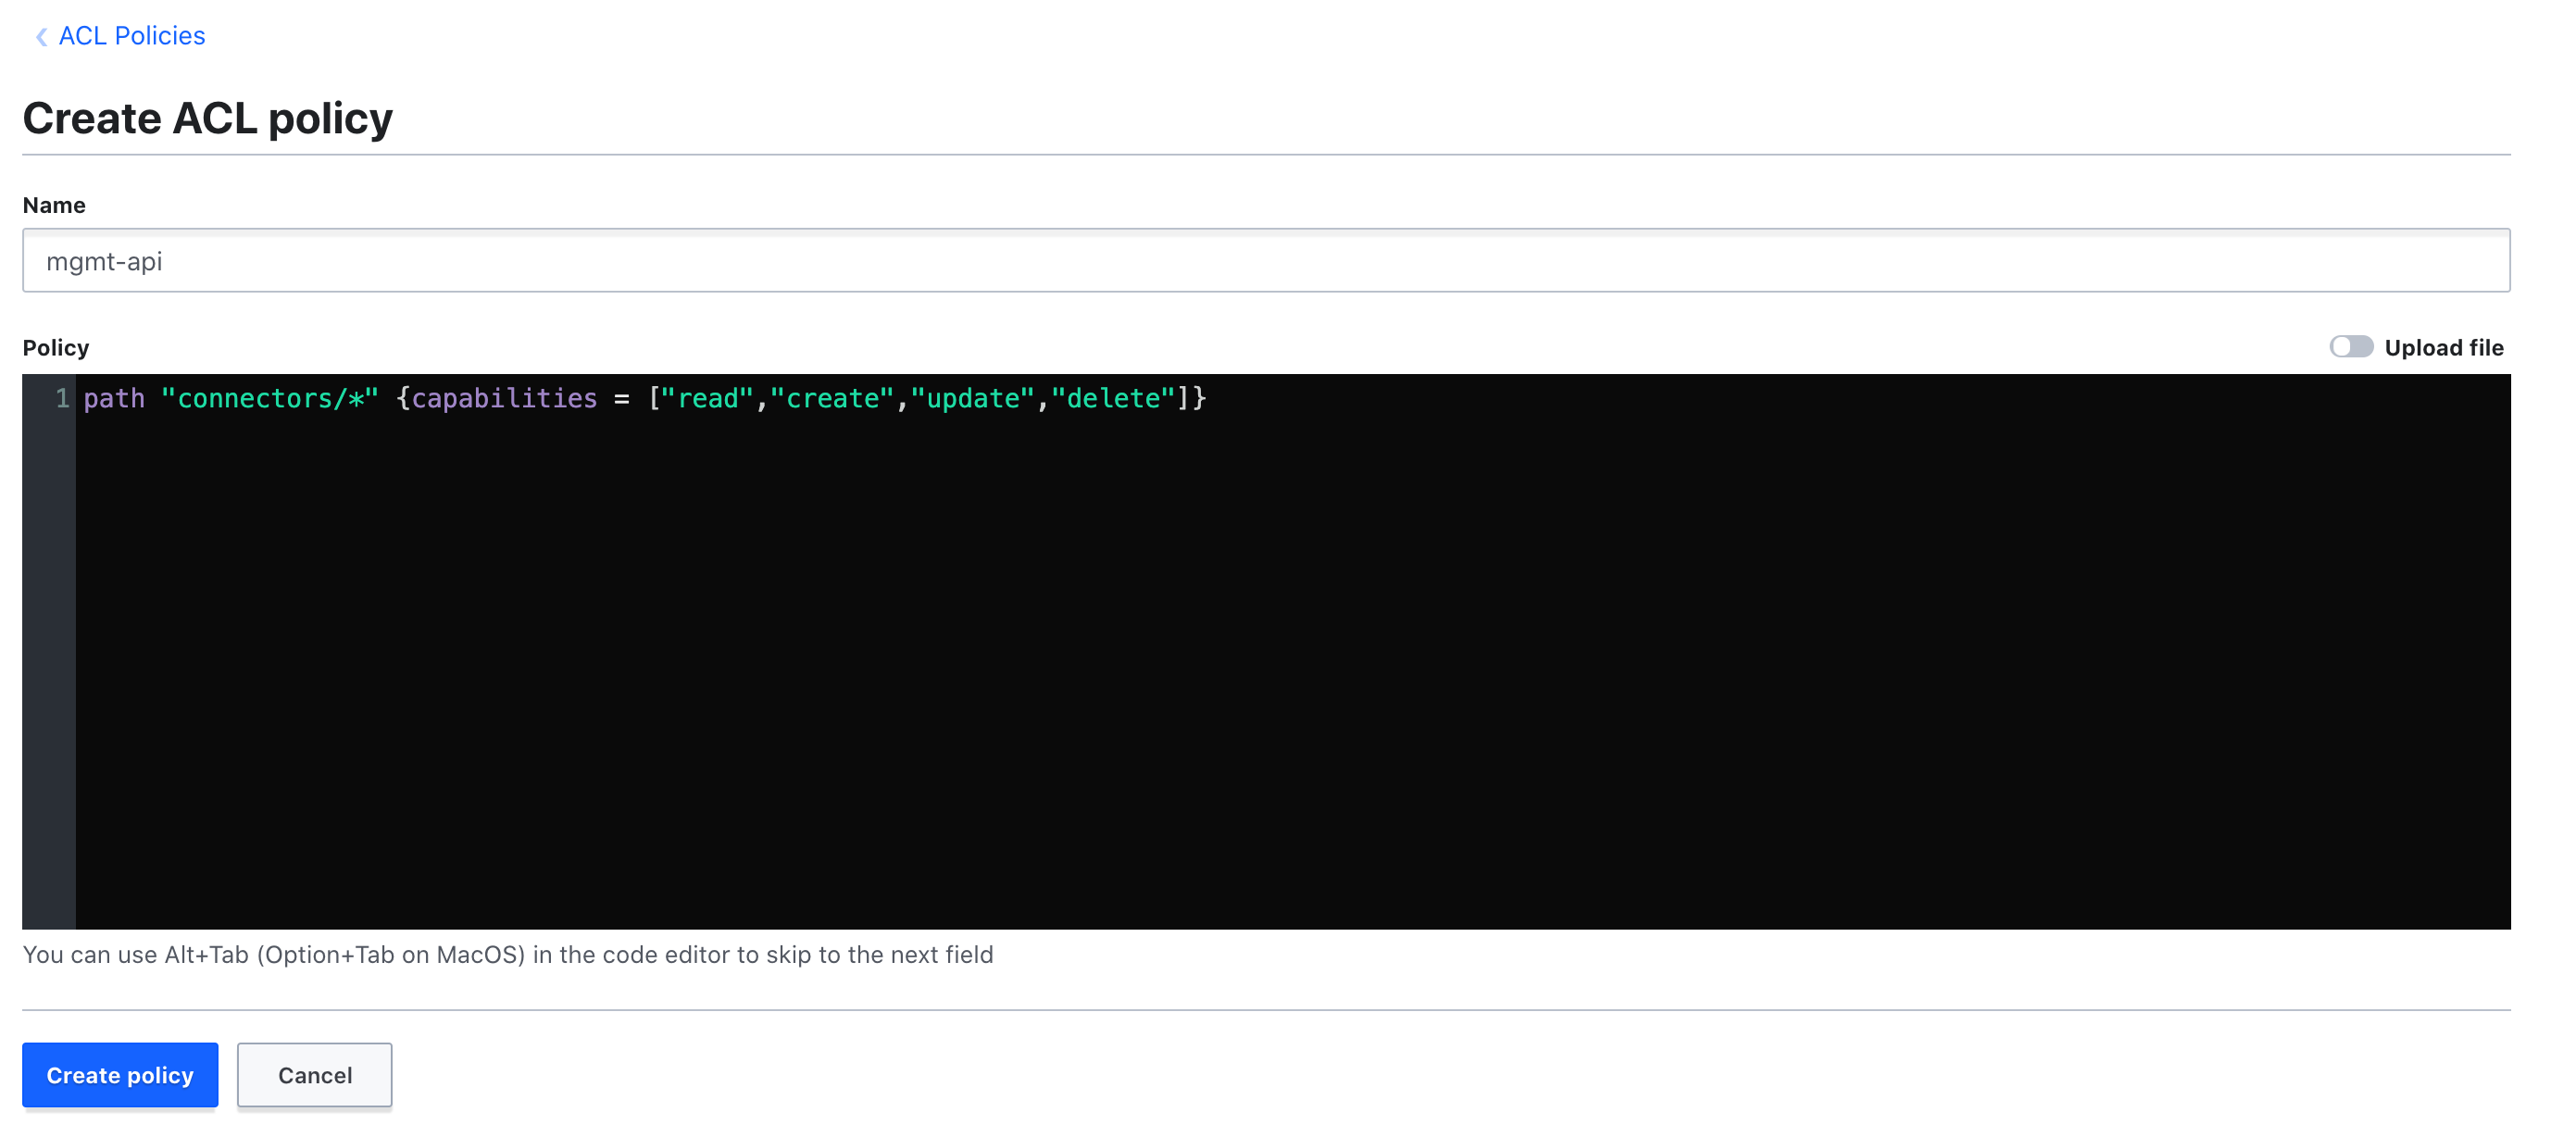
-
Open the Vault Browser CLI by clicking the CLI icon in the top-right of the screen:

Run the following command in order to add this policy to the
mgmt-apiapprole:vault write auth/approle/role/mgmt-api token_policies="mgmt-api" -
Use the CLI to obtain the ID of the mgmt-api role.
vault read auth/approle/role/mgmt-api/role-idThe output should look like this:
Key Value ––– –––-- role_id [MGMT_API_ROLE_ID] -
Use the CLI to create a role-secret using the following command:
vault write auth/approle/role/mgmt-api/secret-id -forceThe output should look like this:
Key Value ––– ----- secret_id [MGMT_API_SECRET_ID] secret_id_accessor [NOT_USED] -
Save the
role IDandsecret IDtemporarily to a file. Note down that these two are themgmt-apirole and secret IDs.
You will create another pair of IDs forconnectand you shouldn’t mix them up.
Create a Vault Policy for Axual-Connect
If your deployment has multiple axual-instances (e.g. prod, dta, etc.), repeat these steps for every instance.
|
-
Open the policy creation menu by going to "Policies" >> "Create ACL policy".
-
Create a policy named
connect-$tenant-$instancewith the following body:path "connectors/data/axual/local/*" {capabilities = ["read"]}Change the
$tenantand$instanceto your tenant and instance names.
The full policy name for the local deployment isconnect-axual-local.
Update the tenant and instance name within the policy-body as well.
-
Open the Vault Browser CLI by clicking the CLI icon in the top-right of the screen:
Run the following command in order to add this policy to the
connect-axual-localapprolevault write auth/approle/role/connect-axual-local token_policies="connect-axual-local" -
Use the CLI to obtain the ID of the
connect-axual-localrole.vault read auth/approle/role/connect-axual-local/role-idThe output should look like this:
Key Value ––– –––-- role_id [CONNECT_INSTANCE_ROLE_ID] -
Use the CLI to create a role secret using the following command:
vault write auth/approle/role/connect-axual-local/secret-id -forceThe output should look like this:
Key Value ––– ----- secret_id [CONNECT_INSTANCE_SECRET_ID] secret_id_accessor [NOT_USED] -
Save the
role IDandsecret IDtemporarily to a file. Note down that these two are theconnect-axual-localrole and secret IDs.
You don’t want to mix them up with themgmt-apiIDs.
Authentication against Vault: Update helm-configs and upgrade the pods
Management API
Edit the values.yaml file in your working directory.
|
Append additional entries to the yaml file or edit existing ones. |
-
Include the newly obtained
role_idandsecret_id:values.yamlmgmt: api: axual: vault: # Vault is accessible at this URL in the k8s cluster, as per the axual platform deployment address: https://selfservice-vault:8200 # The roleId and secretId are used for authentication against Vault, # authorizing the MGMT-API to create secrets within it. roleId: [MGMT_API_ROLE_ID] secretId: [MGMT_API_SECRET_ID] # OPTIONAL! # In case you are using "Hashicorp Vault Enterprise" and you are using namespaces to organize your secrets, # you need to update the Management API deployment to include a reference to a namespace # Most likely, you don't need to include this line. namespace: '' -
Issue a
helm upgradecommand usingvalues.yamlas the input file to upgrade the Management API deployment.helm upgrade --install -n kafka platform axual-stable/platform -f values.yamlAlternatively, you can override a specific property with the
--setoptionhelm upgrade --install -n kafka platform axual-stable/platform \ --set mgmt.api.axual.vault.roleId=[MGMT_API_ROLE_ID] \ --set mgmt.api.axual.vault.secretId=[MGMT_API_SECRET_ID] \ ; # don't forget to --set all the other attributes you've already overwritten, or they will be replaced with defaults
Axual Connect
-
If you already have a
connect-values.yamlfile which you used to deploy theaxual-stable/axual-connecthelm-chart, then we’ll update it.
Otherwise, create a new file calledconnect-values.yamlin your working directory with the following contents.
Replace the role and secret IDs with theconnectIDs you created earlier.Append additional entries to the yaml file or edit existing ones.
Do NOT replace the contents of the whole yaml file.
Do NOT delete or replace anything unless instructed to do so.connect-values.yaml# The roleId and secretId are used for authentication against Vault, # authorizing Axual-Connect to retrieve secrets from within it. vault: approleRoleId: [CONNECT_INSTANCE_ROLE_ID] approleSecretId: [CONNECT_INSTANCE_SECRET_ID] axual: # Feature flag for automated keystore management tls: automatedKeystores: true createServerKeypairSecret: true createTruststoreCaSecret: true -
Issue a
helm upgradecommand withconnect-values.yamlas the input file to upgrade (or install) Axual-Connect.helm upgrade --install -n kafka axual-connect axual-stable/axual-connect -f connect-values.yamlAlternatively, you can override a specific property with the
--setoptionhelm upgrade --install -n kafka axual-connect axual-stable/axual-connect \ --set vault.approleRoleId=[CONNECT_INSTANCE_ROLE_ID] \ --set vault.approleSecretId=[CONNECT_INSTANCE_SECRET_ID] \ ; # don't forget to --set all the other attributes you've already overwritten, or they will be replaced with defaults
Self-Service: Enable Operation-Manager and Connect
Enable "Operation-Manager" and "Axual-Connect". Mark "Vault" as available:
-
Edit the
values.yamlfile from your working directory which was used to deploy the axual-platform (not the one used for connect). Append the following entries to it:Append additional entries to the yaml file or edit existing ones.
Do NOT replace the contents of the whole yaml file.
Do NOT delete or replace anything unless instructed to do so.values.yamlglobal: mgmt: operationManager: enabled: true mgmt: ui: connect: enabled: true api: axual: operationManager: available: true vault: available: trueDo not delete values we added before, such as the role and secret IDs. -
Issue a
helm upgradecommand usingvalues.yamlas the input file to upgrade the axual-platform deployment.helm upgrade --install -n kafka platform axual-stable/platform -f values.yamlAlternatively, you can override a specific property with the
--setoptionhelm upgrade --install -n kafka axual-connect axual-stable/axual-connect \ --set global.mgmt.operationManager.enabled=true \ --set mgmt.ui.connect.enabled=true \ --set mgmt.api.axual.operationManager.available=true \ --set mgmt.api.axual.vault.available=true \ ; # don't forget to --set all the other attributes you've already overwritten, or they will be replaced with defaults
[Intermezzo] - Check the logs of Axual Services
Confirm that Axual Platform is healthy, using k9s
-
Run k9s.
-
Select the
selfservice-aompod. -
Press
lto see the pod’s logs.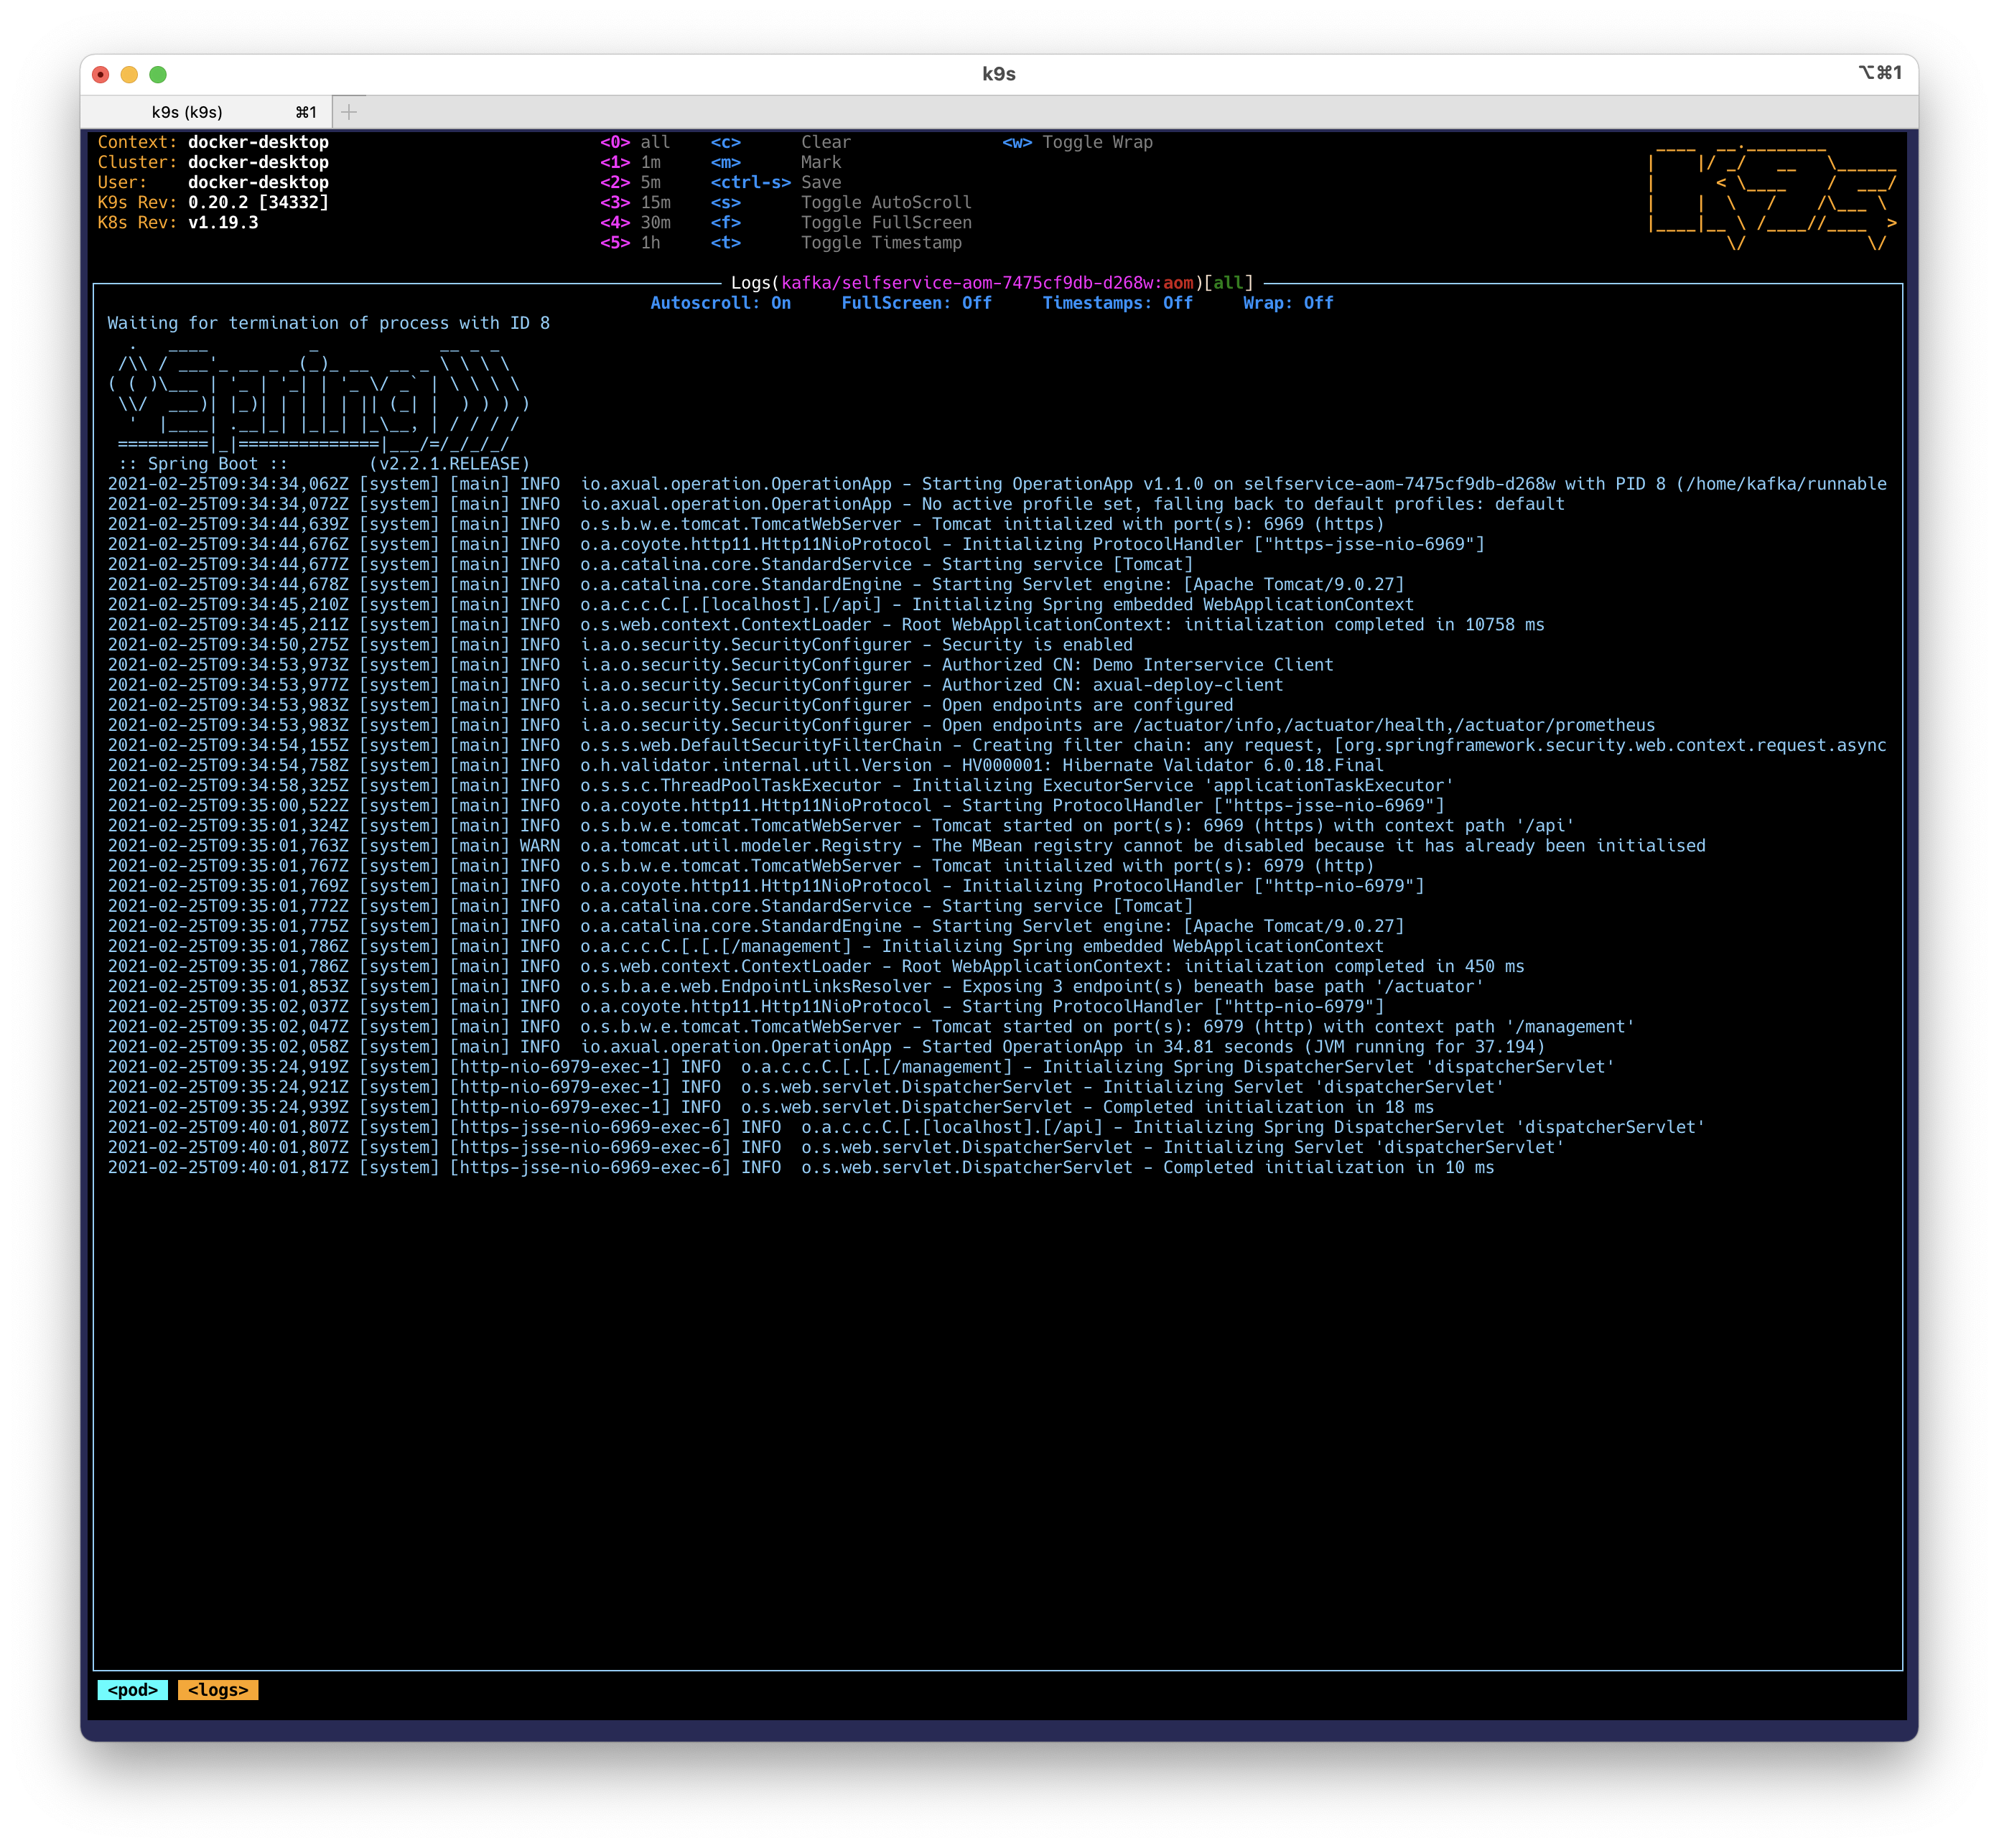
If you want to take a look at what k9s offers, check out this article Speed up Administration with k9s.
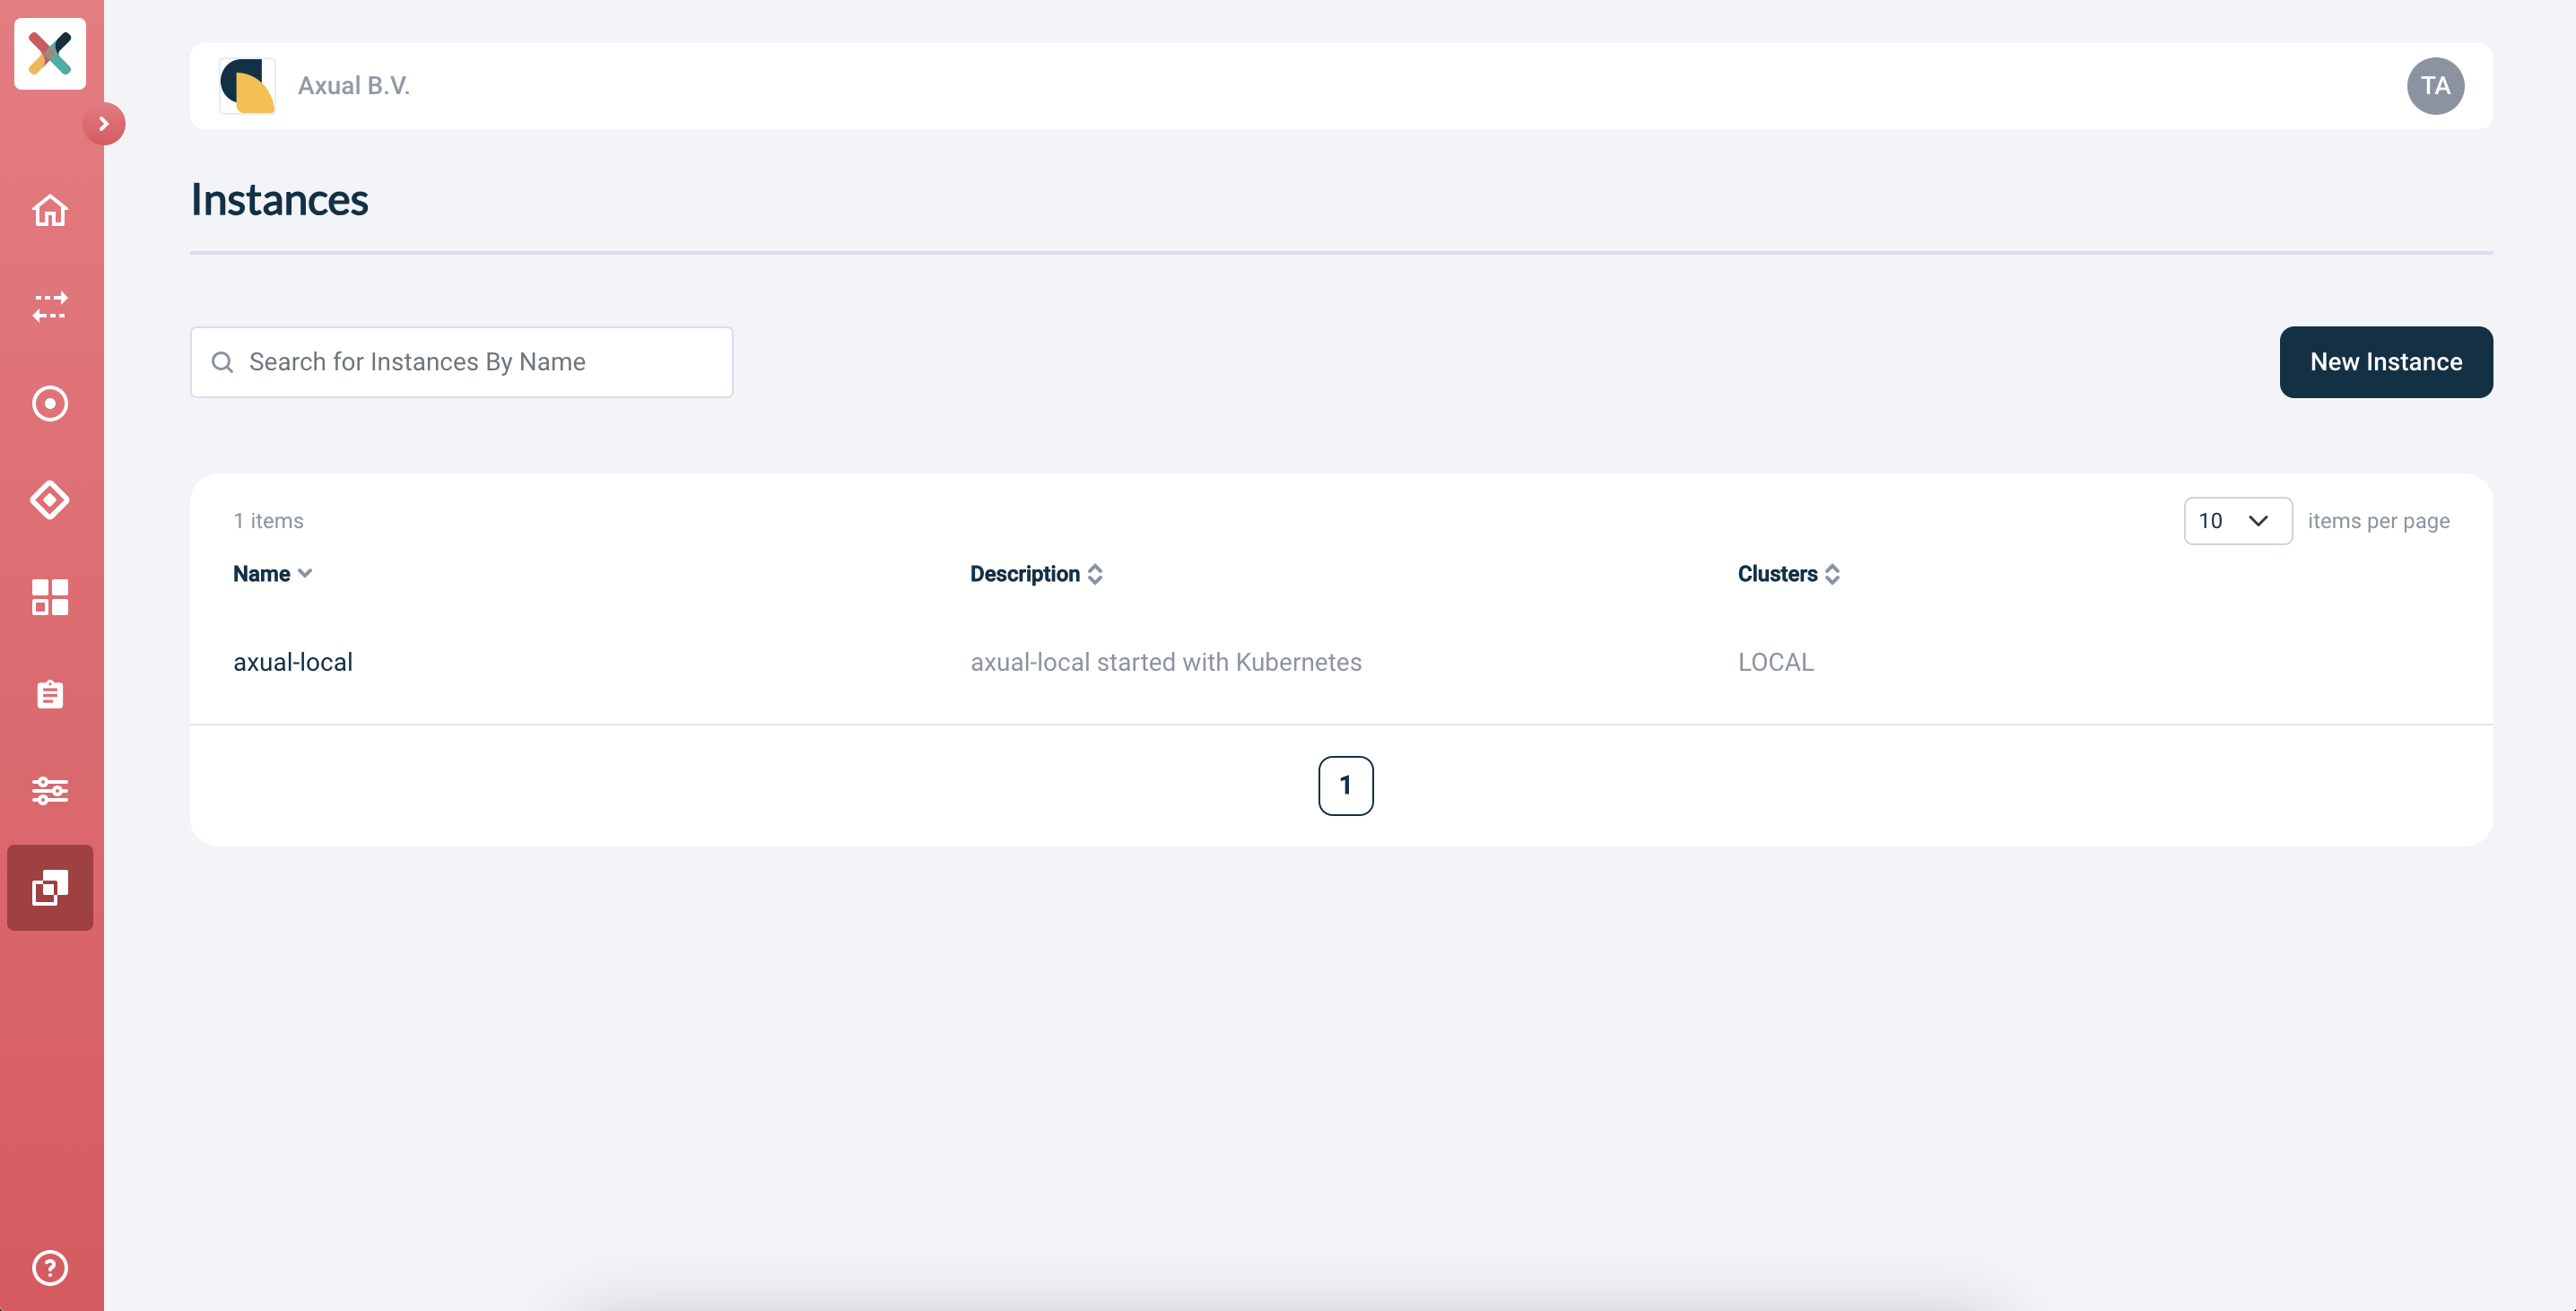
Self Service UI: Enable Axual-Connect
-
Login to Self Service UI using the following URL: https://platform.local/login/axual
-
Go to the Instances page
-
Select
axual-localand open the edit form -
Enable Axual Connect:
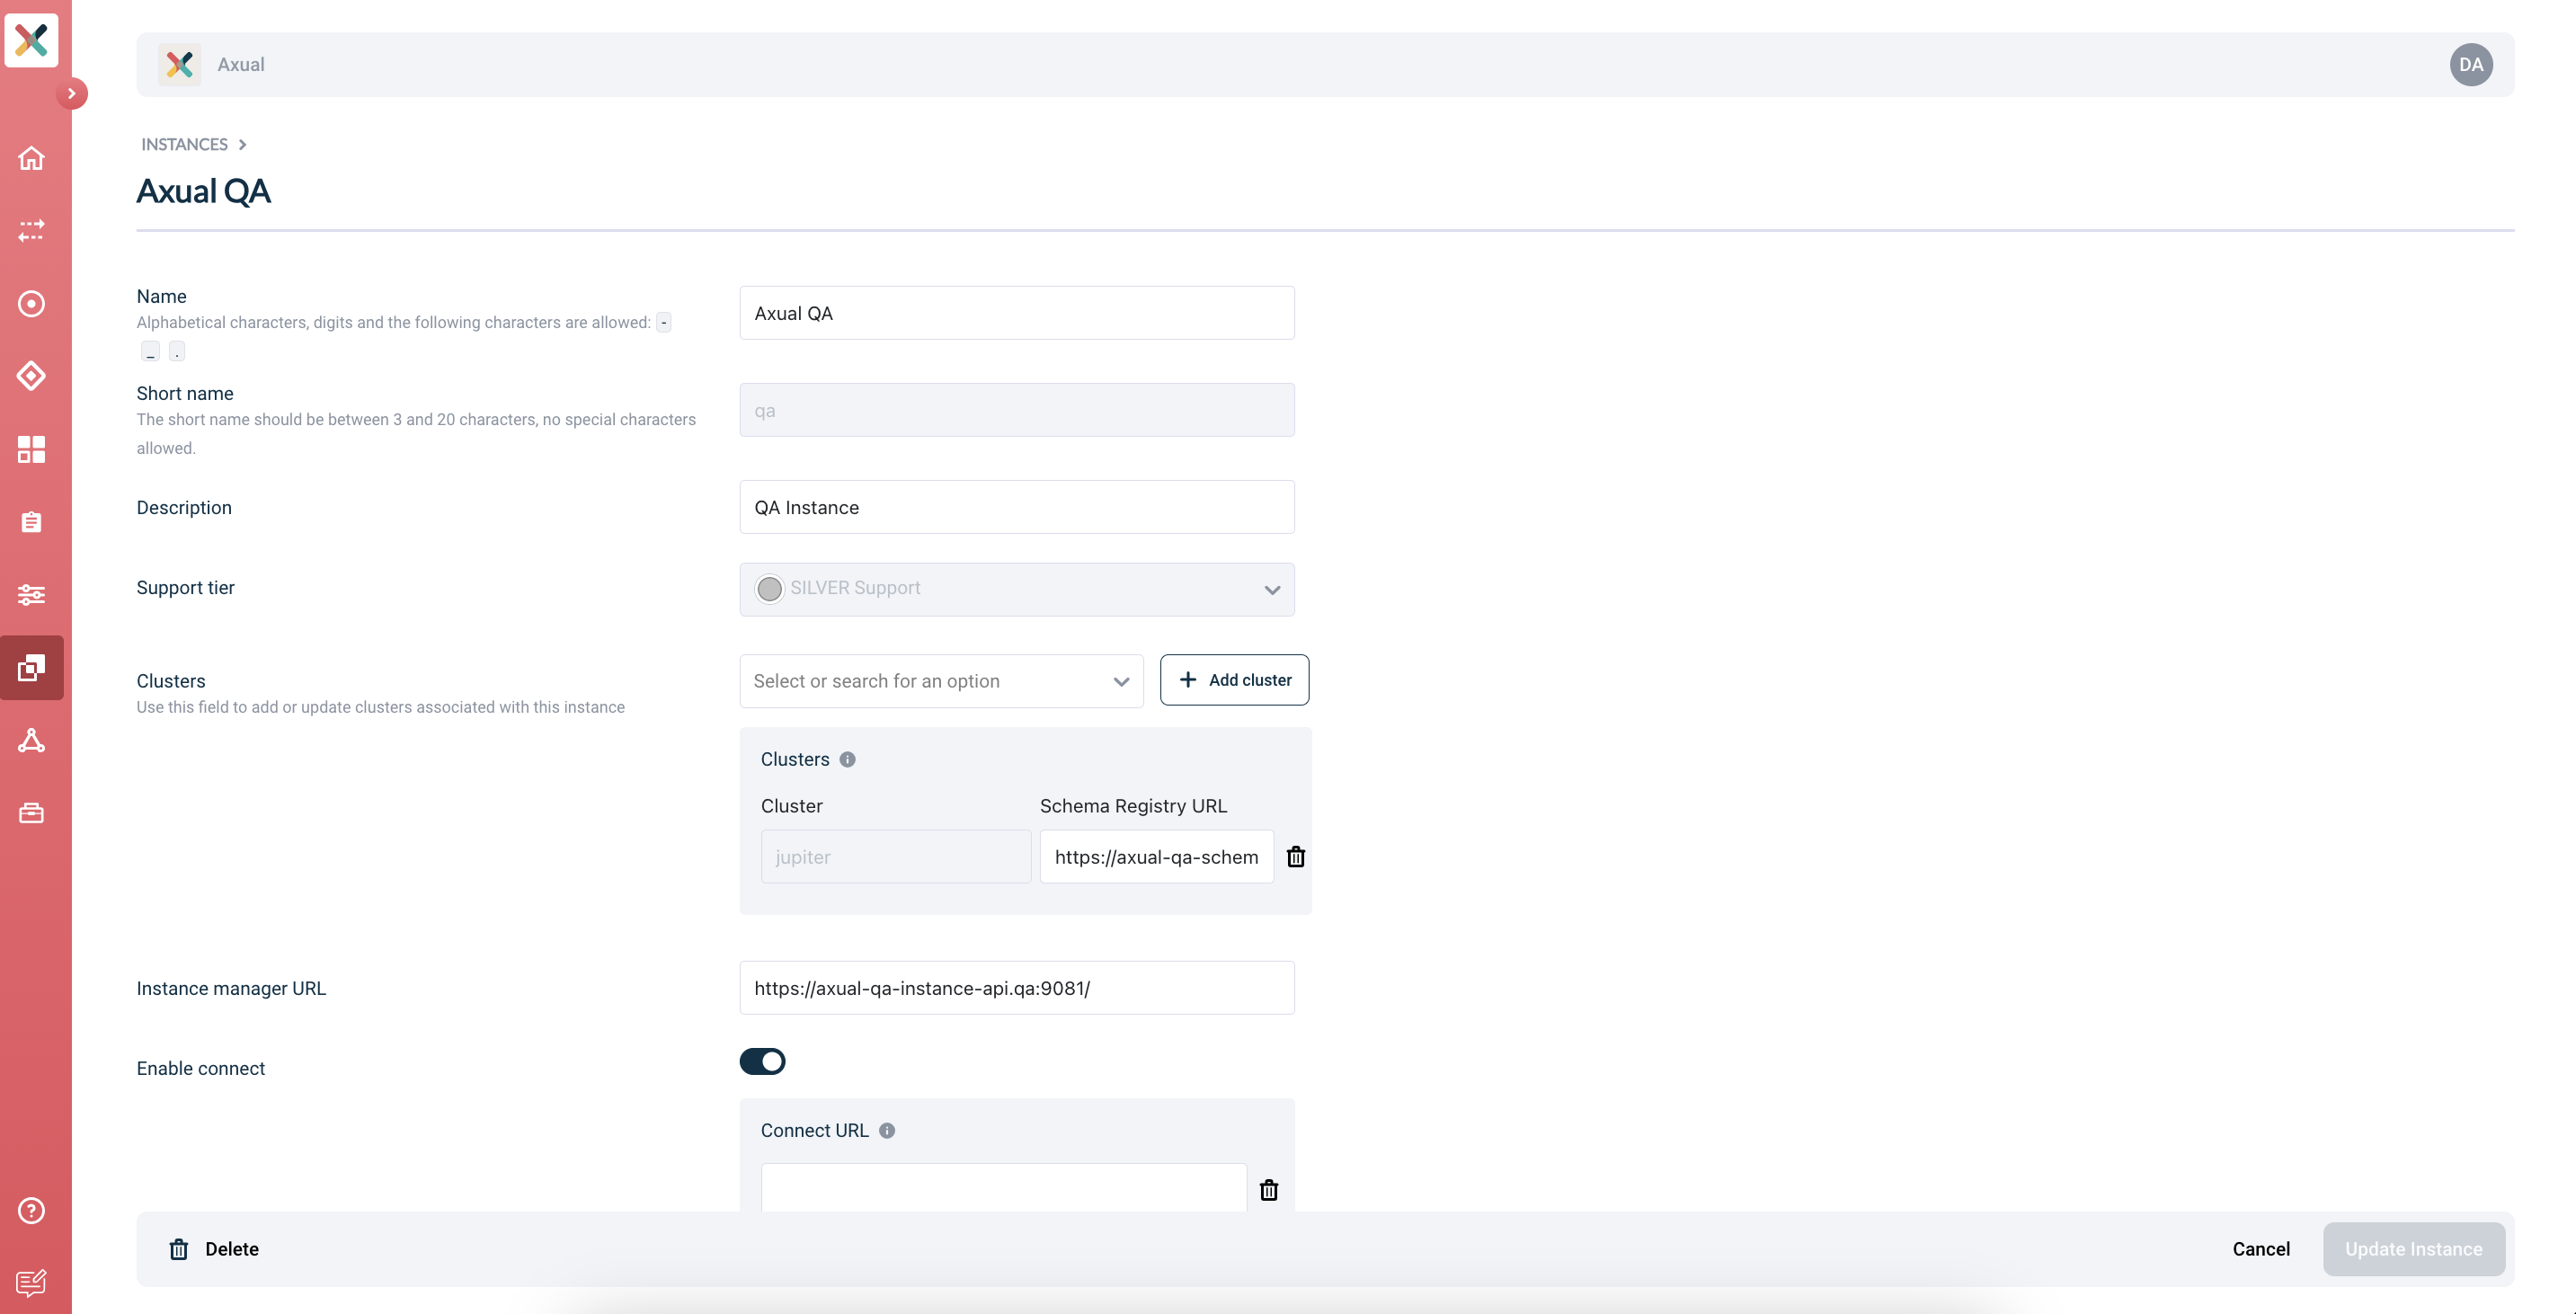
-
Provide the following value for Connect URL:
https://platform.local:11000/ -
Click save in the bottom-right of the screen.
Congratulations! Axual-Connect is now available! You can now Configure and install a connector.