Unresolved include directive in modules/ROOT/pages/_attributes.adoc - include::../_attributes.adoc[]
Snowflake sink Connector, version 1.4.4
Snowflake
If you already have a publicly accessible deployment of Snowflake, you can skip ahead and Configure and install a connector, using the Axual Self-Service UI.
Use the configuration instructions below.
If you don’t have one available, the following section instructs you to deploy a publicly available instance of Snowflake.
Deploying a Snowflake instance
-
You will authenticate against Snowflake using public-key encryption.
You will generate a key-pair in your terminal. There are multiple ways to get an RSA key, but only keys generated this way will work with Snowflake.
For additional information, check Snowflake Key-Pair authentication.openssl genrsa 2048 | openssl pkcs8 -topk8 -inform PEM -out MY_SNOWFLAKE.key -nocrypt openssl rsa -in MY_SNOWFLAKE.key -pubout -out MY_SNOWFLAKE.cert -
For each file, you’ll need to remove the first and last lines, and concatenate all of their remaining contents onto a single line.
The following commands will do just that.cat MY_SNOWFLAKE.key | sed '1d' | sed '$d' | tr -d '\n' > MY_SNOWFLAKE_COMPACT.key cat MY_SNOWFLAKE.cert | sed '1d' | sed '$d' | tr -d '\n' > MY_SNOWFLAKE_COMPACT.certThe contents of the
MY_SNOWFLAKE_COMPACT.keyfile will be used later, when configuring the Connector-Application, for thesnowflake.private.keyconfiguration value.
The contents of theMY_SNOWFLAKE_COMPACT.certfile will be used shortly, when configuring your Snowflake credentials. -
Sign up with Snowflake to create a new trial account.
Select a standard account type and any cloud provider when prompted.
After activating your account by confirming your e-mail address, you should receive a second e-mail which contains your Account URL. -
Login to your Snowflake account and click the Worksheets button on the left-side menu.
Click the + Worksheet button at the top-right of the screen to create a new worksheet. -
Paste the following statements in the worksheet. Do not execute anything yet.
-- For the purposes of this demo, we'll use the admin role USE ROLE ACCOUNTADMIN; -- Create a warehouse which will execute insert statements prompted by kafka connect CREATE WAREHOUSE SF_WAREHOUSE WITH WAREHOUSE_SIZE = 'XSMALL' WAREHOUSE_TYPE = 'STANDARD' AUTO_SUSPEND = 300 AUTO_RESUME = TRUE ; -- Create snowflake resources CREATE DATABASE SF_DATABASE; CREATE SCHEMA SF_DATABASE.SF_SCHEMA; CREATE TABLE SF_TABLE ( RECORD_METADATA VARIANT, RECORD_CONTENT VARIANT ); -- Create a role with permission to use the above resources -- Required permissions for kafka connectors are listed here: -- https://docs.snowflake.com/en/user-guide/kafka-connector-install.html#required-privileges CREATE ROLE SF_ROLE; GRANT USAGE ON WAREHOUSE SF_WAREHOUSE TO ROLE SF_ROLE; GRANT USAGE ON DATABASE SF_DATABASE TO ROLE SF_ROLE; GRANT USAGE ON SCHEMA SF_DATABASE.SF_SCHEMA TO ROLE SF_ROLE; GRANT CREATE STAGE ON SCHEMA SF_DATABASE.SF_SCHEMA TO ROLE SF_ROLE; GRANT CREATE PIPE ON SCHEMA SF_DATABASE.SF_SCHEMA TO ROLE SF_ROLE; GRANT OWNERSHIP ON TABLE SF_DATABASE.SF_SCHEMA.SF_TABLE TO ROLE SF_ROLE; -
Append the following statements to the same worksheet, after replacing the username and public key.
ReplaceYOUR_USERNAMEwith your Snowflake account username.
Paste the contents of theMY_SNOWFLAKE_COMPACT.certas the public key.GRANT ROLE SF_ROLE TO USER YOUR_USERNAME; ALTER USER YOUR_USERNAME SET DEFAULT_ROLE = SF_ROLE; ALTER USER YOUR_USERNAME SET RSA_PUBLIC_KEY='MIIBIj...IDAQAB'; -
Select the entirety of the worksheet contents via Right Click → Select All or Ctrl+A (Cmd+A on MacOS).
We do this because, when executing worksheet instructions, only the selected lines are actually executed.
Now, with all the lines selected, click the Play button on the top-right of the screen to execute all the commands in the worksheet. -
On the left side of the screen, click the + icon to create another worksheet.
Paste the following contents and execute the worksheet, in order to acquire your "Account locator URL":SELECT t.value:host::varchar AS ACCOUNT_LOCATOR FROM TABLE (flatten(input => parse_json(system$whitelist()))) AS t WHERE t.value:type = 'SNOWFLAKE_DEPLOYMENT';We’ll use this URL as the
snowflake.url.nameproperty when configuring the Connector-Application later.
Configuring a new sink Connector
-
Follow the Creating streams documentation in order to create one stream and deploy it onto an environment.
The name of the stream will bemy_snowflake_stream.
The key/value types will beString/String. -
Follow the Configure and install a connector documentation to set up a new Connector-Application.
Let’s call itmy_snowflake_sink.
The plugin name iscom.snowflake.kafka.connector.SnowflakeSinkConnector.
If a plugin isn’t available, ask a platform operator to install plugins. -
Produce some
String/Stringevents to themy_snowflake_streamstream. You can follow the producer documentation and examples. -
Provide the following minimal configuration in order to connect to the previously configured Snowflake instance.
For advanced configuration, see the official sink connector documentation.topicsmy_snowflake_streamkey.converterorg.apache.kafka.connect.storage.StringConvertervalue.converterorg.apache.kafka.connect.storage.StringConvertersnowflake.database.nameSF_DATABASEsnowflake.schema.nameSF_SCHEMAsnowflake.role.nameSF_ROLEsnowflake.topic2table.mapmy_snowflake_stream:SF_TABLEsnowflake.user.name
Your user account name, the one you log into Snowflake with. Not your e-mail.Example value:
JOHNsnowflake.url.name
This is the URL you acquired from snowflake via the second worksheet.Example value:
ab12345.europe-west4.gcp.snowflakecomputing.comsnowflake.private.key
This is the private key you generated at the beginning, in theMY_SNOWFLAKE_COMPACT.keyfile.Example value:
MIIEvgIBAD…WQ9zu9snowflake.private.key.passphrase
Since we created a plaintext key, no password is necessaryMake sure this field is empty (has no value).
I.e. If it contains the word[hidden]by default, you have to delete it. -
Authorize the
my_snowflake_sinksink Connector-Application to consume themy_snowflake_streamstream. -
You can now start the sink Connector-Application.
-
Let’s find the events in Snowflake.
-
Go to the Snowflake Homepage.
-
On the left-side menu, select
Data → Databases -
A new menu appears on the right. Expand
SF_DATABASE → SF_SCHEMA → Tables → SF_TABLE -
The table menu opens. Click the
Data Previewtab. -
Click the Select Warehouse button right below, and select
SF_WAREHOUSE.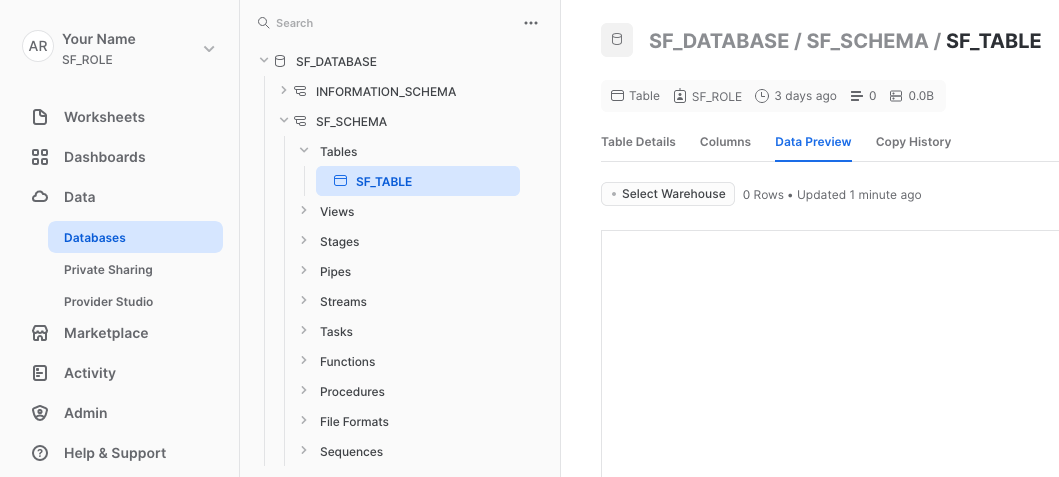
If nothing is displayed, click the Refresh icon in the top-right corner of the page. You might have to wait up to 2 minutes, as the Snowflake connector sends messages in batches.
-
Cleanup
Once you are done, stop the Connector-Application and cleanup the unused axual resources.
In order to clean up your Snowflake resources, you can run the following in a worksheet (don’t forget to edit YOUR_USERNAME):
DROP DATABASE SF_DATABASE;
ALTER USER YOUR_USERNAME SET DEFAULT_ROLE = ACCOUNTADMIN;
DROP ROLE SF_ROLE;
DROP WAREHOUSE SF_WAREHOUSE;
You can now also delete all your worksheets.
License
Snowflake sink-Connector is licensed under the Apache License, Version 2.0.
Source code
The source code for the Connect-Plugin can be found at github.com/snowflakedb/snowflake-kafka-connector.