Unresolved include directive in modules/ROOT/pages/_attributes.adoc - include::../_attributes.adoc[]
Snowflake sink Connector, version 1.8.2
Snowflake
If you already have a publicly accessible deployment of Snowflake, you can skip ahead and Configure and install a connector, using the Axual Self-Service UI.
Use the configuration instructions below.
If you don’t have one available, the following section instructs you to deploy a publicly available instance of Snowflake.
Deploying a Snowflake instance
-
You will authenticate against Snowflake using public-key encryption.
You will generate a key-pair in your terminal. There are multiple ways to get an RSA key, but only keys generated this way will work with Snowflake.
For additional information, check Snowflake Key-Pair authentication.openssl genrsa 2048 | openssl pkcs8 -topk8 -inform PEM -out MY_SNOWFLAKE.key -nocrypt openssl rsa -in MY_SNOWFLAKE.key -pubout -out MY_SNOWFLAKE.cert -
For each file, you’ll need to remove the first and last lines, and concatenate all of their remaining contents onto a single line.
The following commands will do just that.cat MY_SNOWFLAKE.key | sed '1d' | sed '$d' | tr -d '\n' > MY_SNOWFLAKE_COMPACT.key cat MY_SNOWFLAKE.cert | sed '1d' | sed '$d' | tr -d '\n' > MY_SNOWFLAKE_COMPACT.certThe contents of the
MY_SNOWFLAKE_COMPACT.keyfile will be used later, when configuring the Connector-Application, for thesnowflake.private.keyconfiguration value.
The contents of theMY_SNOWFLAKE_COMPACT.certfile will be used shortly, when configuring your Snowflake credentials. -
Sign up with Snowflake to create a new trial account.
Select a standard account type and any cloud provider when prompted.
After activating your account by confirming your e-mail address, you should receive a second e-mail which contains your Account URL.
We’ll use this URL later, when configuring the Connector-Application, for thesnowflake.url.nameconfiguration value. -
Login to your Snowflake account and click the Worksheets button on the left-side menu.
Click the + Worksheet button at the top-right of the screen to create a new worksheet. -
Paste the following statements in the worksheet. Do not execute anything yet.
-- For the purposes of this demo, we'll use the admin role USE ROLE ACCOUNTADMIN; -- Create a warehouse which will execute insert statements prompted by kafka connect CREATE WAREHOUSE SF_WAREHOUSE WITH WAREHOUSE_SIZE = 'XSMALL' WAREHOUSE_TYPE = 'STANDARD' AUTO_SUSPEND = 300 AUTO_RESUME = TRUE ; -- Create snowflake resources CREATE DATABASE SF_DATABASE; CREATE SCHEMA SF_DATABASE.SF_SCHEMA; CREATE TABLE SF_TABLE ( RECORD_METADATA VARIANT, RECORD_CONTENT VARIANT ); -- Create a role with permission to use the above resources -- Required permissions for kafka connectors are listed here: -- https://docs.snowflake.com/en/user-guide/kafka-connector-install.html#required-privileges CREATE ROLE SF_ROLE; GRANT USAGE ON WAREHOUSE SF_WAREHOUSE TO ROLE SF_ROLE; GRANT USAGE ON DATABASE SF_DATABASE TO ROLE SF_ROLE; GRANT USAGE ON SCHEMA SF_DATABASE.SF_SCHEMA TO ROLE SF_ROLE; GRANT CREATE STAGE ON SCHEMA SF_DATABASE.SF_SCHEMA TO ROLE SF_ROLE; GRANT CREATE PIPE ON SCHEMA SF_DATABASE.SF_SCHEMA TO ROLE SF_ROLE; GRANT OWNERSHIP ON TABLE SF_DATABASE.SF_SCHEMA.SF_TABLE TO ROLE SF_ROLE; -
Append the following statements to the same worksheet, after replacing the username and public key.
ReplaceYOUR_USERNAMEwith your Snowflake account username.
Paste the contents of theMY_SNOWFLAKE_COMPACT.certas the public key.GRANT ROLE SF_ROLE TO USER YOUR_USERNAME; ALTER USER YOUR_USERNAME SET DEFAULT_ROLE = SF_ROLE; ALTER USER YOUR_USERNAME SET RSA_PUBLIC_KEY='MIIBIj...IDAQAB'; -
Select the entirety of the worksheet contents via Right Click → Select All or Ctrl+A (Cmd+A on MacOS).
We do this because, when executing worksheet instructions, only the selected lines are actually executed.
Now, with all the lines selected, click the Play button on the top-right of the screen to execute all the commands in the worksheet.
Configuring a new sink Connector
-
Follow the Creating streams documentation in order to create one stream and deploy it onto an environment.
The name of the stream will bemy_snowflake_stream.
The key/value types will beString/String. -
Follow the Configure and install a connector documentation to set up a new Connector-Application.
Let’s call itmy_snowflake_sink.
The plugin name iscom.snowflake.kafka.connector.SnowflakeSinkConnector.
If a plugin isn’t available, ask a platform operator to install plugins. -
Produce some
String/Stringevents to themy_snowflake_streamstream. You can follow the producer documentation and examples. -
Provide the following minimal configuration in order to connect to the previously configured Snowflake instance.
For advanced configuration, see the official sink connector documentation.behavior.on.null.valuesMake sure this field is empty (has no value).
I.e. If it contains the worddefault, you have to delete it.topicsmy_snowflake_streamkey.converterorg.apache.kafka.connect.storage.StringConvertervalue.converterorg.apache.kafka.connect.storage.StringConvertersnowflake.database.nameSF_DATABASEsnowflake.schema.nameSF_SCHEMAsnowflake.role.nameSF_ROLEsnowflake.topic2table.mapmy_snowflake_stream:SF_TABLEsnowflake.user.name
Your user account name, the one you log into Snowflake with. Not your e-mail.Example value:
JOHNsnowflake.url.name
This is the URL you received in your e-mail from snowflake. The protocol (https://) is optional.Example value:
abcdefg-hi12345.snowflakecomputing.comsnowflake.private.key
This is the private key you generated at the beginning, in theMY_SNOWFLAKE_COMPACT.keyfile.Example value:
MIIEvgIBAD…WQ9zu9snowflake.private.key.passphrase
Since we created a plaintext key, no password is necessaryMake sure this field is empty (has no value).
I.e. If it contains the word[hidden]by default, you have to delete it. -
Authorize the
my_snowflake_sinksink Connector-Application to consume themy_snowflake_streamstream. -
You can now start the sink Connector-Application.
-
Let’s find the events in Snowflake.
-
Go to the Snowflake Homepage.
-
On the left-side menu, select
Data → Databases -
A new menu appears on the right. Expand
SF_DATABASE → SF_SCHEMA → Tables → SF_TABLE -
The table menu opens. Click the
Data Previewtab. -
Click the Select Warehouse button right below, and select
SF_WAREHOUSE.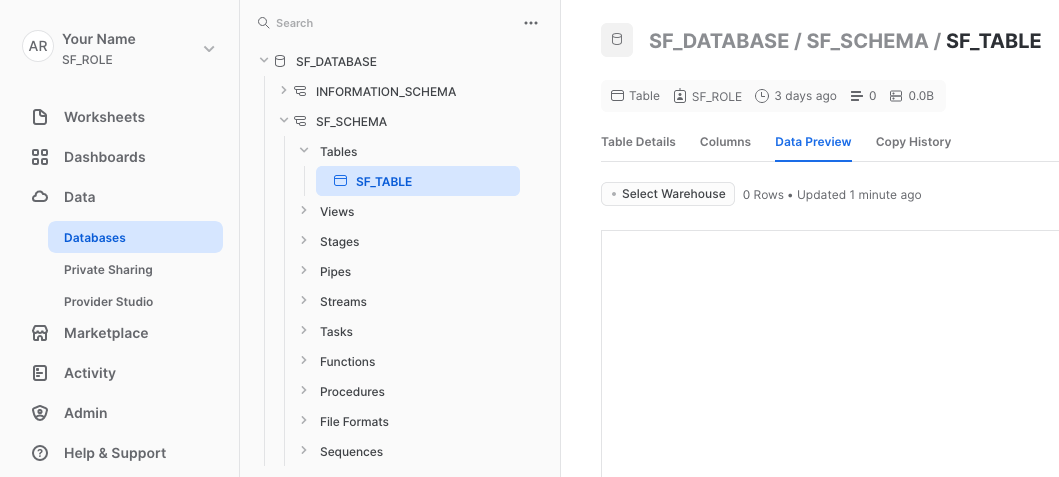
If nothing is displayed, click the Refresh icon in the top-right corner of the page. You might have to wait up to 2 minutes, as the Snowflake connector sends messages in batches.
-
Cleanup
Once you are done, stop the Connector-Application and cleanup the unused axual resources.
In order to clean up your Snowflake resources, you can run the following in a worksheet (don’t forget to edit YOUR_USERNAME):
DROP DATABASE SF_DATABASE;
ALTER USER YOUR_USERNAME SET DEFAULT_ROLE = ACCOUNTADMIN;
DROP ROLE SF_ROLE;
DROP WAREHOUSE SF_WAREHOUSE;
You can now also delete all your worksheets.
License
Snowflake sink-Connector is licensed under the Apache License, Version 2.0.
Source code
The source code for the Connect-Plugin can be found at github.com/snowflakedb/snowflake-kafka-connector.