Managing Applications
Creating An Application
An application registration via the Self-Service portal is necessary in order to provide access to the kafka-cluster. This operation can be done before the application is actually developed and/or released.
The portal also uses this information to provide a great visual overview of all the active streaming data pipelines on the streaming platform.
Custom vs. Connector
When creating an application using the Self-Service portal, you need to define the Application Type, which is either "Custom" or "Connector":
-
Custom: Standalone (Java, .NET, etc.) applications backed by an Axual Client or a native kafka client
-
Connector: A connector is a generic piece of code which can communicate with a kafka-cluster and an external system (like a database). Because of how generic it is, a user is only required to provide configuration in order to connect the two systems. Connector applications run on Axual’s infra (within a "Connect" cluster). The integrated system can be a data source or a data sink. There are different Connector Plugins for different external systems.
This page will describe the registration of Custom applications. If you want to register Connector applications, go to: {xref-starting-connectors}
Creating A Custom Application
-
To register your application, visit the Applications page and click the New Application button.
You will see a screen as below: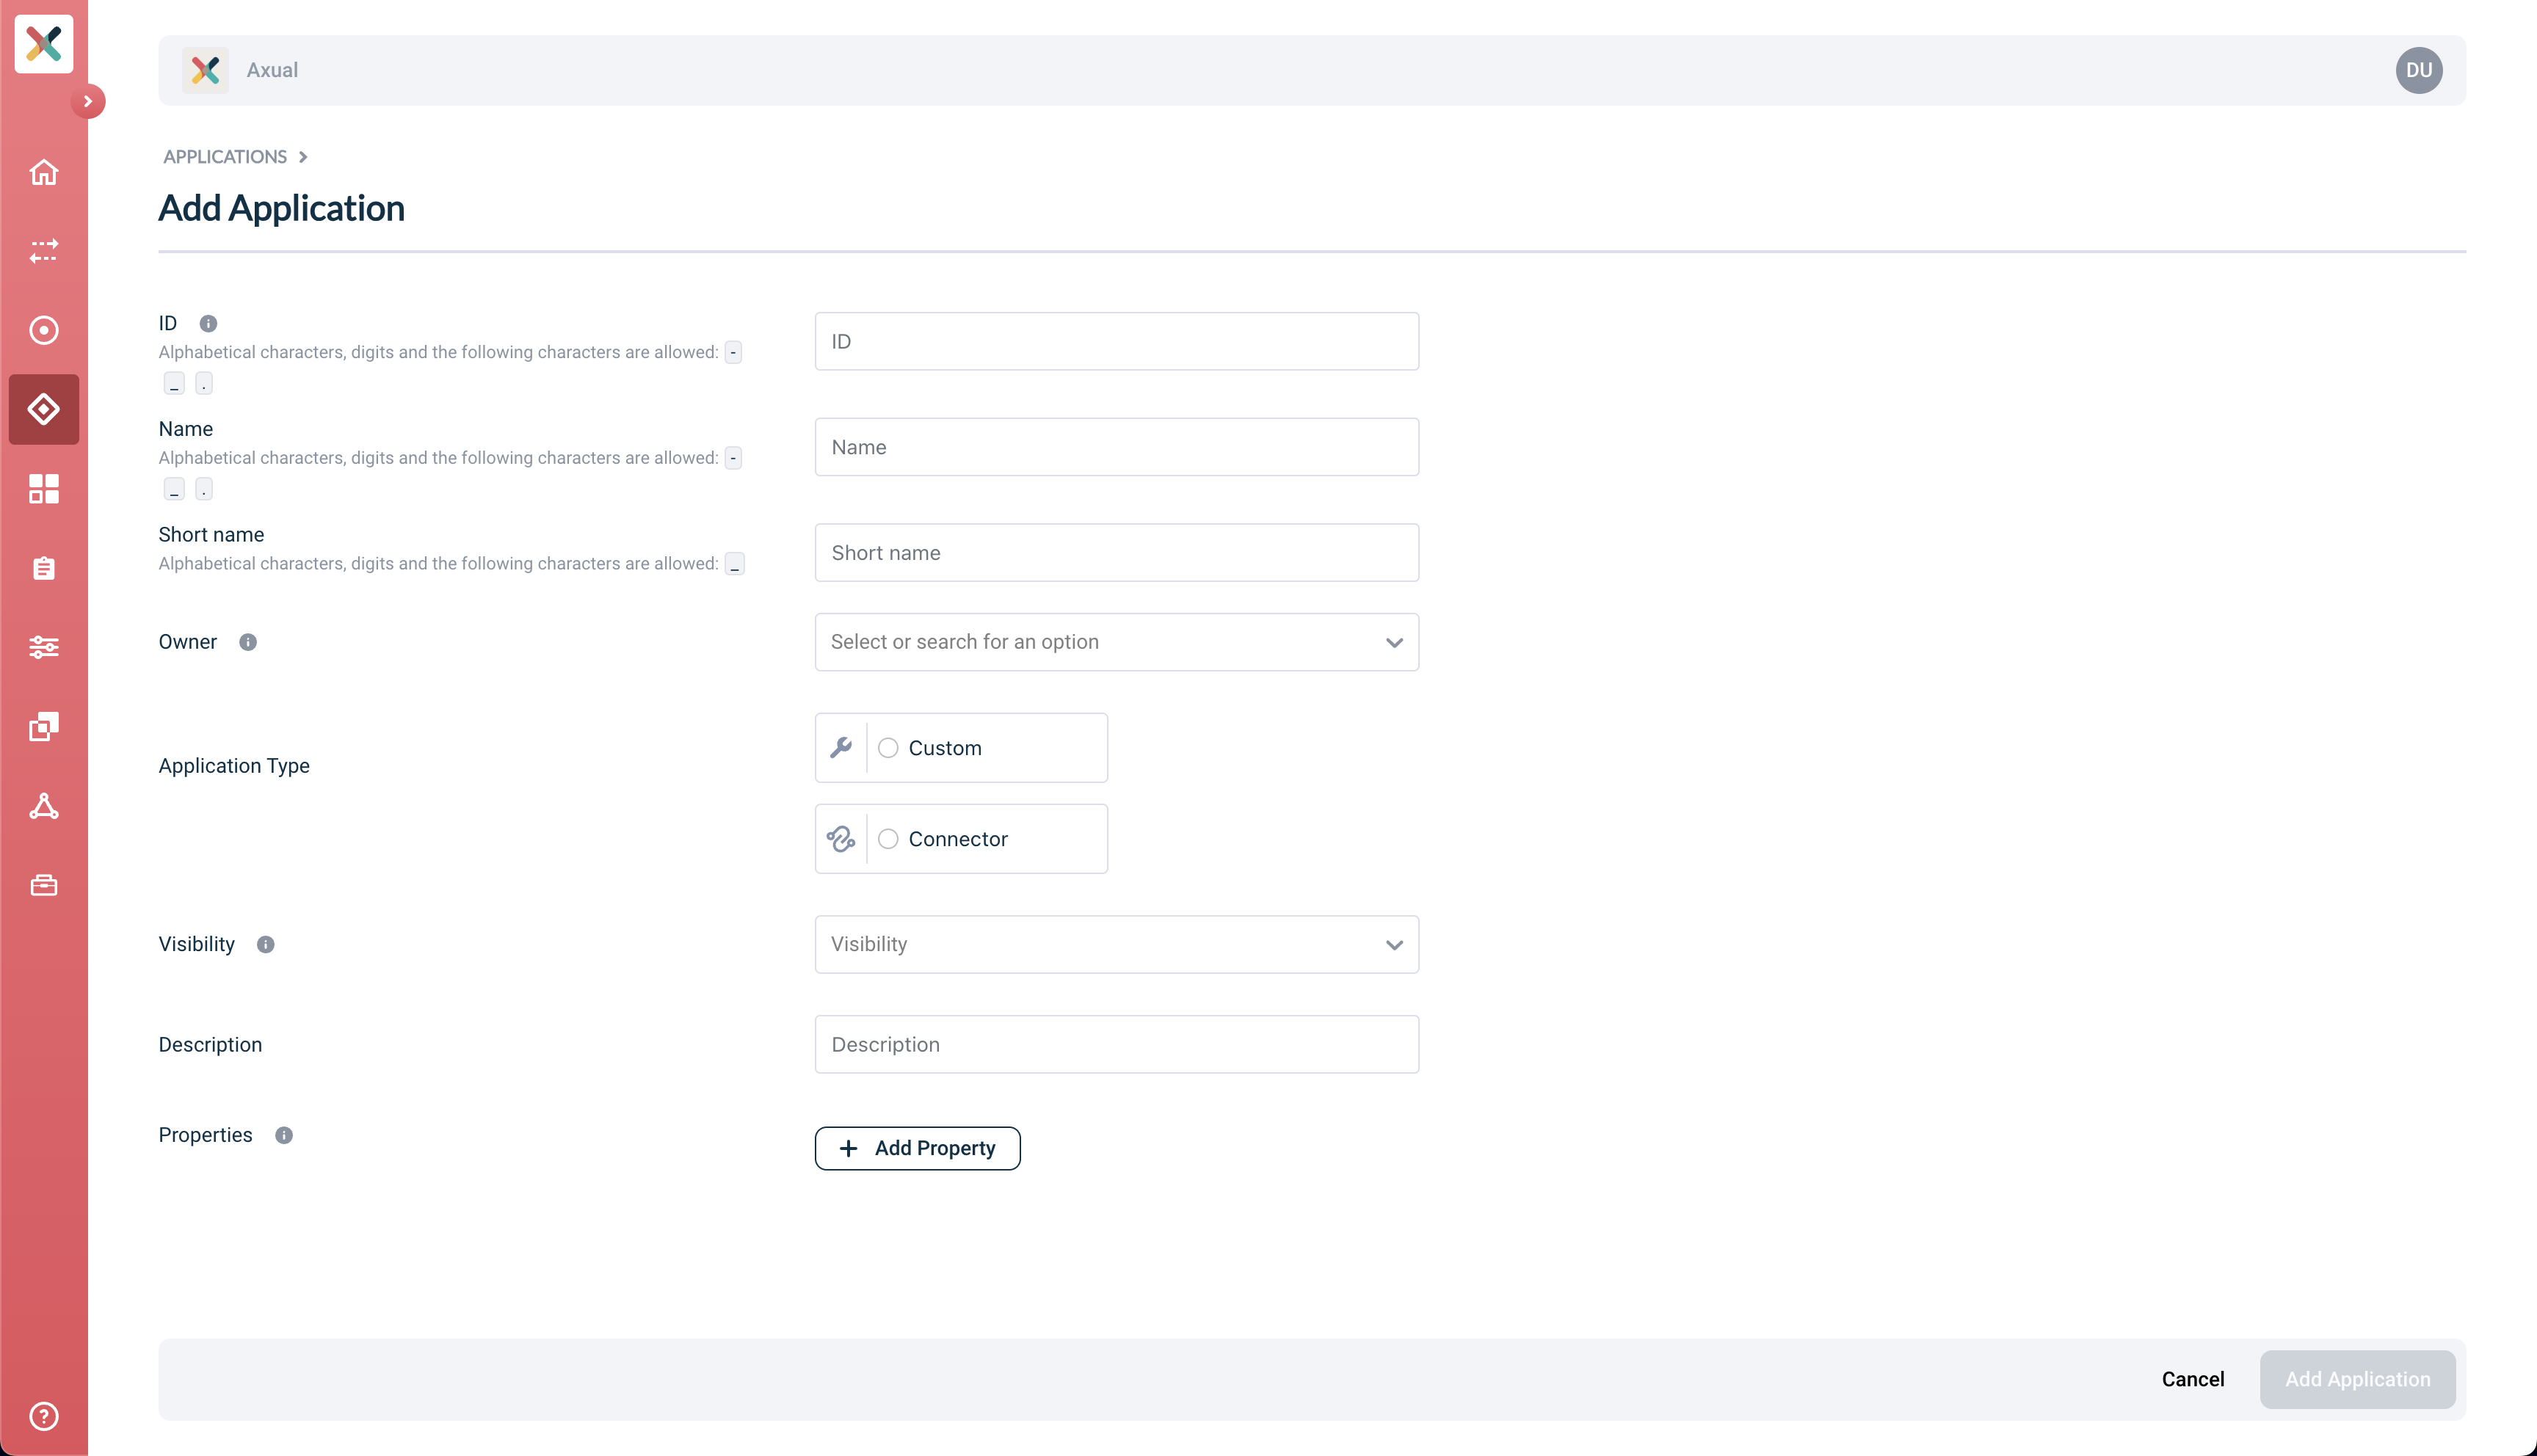
-
Start filling the form with required information:
-
ID: This represents the Application ID of your application. This is a string that uniquely identifies your application. We recommend using a fully qualified package/class name as it is sufficiently unique within the organization, e.g.
com.company.division.AlertingApp. The maximum length is 255 and the value should be alphanumeric with no spaces and underscores are allowed. -
Name: The name of the application. It should not be more than 50 characters. Spaces are allowed.
-
Short Name: A unique human-readable short name of the application. This name is used as a label in Self Service. Only alphanumeric characters and underscore are allowed. Max length should not exceed 60 characters.
-
Owner: Choose the group which would be the owner of this application. Choose your DevOps team’s group. Is it not available yet? Please refer to Creating a group.
-
Type: choose "Custom"
-
Custom Type: Choose the type of application, purely acting as metadata.
-
Visibility: see Application visibility below
-
Description: A short summary describing the purpose of this application, e.g. "Enriching transaction events with transaction categories.". Must not exceed 200 characters.
-
Properties: This is a set of key:value pair for setting various properties of an application. For now, this can be kept empty.
-
At this point, you have created your Application in Self Service. Once the application is successfully created, you will be directed to the application detail page.
| The Application ID is used by consuming applications to keep track of where it left off consuming messages from a topic. Consumers sharing the same ID share the events on a topic. So one event can be only read by one consumer with the same Application ID (read more about consumer groups). |
Configuring Application Security/Authentication
There are 2 methods of to authenticating an application to use a topic.
-
SASL
-
SSL
SASL
Application Credential
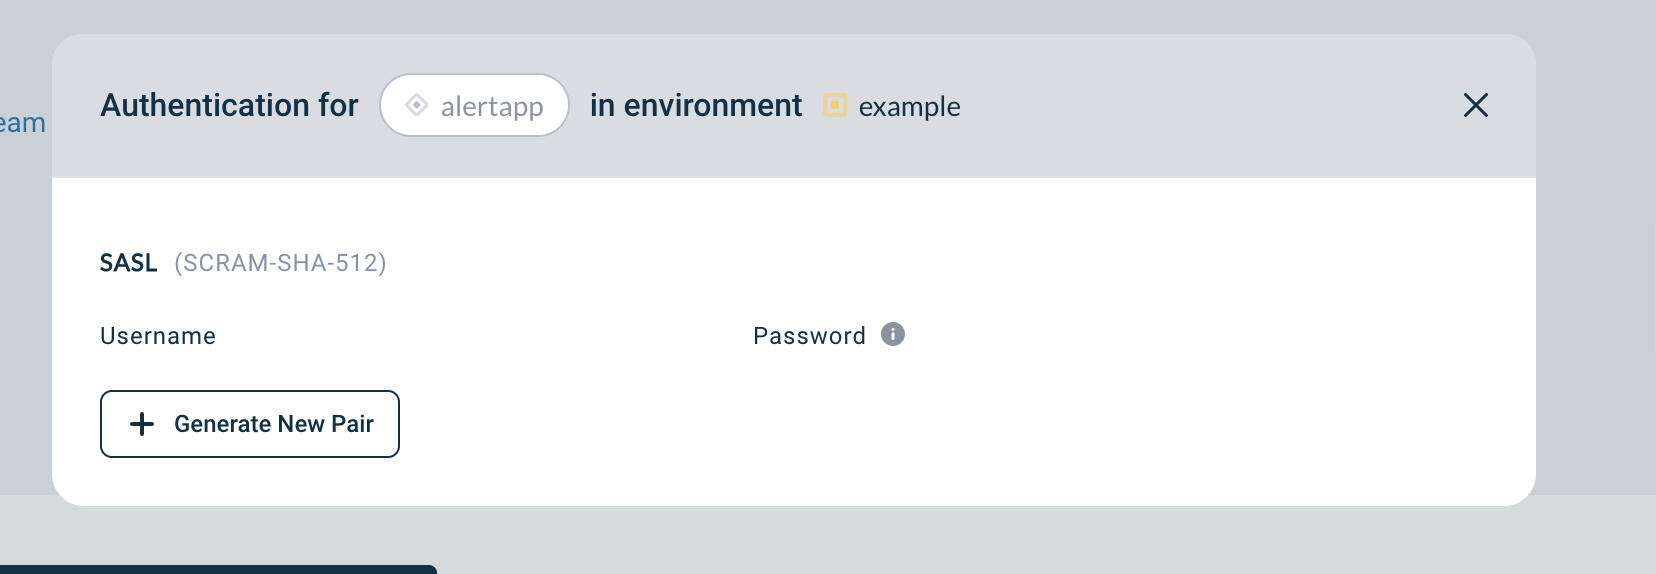
To generate a SASL credential for the selected environment:
-
Visit the detail page of the application.
-
Select the environment for which you want to generate the credentials.
-
Click on the lock button in the application box (hovering over it will show 'Authentication').

-
You will see a modal including the section below:
-
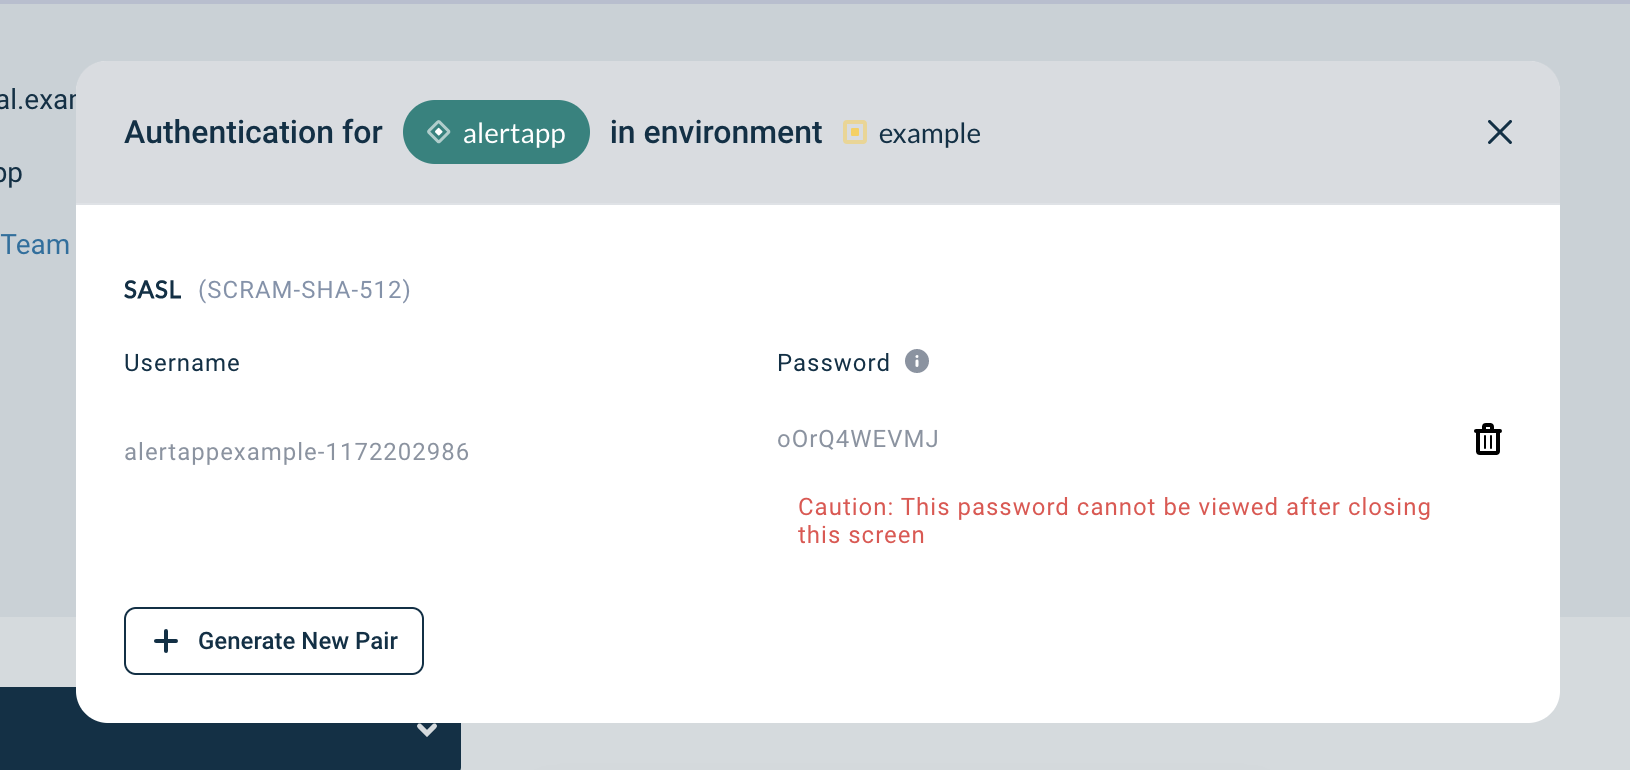
Click +Generate new Pair
-
A new Username Password Pair is shown
-
Copy the Username and Password and add them to your application
| Copy the password and store it in a safe place as soon as it displayed. It shall only be displayed right after generation. Any subsequent views of the Credentials will only show the Username. |
| You can generate as many credentials as you need |
Application Custom Principal
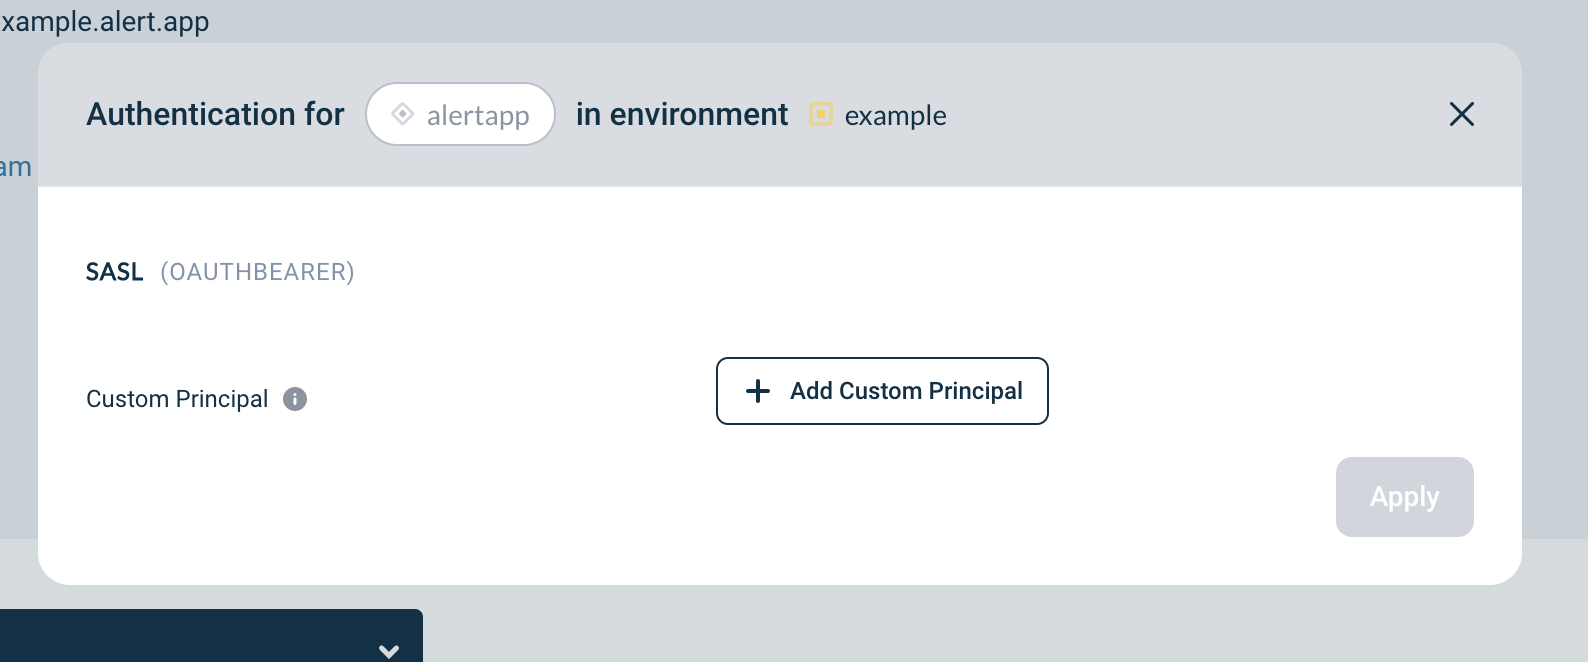
To use a SASL clientID on the selected environment:
-
Visit the detail page of the application.
-
Select the environment for which you want to use a clientID.
-
Click on the Padlock button in the application box (hovering over it will show 'Authentication').
-
You will see a modal including the section below:
-
Provide your ClientID registered in the IAM Provider
-
Click Apply
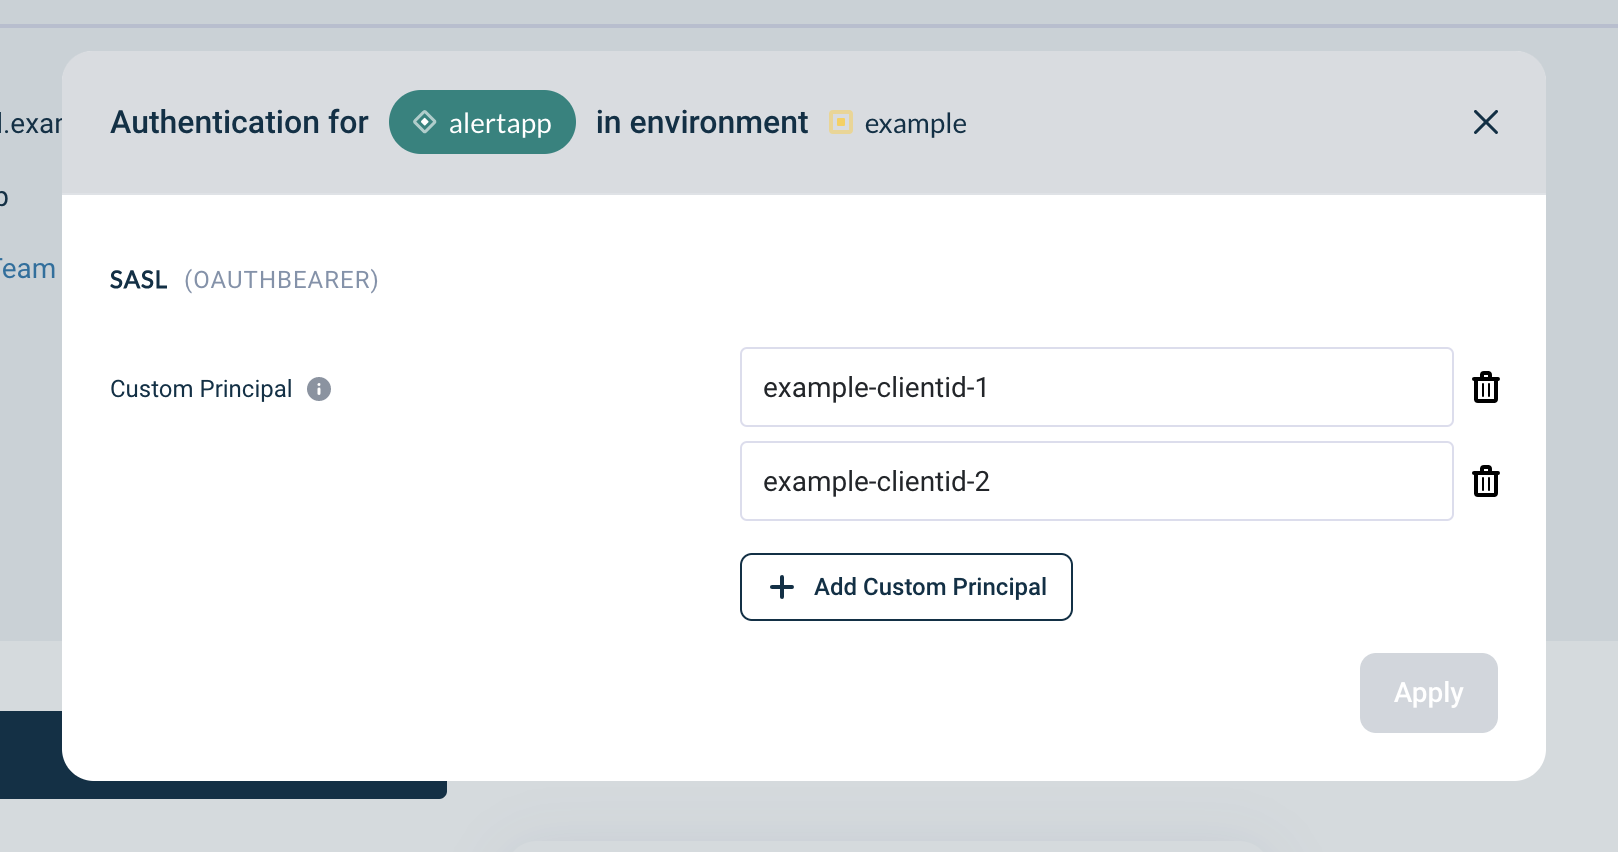
-
Use the
custom principalin your application
| You can add as many custom principals as you need |
SSL (Application Principals)
The application principal is used to authorize the application to use a topic (either producing or consuming) in an environment. The application principal consists of the Distinguished Name (DN) of the certificate used by the application, combined with the full chain of authority (ie. This starts with your application certificate, followed by the certificate of the entity that signed your certificate request, followed by the certificate of the entity that signed the previous one etc. This goes until it reaches the entity that is proclaimed as principal of the Instance you will run your application in).
| The chain of signing authorities are used to allow the applications to access the brokers while the Distinguished Name (DN) name is used to verify the application’s access rights (ACL) to a particular topic. Both of these elements are required to make a successful connection to an Axual topic. |
| For every distinct environment, an application principal needs to be defined. A principal could be re-used, but we strongly advice to have a unique one per environment. Without a principal, an application cannot have consume/produce-access to a topic. |
To configure the application principal on the selected environment:
-
Visit the detail page of the application.
-
Select the environment for which you want to configure the principal.
-
Click on the Padlock button in the application box (hovering over it will show 'Authentication'). You will see a modal as below:
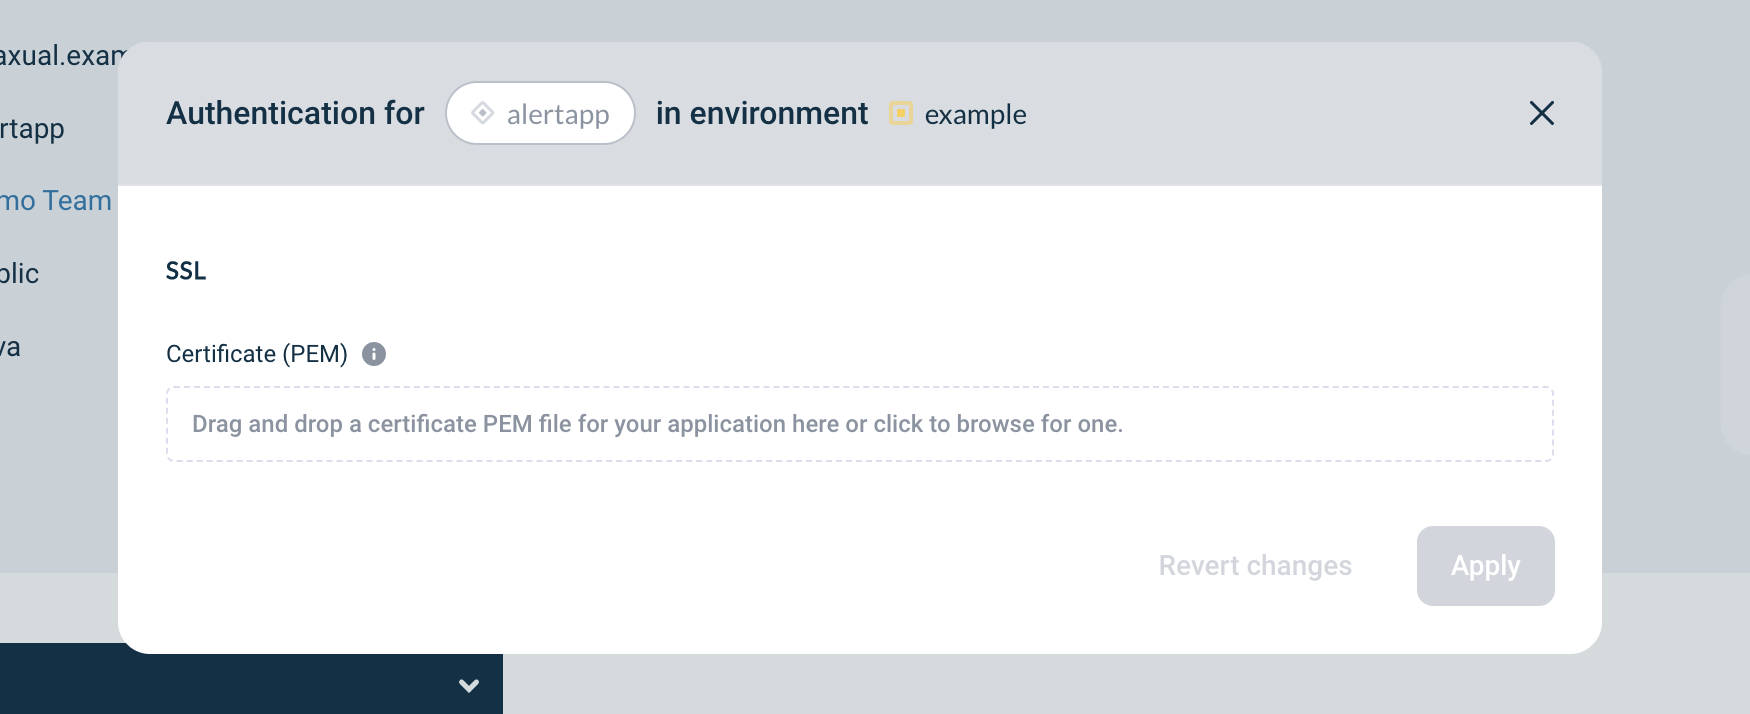
-
Upload the PEM file of your application certificate, see Generating A Certificate PEM File
-
If the upload is successful, it’ll show the certificate chain starting from the subject to the different levels of signing authorities. Confirm that the uploaded certificate matches the certificate that you will use for your application in the corresponding environment.
-
Click on Apply.
The application box name will turn green indicating that the application is configured properly on that environment. Above steps can be repeated for different environments where application is required to access the topic.
| If you are replacing an application certificate, you can register 2 principals at the same time, and choose to delete the old one once the application is not using it anymore. |
Generating A Certificate PEM File
To reduce human error and to validate the uploaded certificates, we have opted to let the user upload a .pem file for his/her certificate-chain.
Most of the time, you are using a .jks file for your application already, so you can use the following instructions to extract a .pem from a .jks file, ready to be used in Self Service.
| The following is taking into account that you are using a bash terminal and not ZSH or another custom terminal to run the following commands. |
-
Export the
.jkskeystore into the PKCS12 format using Keytool, which generally comes with every JRE installment.
Be sure to replace yourAlias with the alias of your application certificate, sourceKeyStore with the path of your .jks file, and password with your own password.
keytool -importkeystore \
  -alias yourAlias \
  -srckeystore sourceKeyStore.jks \
  -srcstoretype jks \
  -srcstorepass password \
  -destkeystore destFile.p12 \
  -deststoretype PKCS12 \
-deststorepass password-
Retrieve the application certificate to the target
.pemfile, using theopensslcommand
openssl pkcs12 \
  -in destFile.p12 \
  -nokeys \
  -passin pass:password \
  -passout pass:password \
  | grep -v -e '^\s' | grep -v '^\(Bag\|subject\|issuer\)' > destKeyStore.pem
This results in a .pem file which can be uploaded as an application principal.
Requesting Topic Access
Before your application can produce to, or consume from, a topic, a Topic Access Request has to be done. If you are making a request for an environment for testing purposes (private), an approval will not be necessary. For all other (public) environments, approval is necessary. The request is then received by the data owner of the topic.
Requesting access to a topic is easy. Follow the steps below:
| Before you request topic access, make sure you have configured the Application Principal or the Application Credentials for the specific environment in which you request access (see above) |
-
Visit the detail page of your application.
-
Scroll to the bottom of the page where + Add request button is visible.
-
Click on the button to open the Request approval modal:
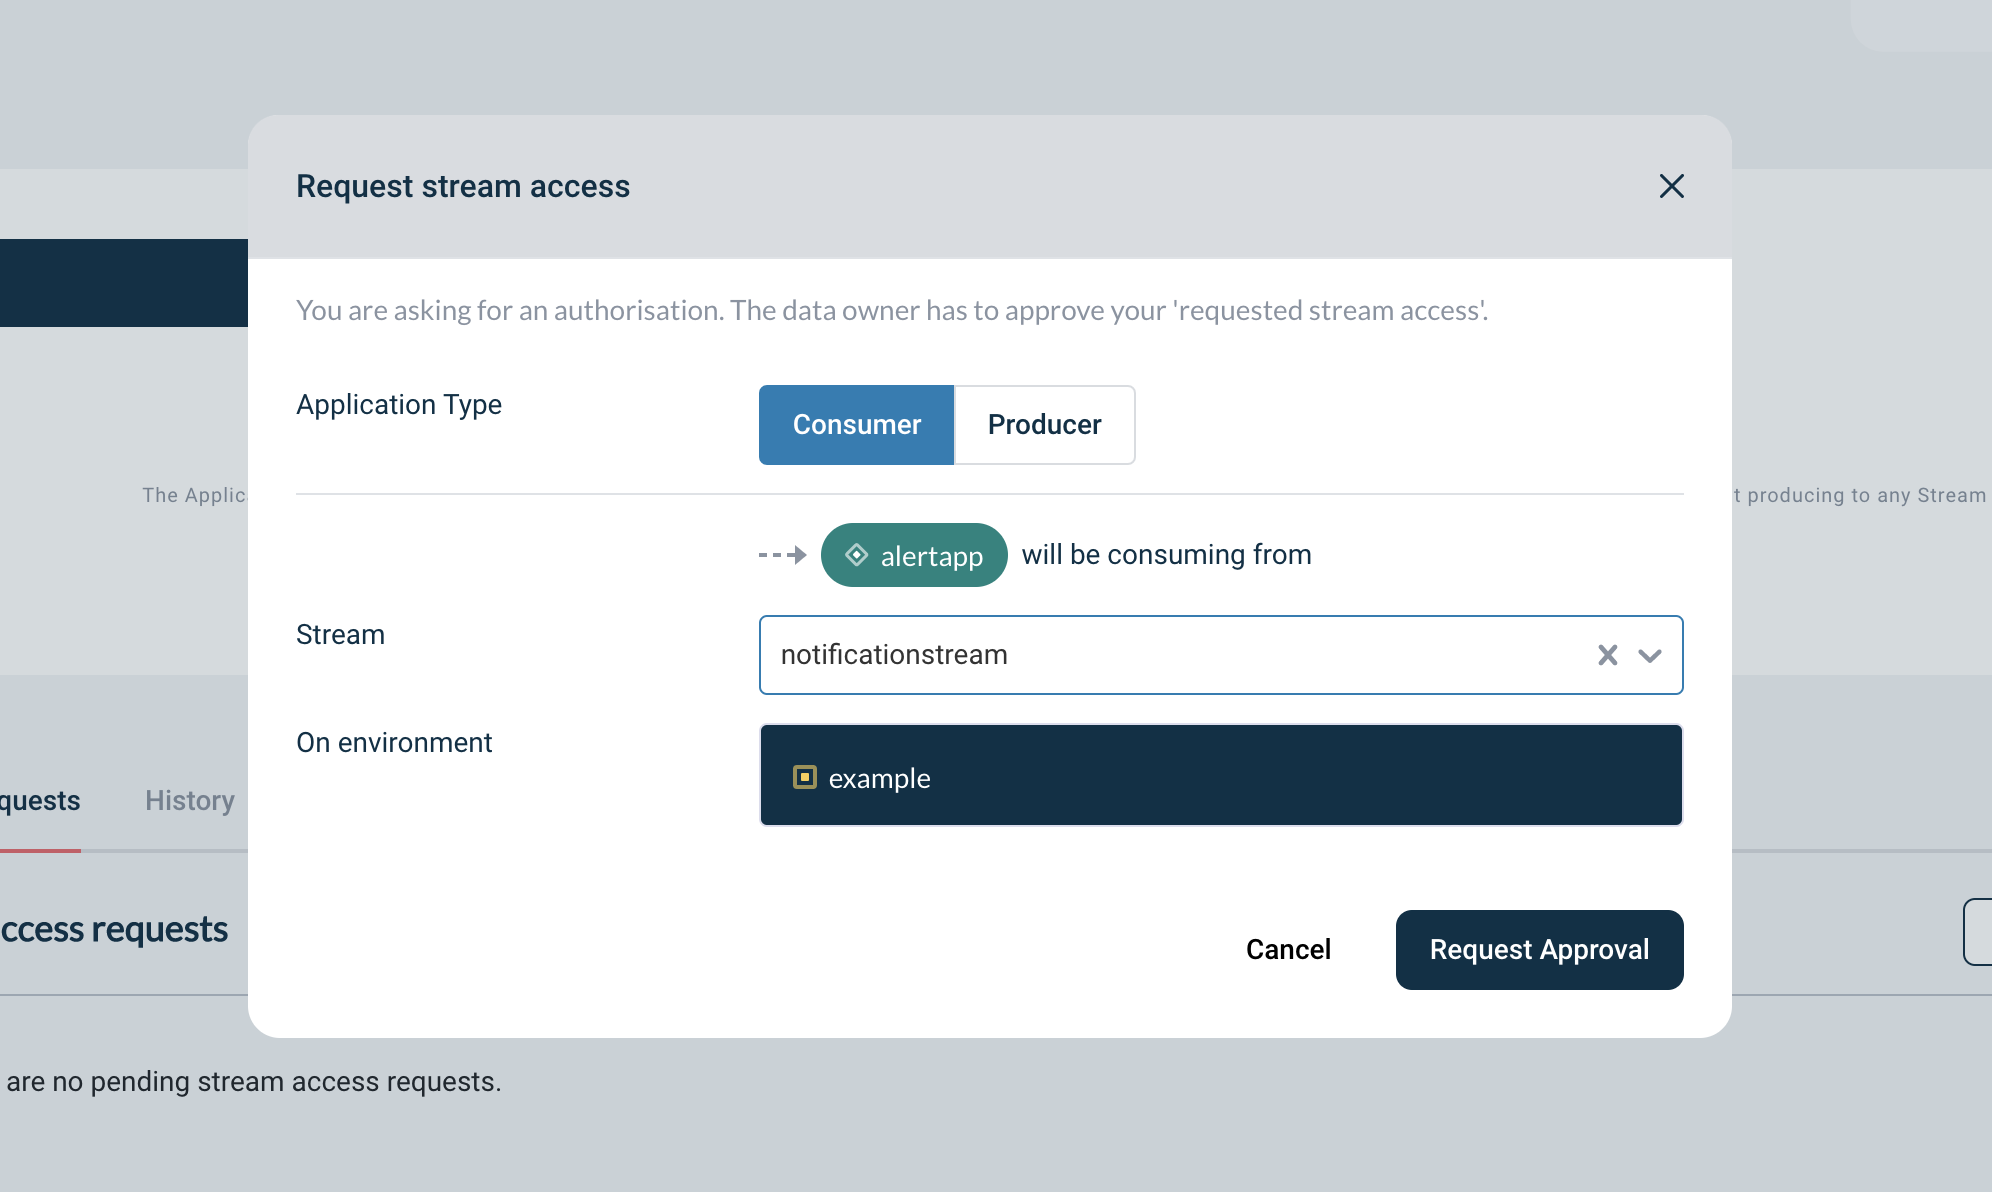
-
Select the Application type by clicking on Consumer or Producer button.
-
Select the Topic from the Topic dropdown. If there are already pending and/or approved requests for this topic a list of them will appear after selection.
-
Submit the request by clicking the Request approval button.
The data owner will receive your request and has to approve your ‘Topic Access Request’.
Deleting An Application
You can use Self Service Portal to delete your application. This can be done if there are no active producer/consumer topic connections in all environments.
-
Visit the Application Detail page
-
Click Edit Application.
-
There is a Delete button on the bottom left of the page. Clicking on that button, if all constraints are met and deletion is possible, a confirmation modal opens, as below:
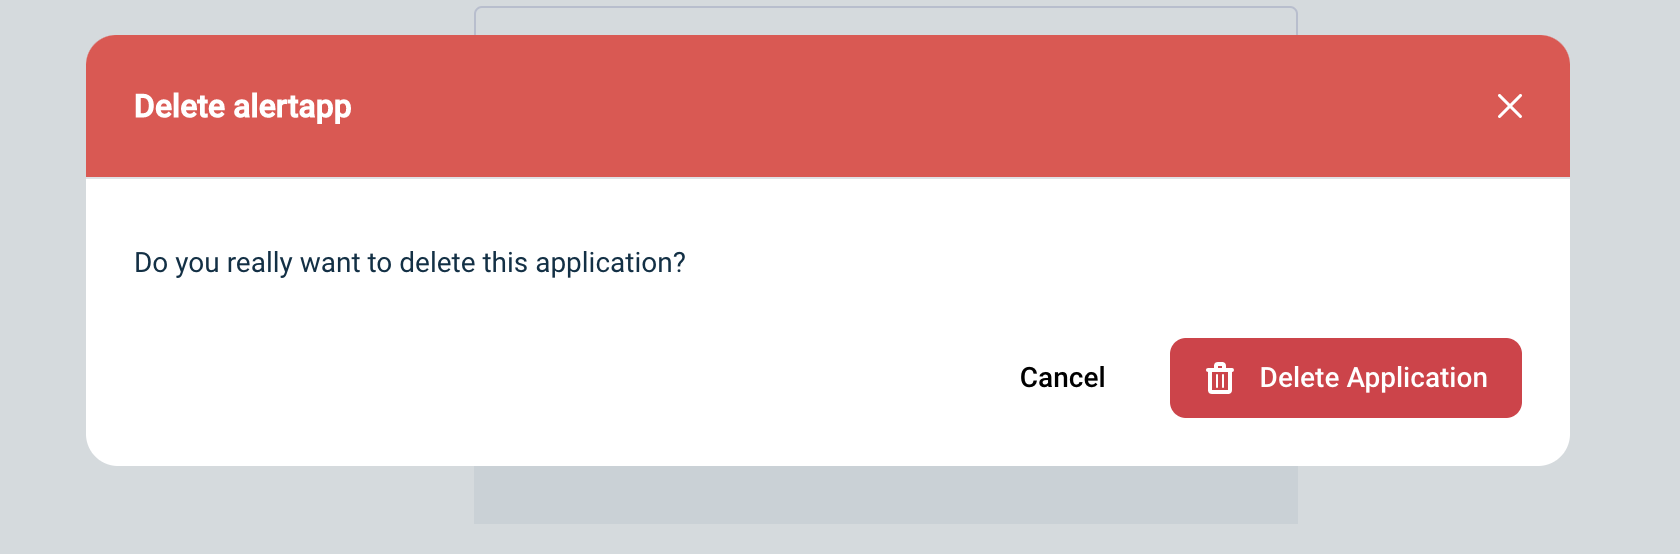
-
Clicking on Delete Application will delete the application. Otherwise, an alert is shown with information that the application is actively mapped to topics, as below:

Application visibility
By setting the application visibility, you control whether applications will end up in the Applications page for everyone, or is just visible to the owner.
-
Public: choose this option if you are working on a normal application that will be eventually deployed in production, and is not confidential in any way
-
Private: choose for private if this is a test application that will never be deployed in production or an application that should not end up in the Applications page.