Performing the upgrade
Typical upgrade steps
A lot of the upgrade steps can be performed without impact on your users. Basically, the deployment or upgrade of components is split in two actions:
-
Configuration changes, such as added or changed configuration parameters, including the new component’s version
-
Deployment of the upgraded component, by (re)starting
The configuration changes can be done in advance most of the time, limiting downtime for your end users.
In the following upgrade steps, platform-config refers to the location where your platform configuration is stored for that particular environment.
|
Verifying every step of the way
When performing the upgrade, we strongly advise to verify whether things are working every step of the way. It is pointless to continue the upgrade if halfway 1 of the services fail to start. In general, we can give you the following tips that apply to every service when performing (re)starts after an upgrade:
-
Check whether the new docker image version has been pulled successfully
-
Check whether the container actually starts and is at least up for > 30 seconds, and not in "Restarting" mode
| There are also verification steps that depend on the service which is being upgraded. Those steps can be found in the upgrade docs itself. |
Step 1 - Update Keycloak Configuration
In order to enable PKCE flow, you need to change some configurations from the Keycloak Admin console.
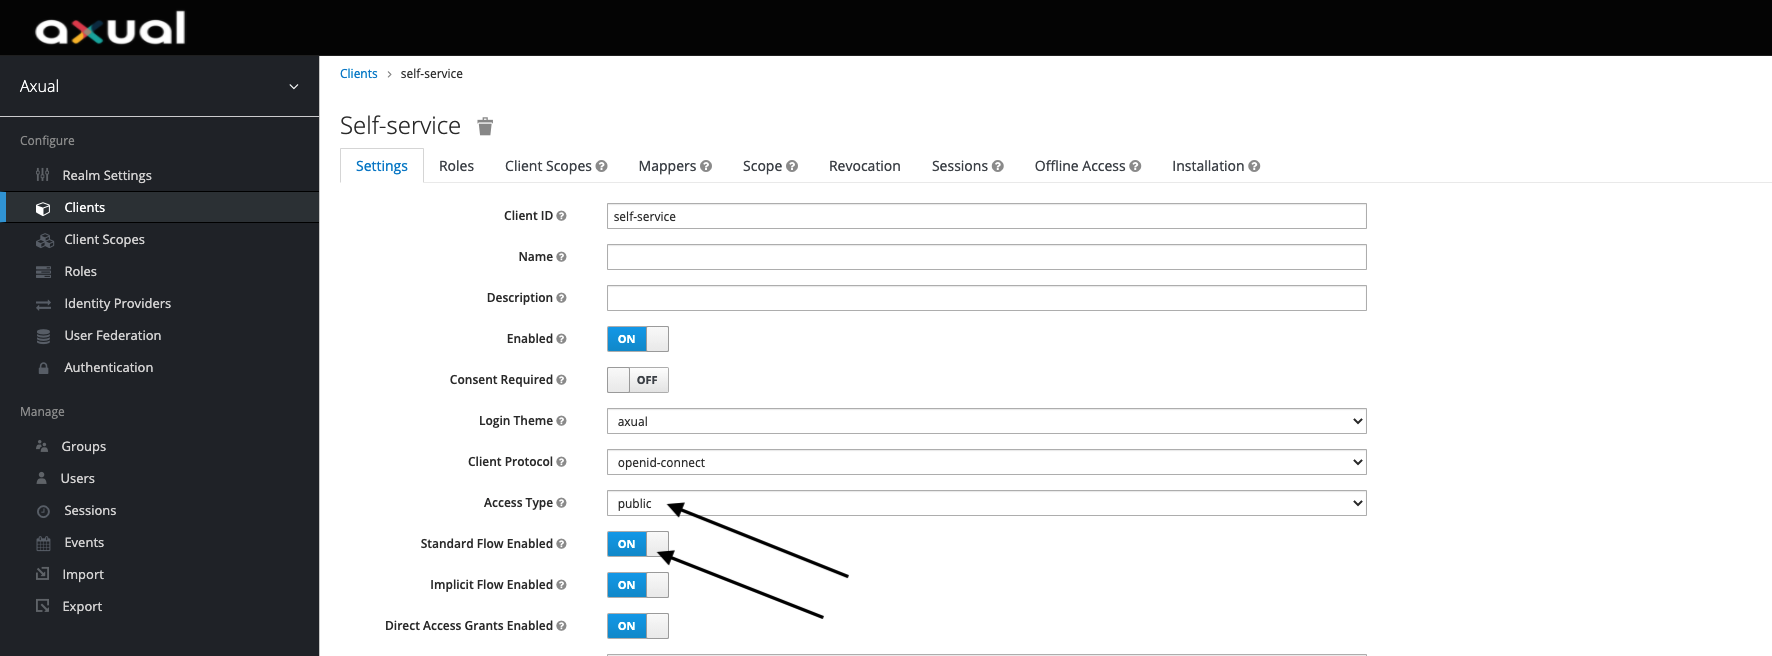
Step 1a - Configure the Client
Access the Keycloak Admin Console.
Select Clients > Self-service.
The Self-Service application needs to be Public and the Standard Flow needs to be enabled.
Step 1b - Set Proof Key for Code Exchange Code Challenge Method
Scroll further down the settings page and expand the Advanced Settings section. For the Proof Key for Code Exchange Code Challenge Method option, select S256

If you need to tweak Keycloak configuration further, go to Keycloak Configuration
Step 2 - Update Management API to 6.3.0
Make sure the default version in the configuration is not overwritten. If it is, please remove or comment the setting as shown below.
platform-config/clusters/{cluster-name}/mgmt-api.sh
# Docker image version, only override if you explicitly want to use a different version
#MGMT_API_VERSION='[OLDER VERSION]'
Restart the service:
axual.sh restart mgmt mgmt-api| Be sure to complete this step update before running Management UI > 5.12.0 |
Step 3 - Update Management UI to 5.13.0
Make sure the default version in the configuration is not overwritten. If it is, please remove or comment the setting as shown below.
platform-config/clusters/{cluster-name}/mgmt-ui.sh
# Docker image version, only override if you explicitly want to use a different version
#MGMT_UI_VERSION='[OLDER VERSION]'
#MGMT_UI_RESPONSE_TYPES='[OLDER VALUE]'
#MGMT_UI_SMALLCHAT_SHA='[OLDER VALUE]'
Restart the service:
axual.sh restart mgmt mgmt-ui| After logging in to the updated Self Service UI, disable the Implicit Flow in Keycloak. |

Step 4 - Upgrade Cluster API to 1.7.3
| While the cluster API is not available, topic apply is not possible. |
Make sure the default version in the configuration is not overwritten. If it is, please remove or comment the setting as shown below.
platform-config/clusters/{cluster-name}/cluster-api.sh
# Docker image version, only override if you explicitly want to use a different version
# CLUSTERAPI_VERSION='[OLDER VERSION]'
Restart the service:
axual.sh restart cluster cluster-apiStep 5 - Upgrade Cluster Browse to 1.1.2
Make sure the default version in the configuration is not overwritten. If it is, please remove or comment the setting as shown below.
platform-config/clusters/{cluster-name}/cluster-browse.sh
# Docker image version, only override if you explicitly want to use a different version
#CLUSTER_BROWSE_VERSION='[OLDER VERSION]'
Restart the service:
axual.sh restart cluster cluster-browseStep 6 - Upgrade Distributor to 4.1.3
The Distributor is running on Kafka Connect which is a distributed system. Therefore, it is safe to restart distributor nodes one by one in a rolling fashion.
Make sure the default version in the configuration is not overwritten. If it is, please remove or comment the setting as shown below.
platform-config/clusters/{cluster-name}/distributor.sh
# Docker image version, only override if you explicitly want to use a different version
# DISTRIBUTOR_VERSION=[OLDER_VERSION]
For each of the nodes running distributor perform the following steps:
Step 6a - Restart Distributor
axual.sh restart cluster distributorThe following output is expected:
Axual Platform 2021.1
Configuring cluster services for node [NODE-NAME] in cluster [CLUSTER-NAME]
Done, cluster-api is available
Preparing distributor security: Done
Preparing distributor topics: Deploying topic _distributor-config: Done
Deploying topic _distributor-offset: Done
Deploying topic _distributor-status: Done
Done
Starting distributor: Done
Step 6b - Check the connector status
-
Check Grafana and verify all connectors have
RUNNINGstatus (on the Distributor Overview dashboard) -
Check the distribution of tasks over distributor nodes, visit: http://<cluster-name>-<machine-name>:8083/connectors/<connector-name>/status
The response should be a JSON payload looking like the following
{
   "name": "[Connector NAME]",
   "connector": {
      "state": "RUNNING",
      "worker_id": "[NODE_X]:8083"
   },
   "tasks": [
   {
      "id": 0,
      "state": "RUNNING",
      "worker_id": "[NODE_X]:8083"
   },
   {
      "id": 1,
      "state": "RUNNING",
      "worker_id": "[NODE_Y]:8083"
   }
   ],
   "type": "sink"
}| Task balancing is done internally in connect, if tasks are not distributed over all nodes for a given connector, try to another connector. |
Step 7 - Upgrade Schema Registry to 5.1.0
Make sure the default version in the configuration is not overwritten. If it is, please remove or comment the setting as shown below.
platform-config/tenants/{tenant-name}/instances/{instance-name}/schema-registry.sh
# Docker image version, only override if you explicitly want to use a different version
# SCHEMAREGISTRY_VERSION=[OLDER_VERSION]
Step 7a - Restart Schema Registry Slaves
-
Restart the service
axual.sh restart <instance-name> sr-slaveThe following output is expected:
Axual Platform 2021.2 Stopping instance services for [Instance Name] in cluster [Cluster Name] Stopping [Instance Name]-sr-slave: Stopped Done, cluster-api is available Deploying topic _[Instance Name]-schemas: Done Deploying topic _[Instance Name]-consumer-timestamps: Done Done, cluster-api is available Done, cluster-api is available Applying ACLs : {...} Done ... Applying ACLs : {...} Done Configuring instance services for [Instance Name] in cluster [Cluster Name] Preparing [Instance Name]-sr-slave: Done Starting [Instance Name]-sr-slave: Done -
Check the docker logs and make sure there is no error and service is up:
docker logs -f <instance-name>-sr-slave
Step 7b - Restart Schema Registry Masters
-
Restart the service
Run the following command for each instance where schema-registry master is running:
axual.sh restart <instance-name> sr-masterThe following output is expected:
Axual Platform 2021.2 Stopping instance services for [Instance Name] in cluster [Cluster Name] Stopping instance services for [Instance Name] in cluster [Cluster Name] Stopping [Instance Name]-sr-master: Stopped Done, cluster-api is available Deploying topic _[Instance Name]-schemas: Done Deploying topic _[Instance Name]-consumer-timestamps: Done Done, cluster-api is available Done, cluster-api is available Applying ACLs :... Done ... Applying ACLs :... Done Configuring instance services for [Instance Name] in cluster [Cluster Name] Preparing [Instance Name]-sr-master: Done Starting [Instance Name]-sr-master: Done -
Check the docker logs and make sure there is no error and service is up:
docker logs -f <instance-name>-sr-master
Step 8 - Upgrade Rest Proxy to 1.3.0
Make sure the default version in the configuration is not overwritten. If it is, please remove or comment the setting as shown below.
platform-config/tenants/{tenant-name}/instances/{instance-name}/rest-proxy.sh
# Docker image version, only override if you explicitly want to use a different version
# RESTPROXY_VERSION=[OLDER_VERSION]-
(Optional) You can now configure Consumer and Producer Properties per the Rest Proxy documentation if desired.
-
Restart the service
Run the following command for each instance where Rest Proxy is running:
axual.sh restart <instance-name> rest-proxyThe following output is expected:
Axual Platform 2021.2 Stopping instance services for [Instance Name] in cluster [Cluster Name] Stopping instance services for [Instance Name] in cluster [Cluster Name] Stopping [Instance Name]-sr-master: Stopped Done, cluster-api is available Deploying topic _[Instance Name]-schemas: Done Deploying topic _[Instance Name]-consumer-timestamps: Done Done, cluster-api is available Done, cluster-api is available Applying ACLs :... Done ... Applying ACLs :... Done Configuring instance services for [Instance Name] in cluster [Cluster Name] Preparing [Instance Name]-rest-proxy: Done Starting [Instance Name]-rest-proxy: Done -
Check the docker logs and make sure there is no error and service is up:
docker logs -f <instance-name>-rest-proxy
Step 9 - Start Platform Metric Provider
In this step we are going to set up Platform Metric Provider. The installation depends on the deployment topology, e.g. whether you are deploying a single cluster or multiple clusters.
Step 9a - Configuring Platform Metric Provider
-
For each Management Cluster, add a new
platform-metric-provider.shfile underplatform-config/clusters/{cluster-name}/platform-config/clusters/{cluster-name}/platform-metric-provider.sh# Docker image version, only override if you explicitly want to use a different version # METRIC_PROVIDER_VERSION= # How often in ms to produce an event. In this case we define 1 tps METRIC_PROVIDER_PRODUCE_INTERVAL_STR="1000" # Ports # The port at which the Distribution Monitor actuator metrics are available on the host machine. METRIC_PROVIDER_PROMETHEUS_PORT=32000 # Distribution Monitor client SSL configuration # The keystore is located at security/platform-metric-provider.client.keystore.jks METRIC_PROVIDER_KEY_PASSWORD="" METRIC_PROVIDER_KEY_STORE_PASSWORD="" # Producer and consumer properties can be overridden by providing METRIC_PROVIDER_CONSUMER_OVERRIDE_ and METRIC_PROVIDER_PRODUCER_OVERRIDE_ prefixed properties, the rest remains as in producer or consumer configs, examples follow: #METRIC_PROVIDER_CONSUMER_OVERRIDE_CONNECTIONS_MAX_IDLE_MS=180000 #METRIC_PROVIDER_PRODUCER_OVERRIDE_CONNECTIONS_MAX_IDLE_MS=180000 # This value MUST be "notsecret" as all the truststores are generated and the password is hardcoded. METRIC_PROVIDER_TRUSTSTORE_PASSWORD="notsecret" # The Distinguished Name of the certificate that is used by producers and consumers used by the Distributor internally. # This certificate is located in a keystore inside security directory (which is next to the local-config directory) # security/platform-metric-provider.client.keystore.jks # This is not the same certificate that is used by distribution jobs. METRIC_PROVIDER_PRINCIPAL="CN=platform-metric-provider-clusterA,OU=Axual B.V.,O=Axual B.V.,L=Utrecht,ST=Utrecht,C=NL" METRIC_PROVIDER_PRINCIPAL_CHAIN="[0] CN=Axual Root CA 2018, [1] CN=Axual Intermediate CA 2018 1, [2] CN=platform-metric-provider-clusterB,OU=Axual B.V.,O=Axual B.V.,L=Utrecht,ST=Utrecht,C=NL" -
For each Node in the Management Cluster append platform-metric-provider. The file located in
platform-config/clusters/{cluster-name}/usually called nodes.sh.If you have more than one Cluster you will need to repeat the following for each
nodes.shfile. For example, for two Clusters underplatform-config/clusters/{cluster-a}/nodes.shandplatform-config/clusters/{cluster-b}/nodes.shyou will need to add theplatform-metric-providerservice like this:NODE11_CLUSTER_SERVICES=prod-mgmt-1:...,platform-metric-provider
Step 9b - Restarting instance distributions
Every instance that will be monitored by Platform Metric Provider needs to be restarted.
By doing that we will have a new _<tenant>-<instance>-metric-provider topic and also enable distribution for that topic.
Run the following command for each instance where distribution is running:
axual.sh restart instance <instance-name> distribution