Snowflake Sink Connector
Type |
sink |
Class |
|
Target System |
Snowflake |
Maintainer |
Snowflake |
License |
Apache License 2.0 |
Project |
|
Download |
|
This page documents version 3.5.3. Newer versions should be compatible unless there are breaking changes, but field names or default values may differ. If you notice discrepancies, please contact Axual Support. |
Description
The Snowflake Sink Connector consumes records from Kafka topics and writes them into Snowflake tables.
It is maintained by Snowflake as part of the open-source github.com/snowflakedb/snowflake-kafka-connector.
Features
-
Write Kafka records into Snowflake tables
-
Public-key pair authentication (no username/password)
-
Configurable topic-to-table mapping
-
Works with string-valued Kafka records
When to Use
-
You need to load Kafka topic data into Snowflake for analytics or data warehousing.
-
You want to build a data pipeline from Kafka into Snowflake.
When NOT to Use
-
Your Kafka records are not in a format Snowflake can ingest without conversion.
-
You do not have a Snowflake warehouse and schema configured.
Installation
The connector is available from the Maven Central.
-
Navigate to the releases page and select the version matching your Kafka Connect installation.
-
Download the JAR file.
For installation steps, see Installing Connector Plugins.
Configuration
For the complete configuration reference, see the official sink connector documentation.
| To configure a connector in Axual Self-Service, see Starting Connectors. TIP: To speed up your deployment, use the Terraform Boilerplate or the Management API Boilerplate. |
Getting Started
Prerequisites
RSA key pair
You will authenticate against Snowflake using public-key encryption. For additional information, check Snowflake Key-Pair authentication.
openssl genrsa 2048 | openssl pkcs8 -topk8 -inform PEM -out MY_SNOWFLAKE.key -nocrypt
openssl rsa -in MY_SNOWFLAKE.key -pubout -out MY_SNOWFLAKE.cert
Remove headers and concatenate the key contents onto a single line:
cat MY_SNOWFLAKE.key  | sed '1d' | sed '$d' | tr -d '\n' > MY_SNOWFLAKE_COMPACT.key
cat MY_SNOWFLAKE.cert | sed '1d' | sed '$d' | tr -d '\n' > MY_SNOWFLAKE_COMPACT.cert-
The contents of
MY_SNOWFLAKE_COMPACT.keyare used for thesnowflake.private.keyconfig. -
The contents of
MY_SNOWFLAKE_COMPACT.certare used when registering the public key in Snowflake.
Snowflake account
-
Sign up with Snowflake. Select a standard account and any cloud provider.
After activation, you will receive an email containing your Account URL. Note this down forsnowflake.url.name.If the URL from the email does not work, you can retrieve it by running the following query in a Snowflake worksheet:
SELECT t.value:host::varchar AS ACCOUNT_LOCATOR FROM TABLE (flatten(input => parse_json(system$whitelist()))) AS t WHERE t.value:type = 'SNOWFLAKE_DEPLOYMENT'; -
Login and open the Worksheets section. Create a new worksheet and paste the following statements:
USE ROLE ACCOUNTADMIN; CREATE WAREHOUSE SF_WAREHOUSE WITH WAREHOUSE_SIZE = 'XSMALL' WAREHOUSE_TYPE = 'STANDARD' AUTO_SUSPEND = 300 AUTO_RESUME = TRUE ; CREATE DATABASE SF_DATABASE; CREATE SCHEMA SF_DATABASE.SF_SCHEMA; CREATE TABLE SF_TABLE ( RECORD_METADATA VARIANT, RECORD_CONTENT VARIANT ); CREATE ROLE SF_ROLE; GRANT USAGE ON WAREHOUSE SF_WAREHOUSE TO ROLE SF_ROLE; GRANT USAGE ON DATABASE SF_DATABASE TO ROLE SF_ROLE; GRANT USAGE ON SCHEMA SF_DATABASE.SF_SCHEMA TO ROLE SF_ROLE; GRANT CREATE STAGE ON SCHEMA SF_DATABASE.SF_SCHEMA TO ROLE SF_ROLE; GRANT CREATE PIPE ON SCHEMA SF_DATABASE.SF_SCHEMA TO ROLE SF_ROLE; GRANT OWNERSHIP ON TABLE SF_DATABASE.SF_SCHEMA.SF_TABLE TO ROLE SF_ROLE; -
Append the following (replace
YOUR_USERNAMEand the public key):GRANT ROLE SF_ROLE TO USER YOUR_USERNAME; ALTER USER YOUR_USERNAME SET DEFAULT_ROLE = SF_ROLE; ALTER USER YOUR_USERNAME SET RSA_PUBLIC_KEY='MIIBIj...IDAQAB';Select all (Ctrl+A) and click Play to execute.
Axual stream
The Kafka stream this connector will consume must already exist and contain records in Axual Self-Service. See Creating streams if you need to create it.
Steps
Step 1 — Create a connector application
-
Follow the Creating streams documentation in order to create one stream and deploy it onto an environment.
The name of the stream will bemy_snowflake_stream.
The key/value types will beString/String. -
Follow the Configure and install a connector documentation to set up a new Connector-Application.
Let’s call itmy_snowflake_sink.
The plugin name iscom.snowflake.kafka.connector.SnowflakeSinkConnector.
If a plugin isn’t available, ask a platform operator to install plugins. -
Produce some
String/Stringevents to themy_snowflake_streamstream.
Step 2 — Configure the connector
-
Provide the following minimal configuration:
behavior.on.null.valuesMake sure this field is empty (no value).
If it contains the worddefault, delete it.topicsmy_snowflake_streamkey.converterorg.apache.kafka.connect.storage.StringConvertervalue.converterorg.apache.kafka.connect.storage.StringConvertersnowflake.database.nameSF_DATABASEsnowflake.schema.nameSF_SCHEMAsnowflake.role.nameSF_ROLEsnowflake.topic2table.mapmy_snowflake_stream:SF_TABLEsnowflake.user.nameYour Snowflake account username (not email).
snowflake.url.nameYour account URL from Snowflake email.
Example:abcdefg-hi12345.snowflakecomputing.comsnowflake.private.keyContents of
MY_SNOWFLAKE_COMPACT.key.snowflake.private.key.passphraseMake sure this field is empty (no value).
If it contains[hidden], delete it.For advanced options, see the official sink connector documentation.
-
Authorize the
my_snowflake_sinksink Connector-Application to consume themy_snowflake_streamstream.
Step 4 — Verify
-
Go to the Snowflake Homepage.
-
On the left menu: Data → Databases → expand
SF_DATABASE → SF_SCHEMA → Tables → SF_TABLE. -
Click the Data Preview tab → select the warehouse
SF_WAREHOUSE.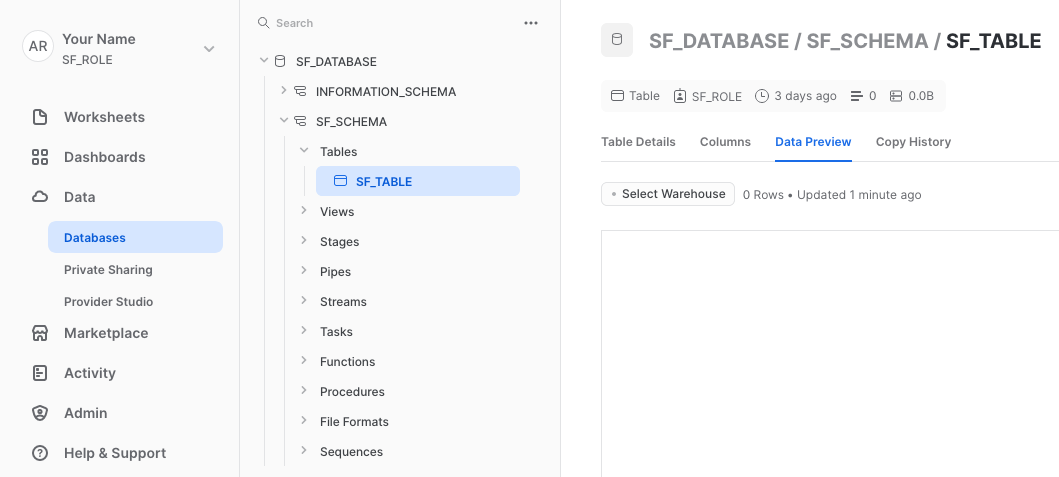
If nothing is displayed, click the Refresh icon. You might have to wait up to 2 minutes as the connector sends messages in batches.
Cleanup
When you are done:
-
Stop the connector application in Axual Self-Service.
-
Remove stream access for the application if no longer needed.
-
Run the following in a Snowflake worksheet (edit
YOUR_USERNAME):DROP DATABASE SF_DATABASE; ALTER USER YOUR_USERNAME SET DEFAULT_ROLE = ACCOUNTADMIN; DROP ROLE SF_ROLE; DROP WAREHOUSE SF_WAREHOUSE; -
Delete all worksheets.
Known limitations
-
The Snowflake connector sends records in batches — records may not appear immediately in Snowflake after being consumed from Kafka.
-
behavior.on.null.valuesandsnowflake.private.key.passphrasemust be explicitly left empty (not containing their default placeholder text).
Examples
Minimal configuration
{
  "name": "my-snowflake-sink",
  "config": {
    "connector.class": "com.snowflake.kafka.connector.SnowflakeSinkConnector",
    "topics": "my_snowflake_stream",
    "key.converter": "org.apache.kafka.connect.storage.StringConverter",
    "value.converter": "org.apache.kafka.connect.storage.StringConverter",
    "snowflake.database.name": "SF_DATABASE",
    "snowflake.schema.name": "SF_SCHEMA",
    "snowflake.role.name": "SF_ROLE",
    "snowflake.topic2table.map": "my_snowflake_stream:SF_TABLE",
    "snowflake.user.name": "svc_kafka_connect",
    "snowflake.url.name": "myorg-myaccount123.snowflakecomputing.com",
    "snowflake.private.key": "MIIEvQIBADANBgkqhkiG9w0BAQEFAASCBKcwggSjAgEAAoIBAQC7..."
  }
}
License
Snowflake sink connector is licensed under the Apache License, Version 2.0.