Deploying Axual-Connect
Introduction to Axual-Connect
If you are familiar with kafka-connect, or you have your connector that you want to run on the Axual platform, you may want to enable Axual-Connect. This service is managed through the Self-Service stack easily.
Enable Vault
Vault is needed to define policies to create, read, updates the certificates of your connectors used by the Self-Service and Axual-Connect.
-
Create a values.yaml file in your working directory.
values.yaml# Enable Vault global: mgmt: vault: enabled: true -
Issue a helm upgrade command with the values.yaml as input file to upgrade Axual Platform configuration.
helm upgrade --install platform axual-stable/platform -f values.yaml -n kafka -
Alternatively you can override a specific property with the
--setoptionhelm upgrade --install platform axual-stable/platform --set global.mgmt.vault.enabled=true -n kafka -
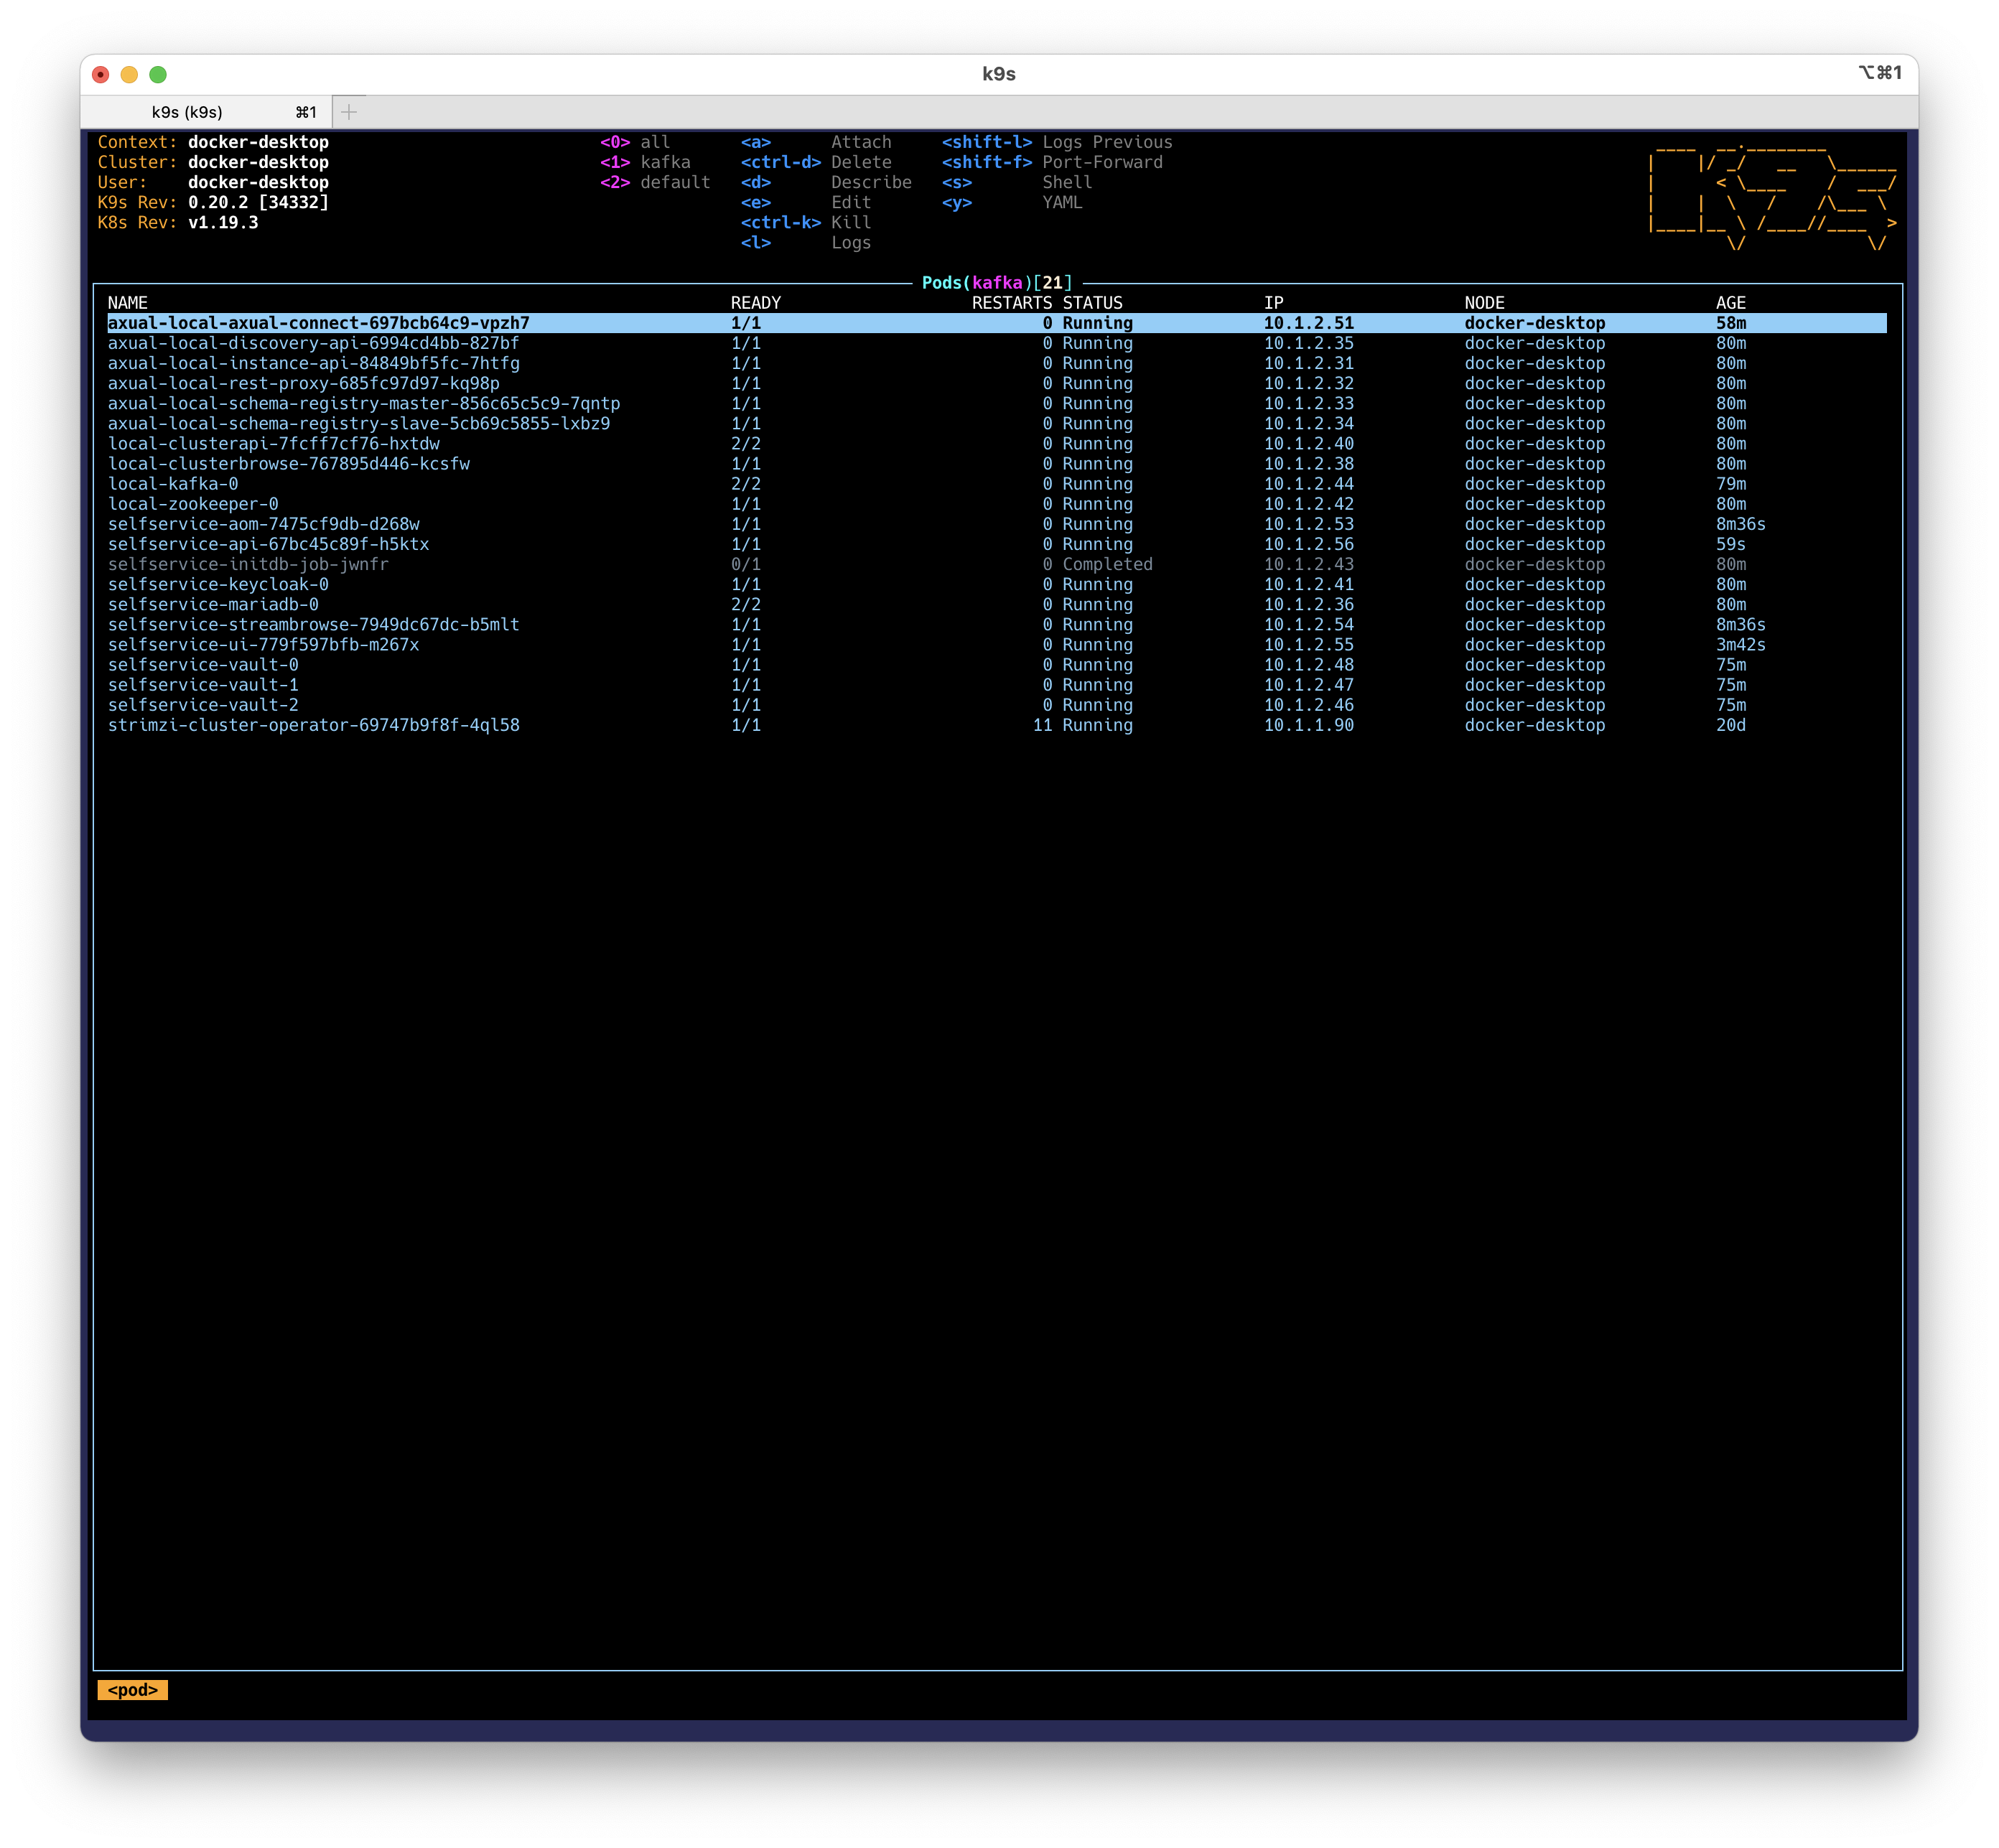
Check with k9s that 3 new pods have been started.

Initialize and Unseal the Vault cluster
To initialize Vault choose a leader node for the vault cluster. If you are unsure, just pick the first pod name. This pod name is further referred to as selfservice-vault-0. Initialize and Unseal Vault on selfservice-vault-0 by following the steps below:
-
Enter inside the vault node 1 referred as selfservice-vault-0 pod
kubectl -n kafka exec -it selfservice-vault-0 -- /bin/shAlternatively you can use
k9s → Shellto execute shell commands within a pod. -
The first time we install Vault we need to initialize it. We do this by creating key shares and a root token.
-
KS = number of keys to unseal a Vault (Local: 1 – Prod: 3)
-
KT = the minimum amount of keys to unseal a Vault (Local: 1 – Prod: 2)
In the example below, KS = 1 and KT = 1
vault operator init -key-shares=1 -key-threshold=1Keep the key-shares, and the root token values in a safe place. You need this in the future to unseal and access Vault after a restart of the cluster.
-
-
Unseal vault node selfservice-vault-0 using
[Unseal-Key]which you have received after initializing vault (step 2).vault operator unseal [Unseal-Key] -
Exit from selfservice-vault-0 pod.
exit -
Repeat step 1, 3 and 4 (skip step 2) to unseal other nodes e.g vault node-2 (selfservice-vault-1) and node-3 (selfservice-vault-2).
You’ll have to unseal all nodes each time you uninstall the platform
-
On the leader node (selfservice-vault-0). Enable key-value version 2 on connectors path by entering into the pod of vault on node-1 (selfservice-vault-0) using the following commands if not already entered.
kubectl -n kafka exec -it selfservice-vault-0 -- /bin/shAlternatively you can use
k9s → Shellto execute shell commands within a pod.vault login [rootToken]vault secrets enable -path=connectors kv-v2vault auth enable approle
|
Vault cluster has been initialized and unsealed. |
Intermezzo: using the Vault UI
The Vault operator commands were issues in a docker container, but Vault offers a convenient UI with a Browser CLI which can be used for most of the commands needed in the following steps. To access the Vault UI you have to port-forward a vault pod.
-
On the leader node (seflservice-vault-0) port-forward port 8200.
kubectl port-forward pod/selfservice-vault-0 8200:8200 -n kafkaAlternatively you can use
k9s → port-forwardto create a port forward. -
Log in to Vault, using the UI, go to https://localhost:8200/ui. You will see the following login screen.
Chrome doesn’t trust self-sign certificates, type
thisisunsafeto get the page displayed.The Vault local server certificates have SAN matching the
service-name,service-name.namespace,pod-name.internal-service-name, andlocahost. On a production environment you will have to add theload-balancer.
-
Enter the root token and click "Sign in". If the vault is not unsealed yet, you need to use the shared keys as well.
-
Open the Vault Browser CLI by clicking the CLI icon:

Creating a Management API Policy in Vault
Complete the Vault setup with the Browser CLI for the following commands:
-
Create a policy named
mgmt-api, via the menu "Policies" >> "Create ACL policy", as follows: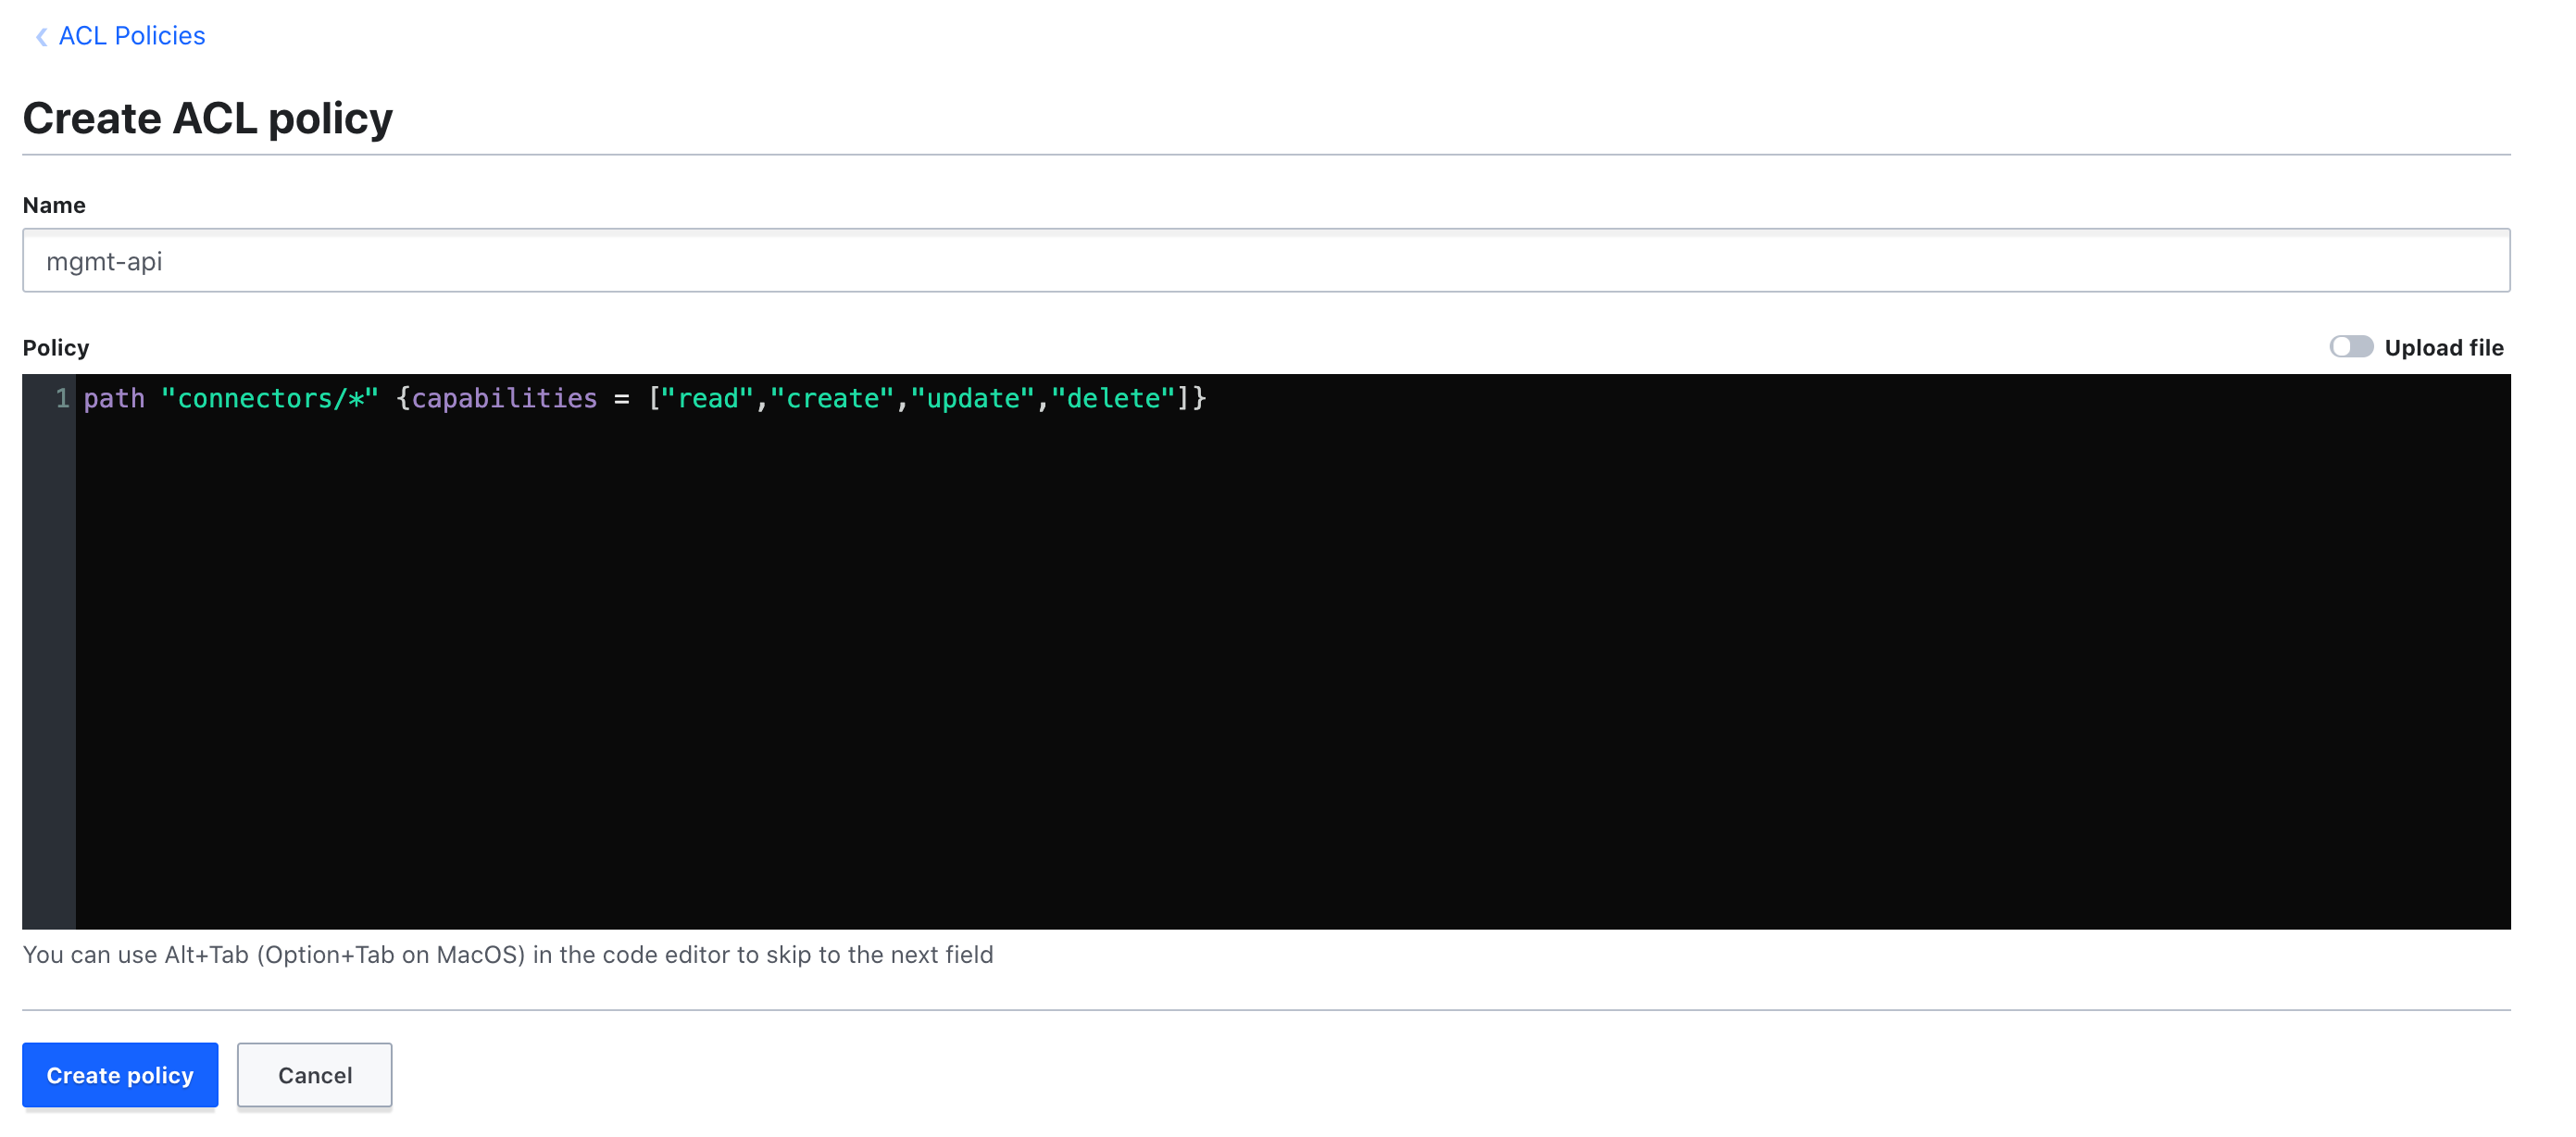
path "connectors/*" {capabilities= ["read", "create", "update","delete"]} -
Add the policy to the approle for mgmt-api:
vault write auth/approle/role/mgmt-api token_policies="mgmt-api" -
Obtain the role id for mgmt-api.
vault read auth/approle/role/mgmt-api/role-idThe
role_idwill now be shown:Key Value ––– –––-- role_id [MGMT_API_ROLE_ID] -
Create a
secret_idas well, with the following command:vault write auth/approle/role/mgmt-api/secret-id -forceThe
secret_idwill now be shown:Key Value ––– ----- secret_id [MGMT_API_SECRET_ID] secret_id_accessor [NOT_USED]
Create an Axual Connect Policy in Vault
| Repeat the steps below for every Connect instance. |
-
Create a policy named
connect-tenant-instance, via the menu "Policies" >> "Create ACL policy", as follows: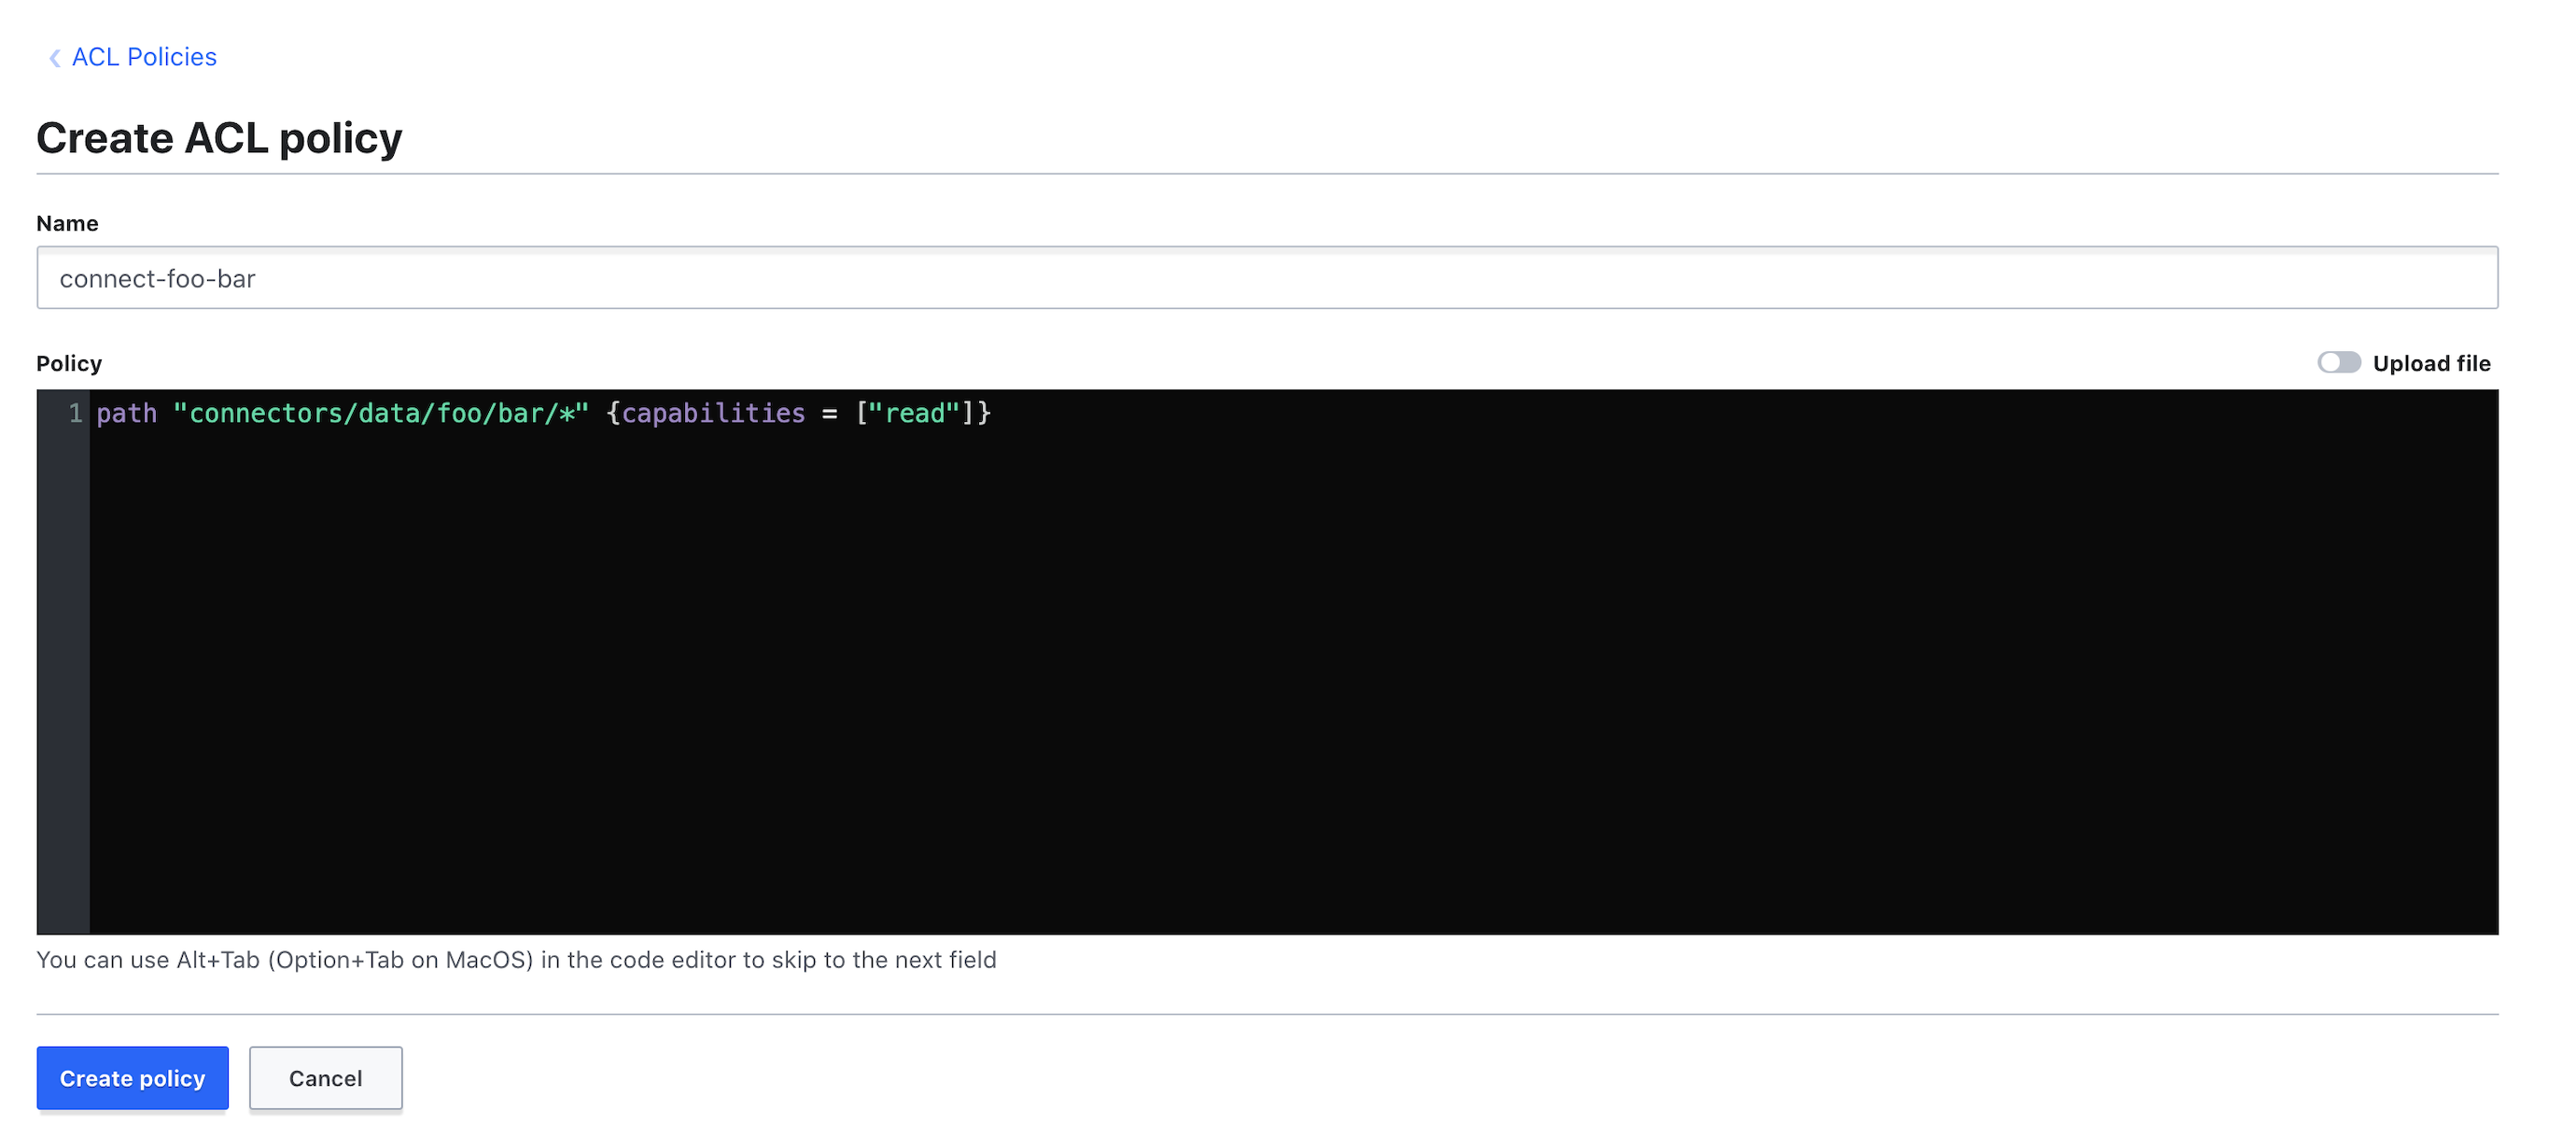
Change tenant and instance with your desired values, for local it’s
axual-localpath "connectors/data/axual/local/*" {capabilities = ["read"]} -
Add the policy to the approle for connect-axual-local:
vault write auth/approle/role/connect-axual-local token_policies="connect-axual-local" -
Obtain the role id:
vault read auth/approle/role/connect-axual-local/role-idThe
role_idwill now be shown:Key Value ––– –––-- role_id [CONNECT_INSTANCE_ROLE_ID] -
Create a
secret_idas well, with the following command:vault write auth/approle/role/connect-axual-local/secret-id -forceThe
secret_idwill now be shown:Key Value ––– ----- secret_id [CONNECT_INSTANCE_SECRET_ID] secret_id_accessor [NOT_USED] -
Keep the values for
role_idandsecret_id, we will need them in connect instance configuration.
Override Management API values and Upgrade Management API pod
-
Edit the values.yaml file in your working directory with the obtained
role_idandsecret_idandvault-uri.values.yaml# Update roleId, secretId for MGMT_API mgmt: api: axual: vault: #Mark Vault as available available: true roleId: [ROLE-ID] # Vault role obtained during initialization secretId: [SECRET-ID] # Vault secret obtained during initialization -
Issue a helm upgrade command with the values.yaml as input file to upgrade Management API configuration.
helm upgrade --install platform axual-stable/platform -f values.yaml -n kafka -
Alternatively you can override a specific property with the
--setoptionhelm upgrade --install platform axual-stable/platform --set mgmt.api.axual.vault.available=true --set mgmt.api.axual.vault.roleId=[ROLE-ID] --set mgmt.api.axual.vault.secretId=[SECRET-ID] -n kafka
Configure Management API with Vault Namespace (Optional)
In case you are using Hashicorp Vault Enterprise and you are using namespaces to organize your secrets, you need to update the Management API deployment with a reference for namespace.
-
Edit the values.yaml file in your working directory with the namespace you want to use.
values.yaml#Update NAMESPACE for your vault mgmt: api: axual: vault: namespace: [NAMESPACE] # Vault Enterprise Namespace -
Issue a helm upgrade command with the values.yaml as input file to upgrade Management API configuration.
helm upgrade --install platform axual-stable/platform -f values.yaml -n kafka -
Alternatively you can override a specific property with the
--setoptionhelm upgrade --install platform axual-stable/platform --set mgmt.api.axual.vault.namespace=[NAMESPACE] -n kafka
Install Client Services in Kubernetes
Deployment of client services happens separately from deployment of the platform. See the information below on how to deploy client services using helm charts
Axual Connect
To install the latest version of Axual Connect run the command as shown below.
helm install axual-connect axual-stable/axual-connect -n kafkaYou can see the available chart versions by running the following command:
helm search repo -l axual-stable/axual-connectTo install Axual Connect with a specific version my-version:
helm install axual-connect axual-stable/axual-connect --version=my-version -n kafka-
Create a connect-values.yaml file in your working directory with the obtained
role_idandsecret_idandvault-uri.connect-values.yaml# Update roleId, secretId for AXUAL_CONNECT vault: address: "https://selfservice-vault:8200" # Vault address running locally approleRoleId: [ROLE-ID] # Vault role obtained during initialization approleSecretId: [SECRET-ID] # Vault secret obtained during initialization -
Issue a helm upgrade command with the connect-values.yaml as input file to upgrade Axual Connect configuration.
helm upgrade --install axual-connect axual-stable/axual-connect -f connect-values.yaml -n kafka -
Alternatively you can override a specific property with the
--setoptionhelm upgrade --install axual-connect axual-stable/axual-connect --set vault.address="https://selfservice-vault:8200" --set vault.approleRoleId=[ROLE-ID] --set vault.approleSecretId=[SECRET-ID] -n kafka
Enable Operation Manager and Connect on Self-Service
-
Edit the values.yaml file in your working directory as below to start Operation Manager and enable Connect on the Self-Service
values.yamlglobal: mgmt: # Enable Vault vault: enabled: true # Enable Operation Manager operationManager: enabled: true mgmt: # Update roleId, secretId for MGMT_API api: axual: # Mark vault as available, update roleId and secretId for Management API vault: available: true roleId: [ROLE-ID] # Vault role obtained during initialization secretId: [SECRET-ID] # Vault secret obtained during initialization # Mark operation manager as available operationManager: available: true # Enable Connect UI ui: connect: enabled: true -
Issue a helm upgrade command with the values.yaml as input file to upgrade Management API configuration.
helm upgrade --install platform axual-stable/platform -f values.yaml -n kafka
[Intermezzo] - Check Axual Services logs
Confirm that Axual Platform is starting fine, with k9s
-
open k9s.
-
select selfservice-aom pod.
-
press
lto get the logs for the container.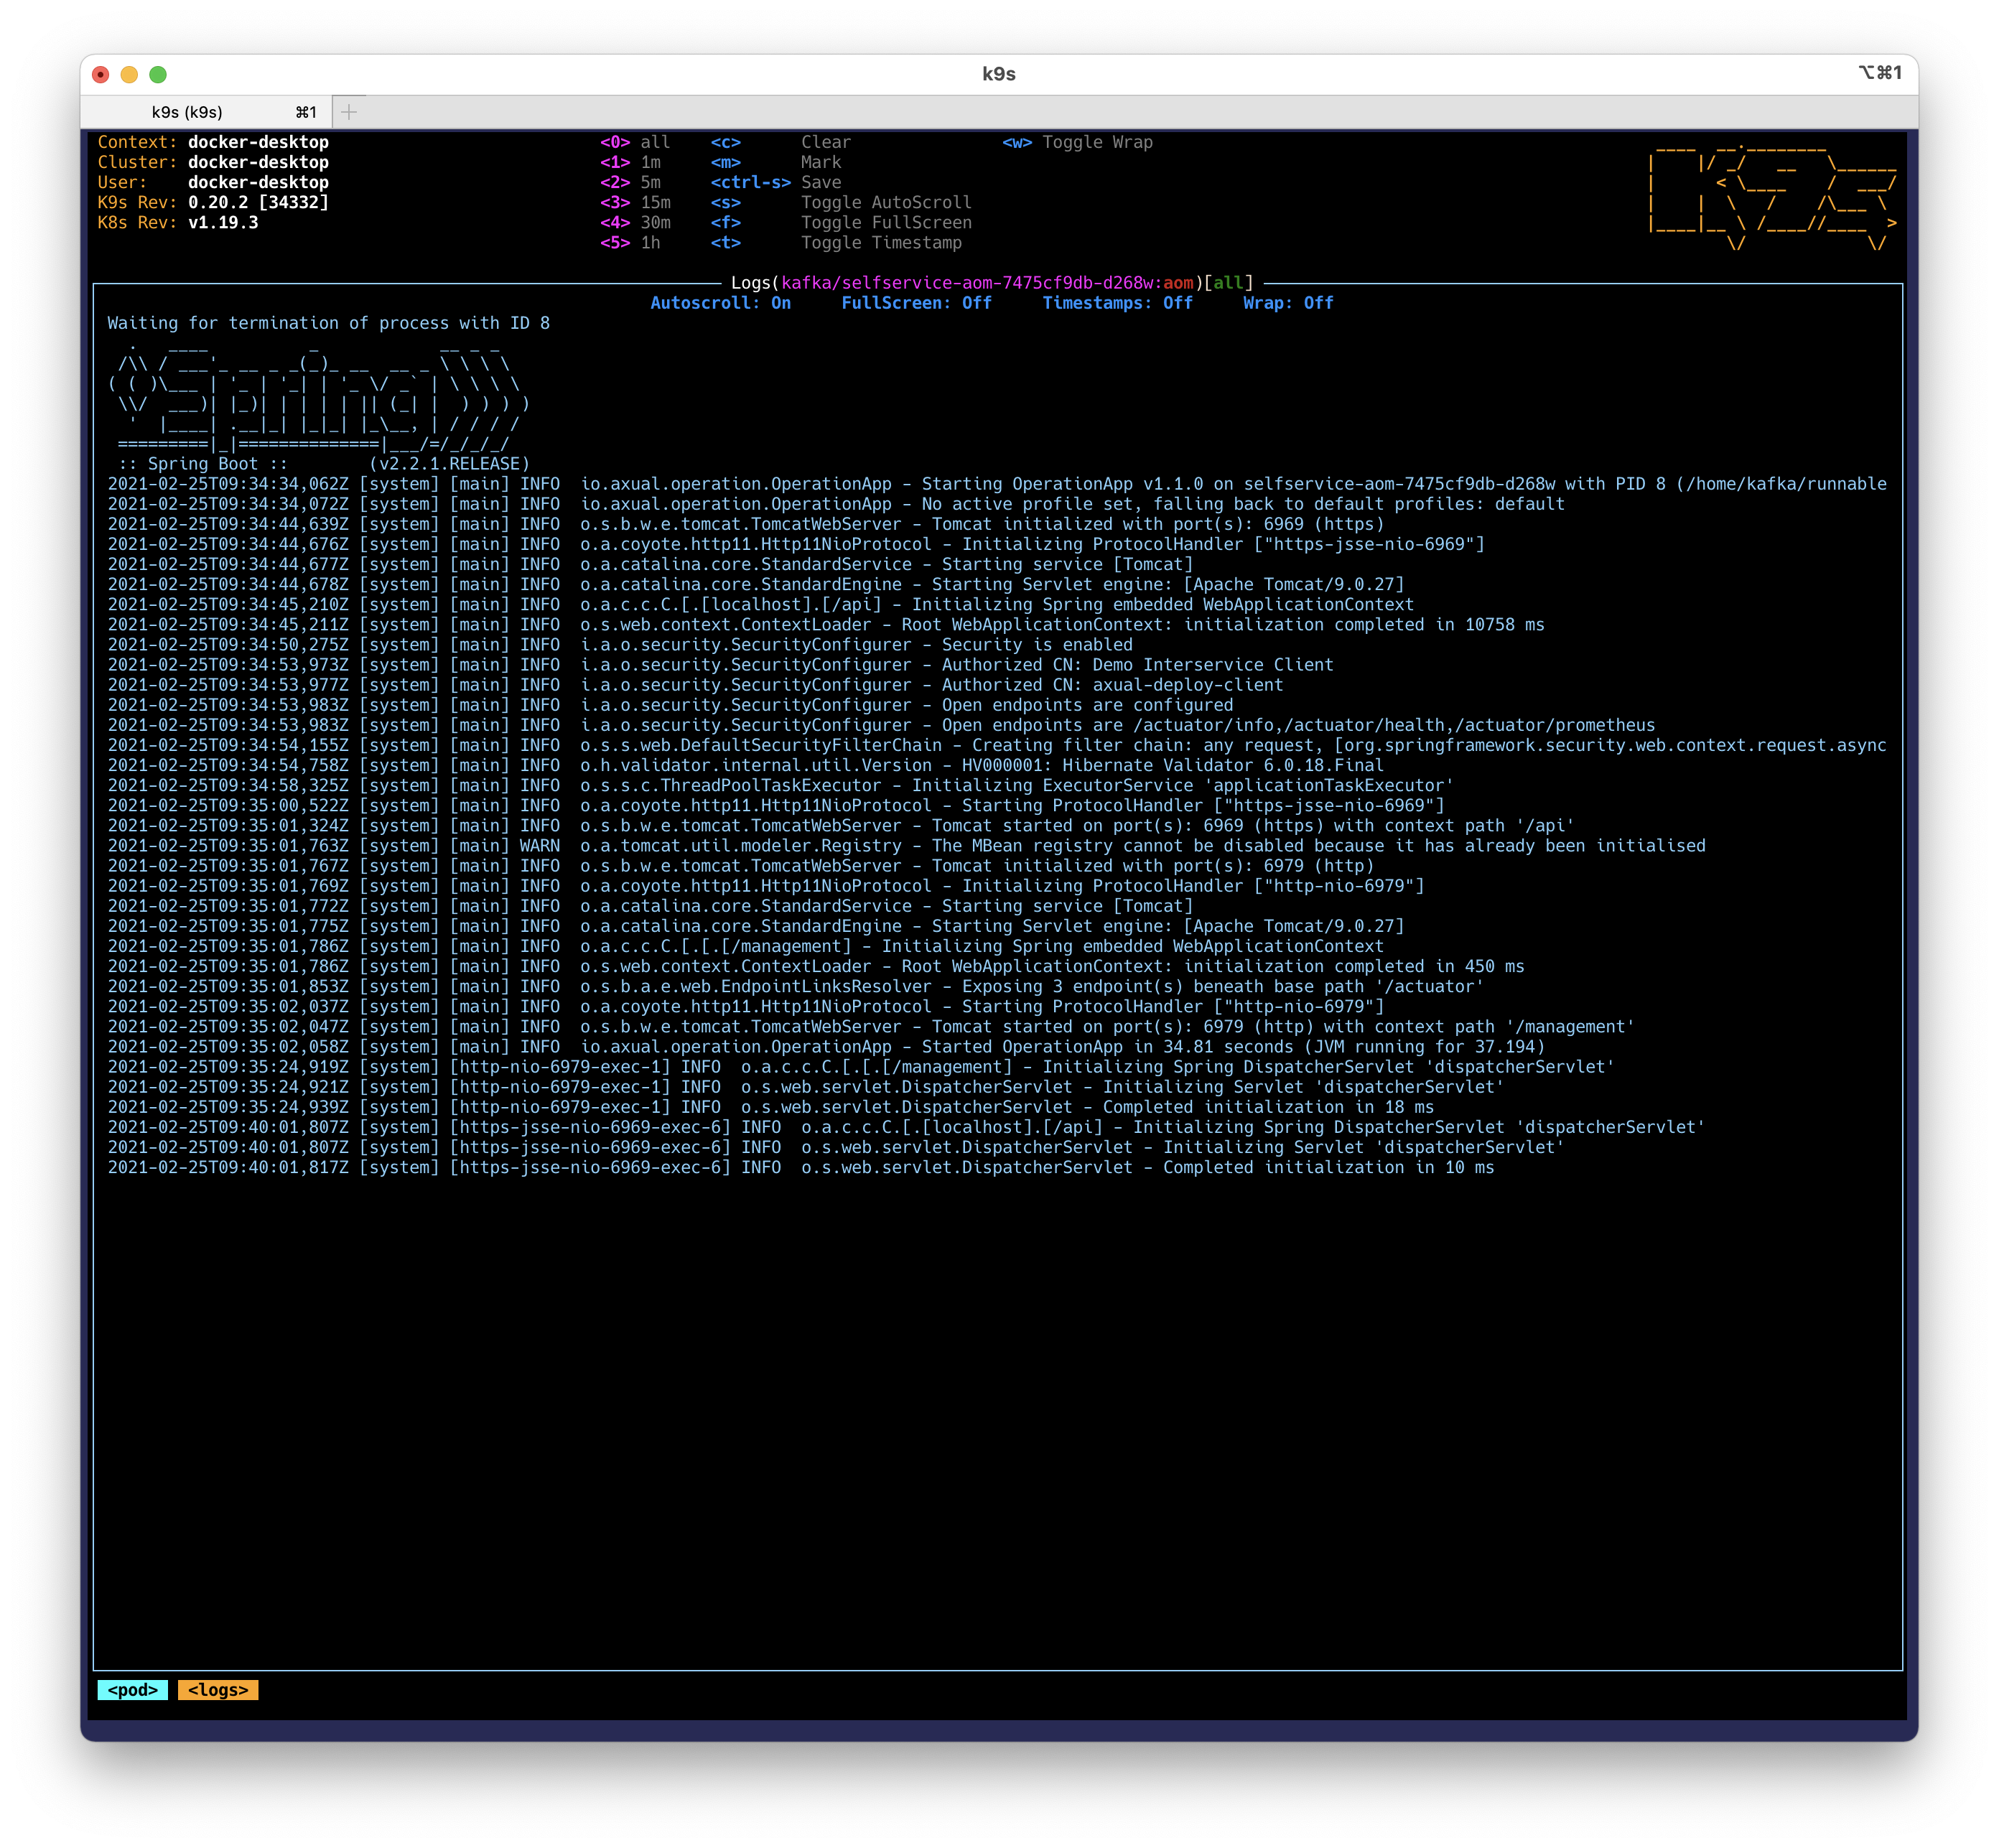
| If you want to take a look at what k9s offers, check out this article Speed up Administration with k9s |
Try out Axual Connect
Enable Connect for the local instance
-
Login to Self Service with the following URL:
URL: https://platform.local/login/axual -
Move to Instances page
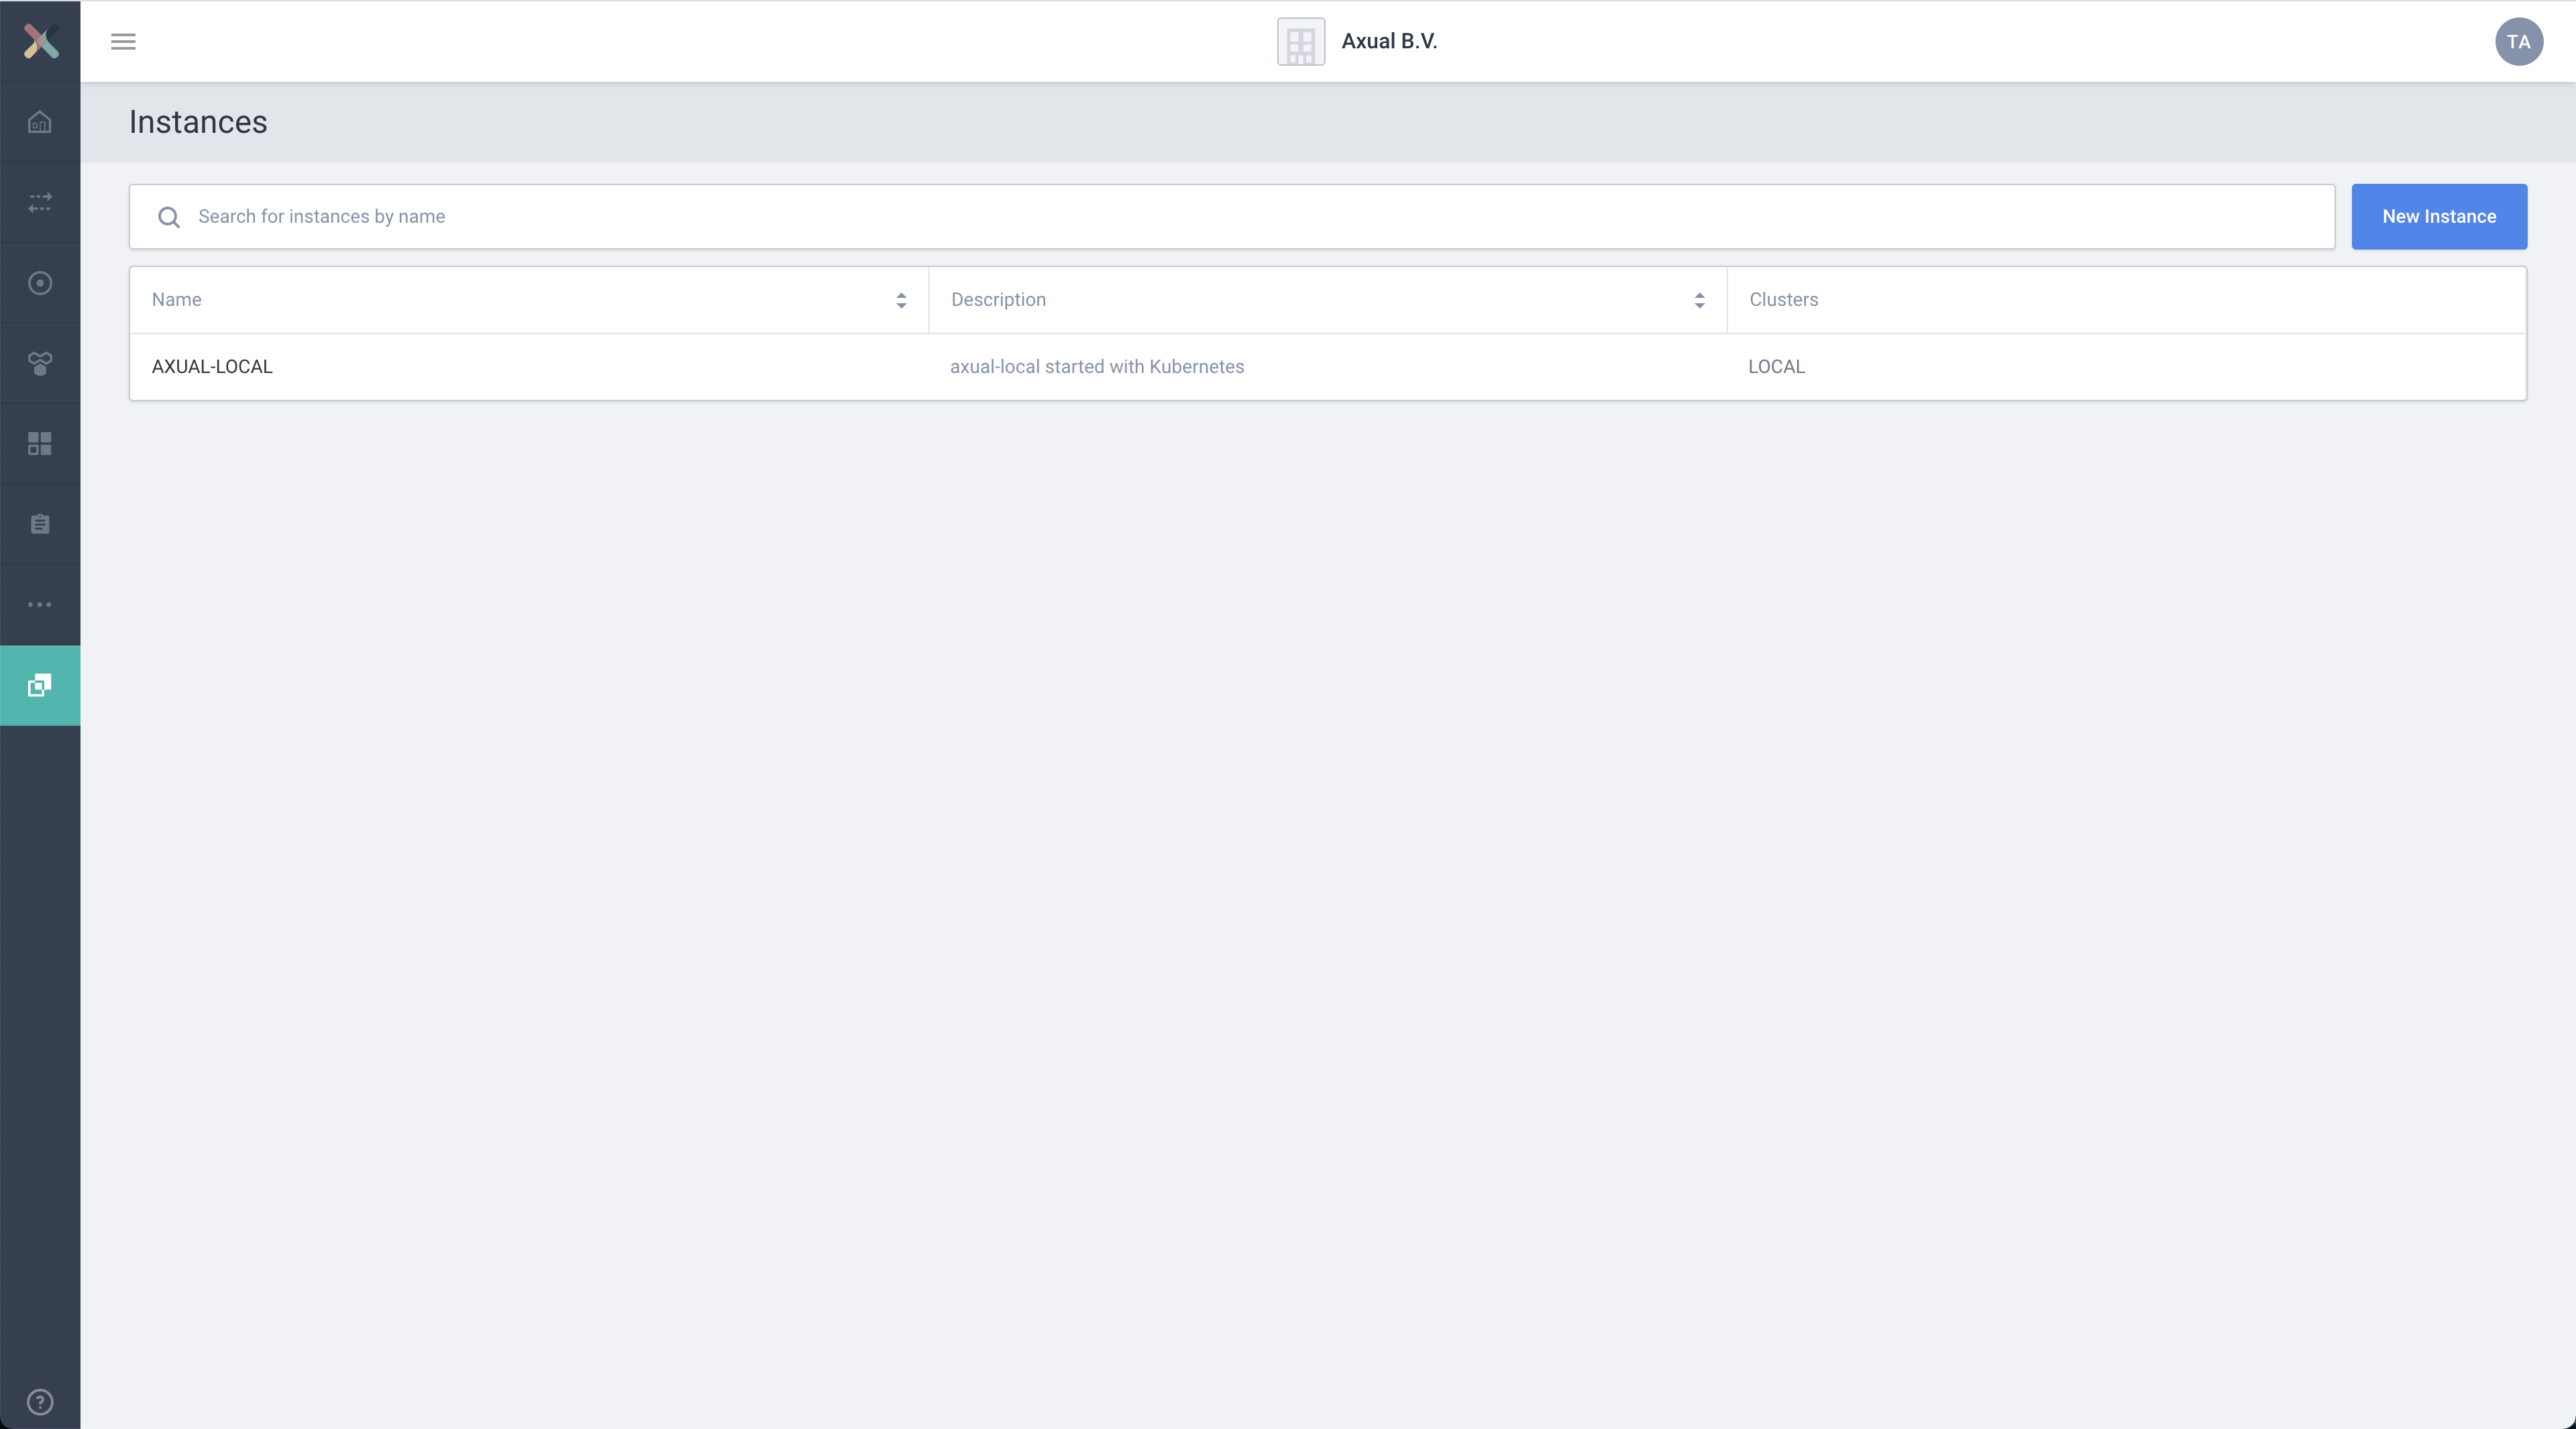
-
Select
axual-localand open the edit form -
Enable Connect
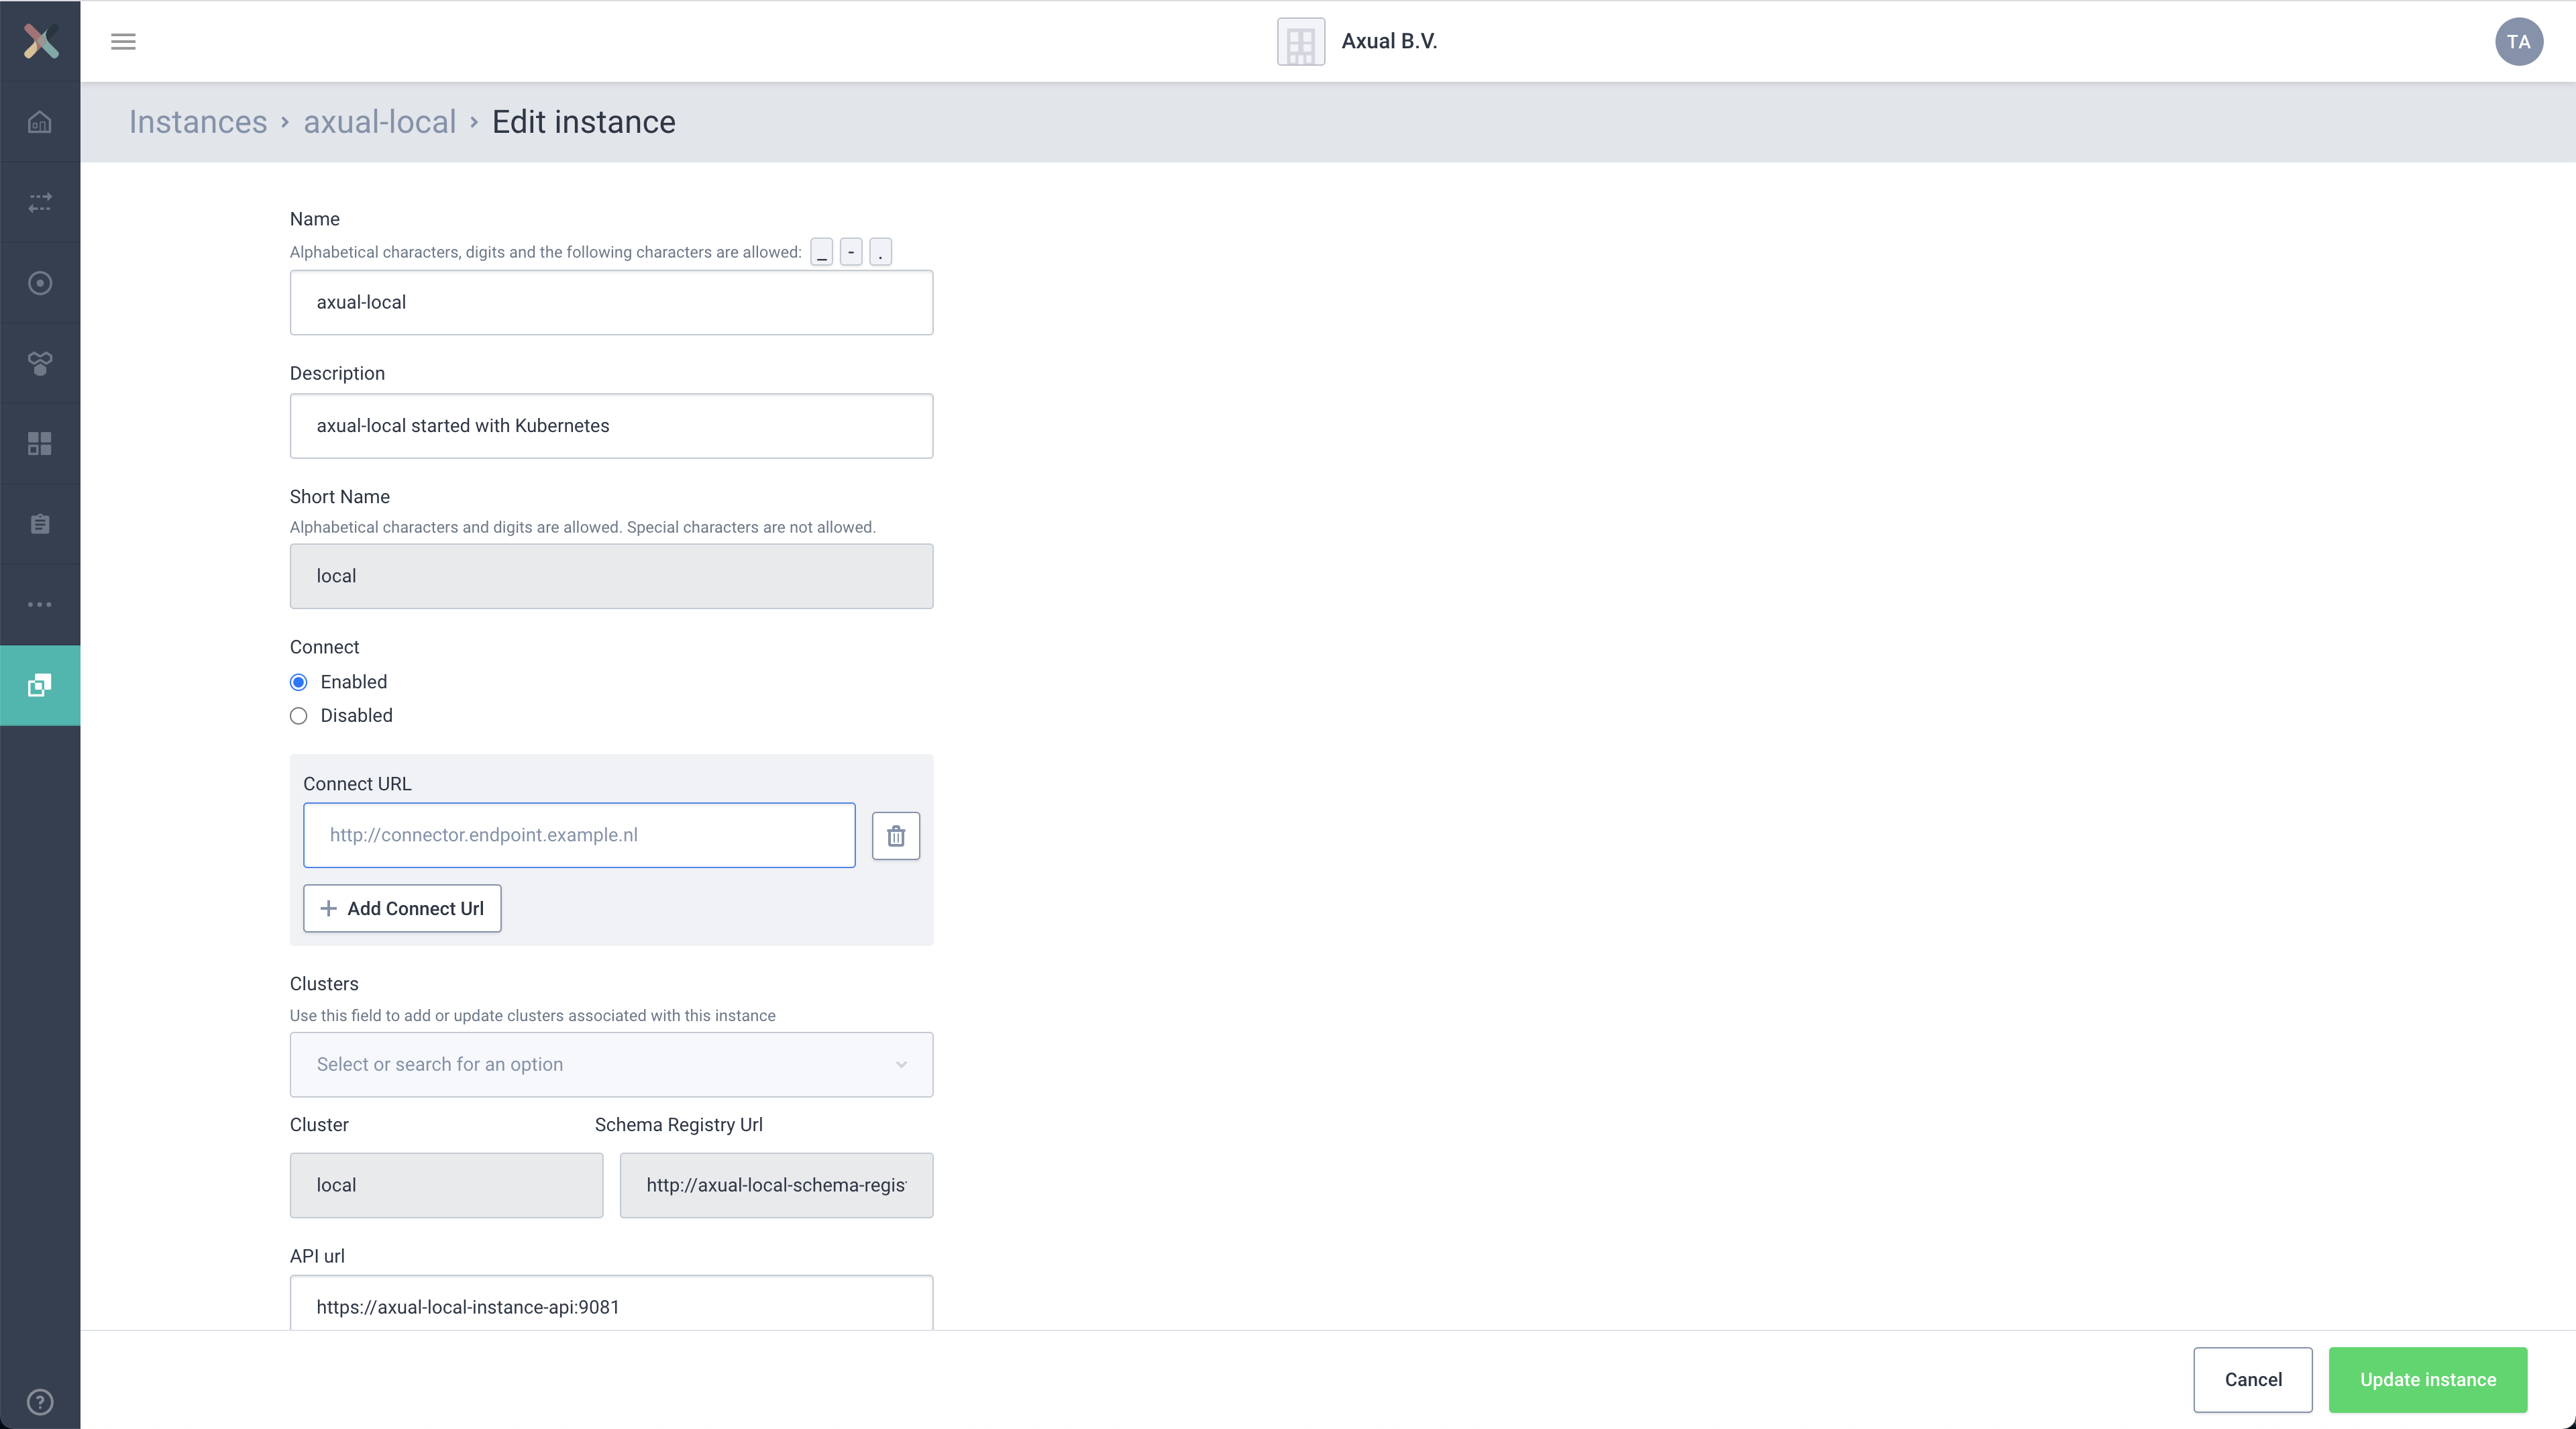
-
Provide in the Connect URL the following value
https://platform.local:11000/and press save.
|
Now Connect is available, and you can 2022.3@axual::self-service/applications/connector-applications.adoc. |