Performing the upgrade
Typical upgrade steps
A lot of the upgrade steps can be performed without impact on your users. Basically, the deployment or upgrade of components is split in two actions:
-
Configuration changes, such as added or changed configuration parameters, including the new component’s version
-
Deployment of the upgraded component, by (re)starting
The configuration changes can be done in advance most of the time, limiting downtime for your end users.
in the following upgrade steps, _platform-config refers to the location where your platform configuration is stored for that particular environment.
|
Verifying every step of the way
When performing the upgrade, we strongly advise to verify whether things are working every step of the way. It is pointless to continue the upgrade if halfway 1 of the services fail to start. In general we can give you the following tips that apply to every service when performing (re)starts after an upgrade:
-
Check whether the new docker image version is pulled successfully
-
Check whether the container actually starts and is at least up for > 30 seconds, and not in "Restarting" mode
| There are also verification steps that depend on the service which is being upgraded. Those steps can be found in the upgrade docs itself. |
Step 1 - Setting up Vault
In this step we are going to set up Vault, used to securely store the connector private key. The installation depends on the deployment topology, e.g. whether you are deploying a single node or multiple node Vault cluster.
Step 1a - Configuring Vault
-
For each Management Cluster, add a new vault.sh.sh file under platform-config/clusters/{cluster-name}/
platform-config/clusters/{cluster-name}/vault.sh# Docker image version, only override if you explicitly want to use a different version # VAULT_VERSION=1.4.2 #Vault ui is enabled or not VAULT_UI=true # Port over which client-vault communication happens. # Vault non leader nodes redirect to this port of the leader node. VAULT_API_PORT=8200 # Port over which vault-vault communication happens in a cluster VAULT_CLUSTER_PORT=8201 VAULT_LOG_LEVEL=Debug -
For each
Nodein the Management Cluster addmgmt-vaultvalue beforemgmt-api, asmgmt-apirequires vault. The file located in platform-config/clusters/{cluster-name}/ usually called nodes.sh.If you have more than one
Nodein a Cluster you will need to repeat the following for each .node.sh file.
For example, for twoNodesfor the files .node1.sh, .node2.sh you will edit the configurationNODE1_MGMT_SERVICES,NODE2_MGMT_SERVICESrespectively._platform-config/clusters/{cluster-name}/node.shNODE_MGMT_SERVICES=prod-mgmt-1:...,mgmt-vault,mgmt-api,...
Step 1b - Starting Vault
Log in to the nodes where Vault should be running and start Vault with the following command:
./axual.sh start mgmt mgmt-vaultStep 1c - Initializing Vault
-
Choose a leader node for the vault cluster. If you are unsure, just pick the second VM. This node is further referred to as
vault-node-2. Initialize and Unseal Vault onvault-node-2by following the steps below:-
Enter the mgmt-vault docker container
docker exec -ti --user root mgmt-vault /bin/sh -
In order to configure the vault operator environment, set the following variables:
export VAULT_ADDR="https://127.0.0.1:8200"
export VAULT_CLIENT_CERT="/security/mgmt-vault.server.certificate.crt"
export VAULT_CLIENT_KEY="/security/mgmt-vault.server.certificate.key"
export VAULT_CACERT="/security/mgmt-vault-ca.cer"
In case your certificate does not have a DNS entry for 127.0.0.1 change it to the IP of the host itself
-
-
The first time we install Vault we need to initialise the Vault. We do this by creating key shares and a root token.
-
KS = number of keys to unseal a Vault (Local: 1 – Prod: 3)
-
KT = the minimum amount of keys to unseal a Vault (Local: 1 – Prod: 2)
In the example below, KS = 1 and KT = 1
vault operator init -key-shares=1 -key-threshold=1An unseal key, and a root token are being generated which can be used to unseal the vault.
Please make sure you store the key and token in a secure location, like a password manager.
-
-
Check if vault-node-2 is the leader using vault operator
raft list-peersvault operator unseal [unseal-key] vault login [root-token] vault operator raft list-peers -
On vault-node-1 and vault-node-3, repeat the
vault operator unsealcommand with the keyshared obtained earlier:docker exec -ti --user root mgmt-vault /bin/sh export VAULT_ADDR="https://127.0.0.1:8200" export VAULT_CLIENT_CERT="/security/mgmt-vault.server.certificate.crt" export VAULT_CLIENT_KEY="/security/mgmt-vault.server.certificate.key" export VAULT_CACERT="/security/mgmt-vault-ca.cer" vault operator unseal [unseal-key] -
Run the command vault operator raft list-peers on all the 3 nodes to verify the cluster state
vault operator raft list-peersNode Address State Voter ----- ------- ----- ----- raft_node_1 [SERVER-IP]:8021 follower true raft_node_2 [SERVER-IP]:8021 leader true raft_node_3 [SERVER-IP]:8021 follower true -
On the leader node(node-2). Enable Key value version 2 on connectors path Enter docker container of vault on node-2 using commands below if not already entered.
vault secrets enable -path=connectors kv-v2
vault auth enable approle
Set up of vault cluster is complete now and vault http://server-ip:8200/ui/ can be accessed from your browser using the root token obtained in Step 5! The remainder of the vault actions can now be done in the Vault GUI, with the Vault Browser CLI.
Intermezzo: using the Vault Browser CLI
The vault operator commands were issues in a docker container, but Vault offers a convenient UI with a Browser CLI which can be used for most of the commands needed in the following steps. You can access it as follows:
-
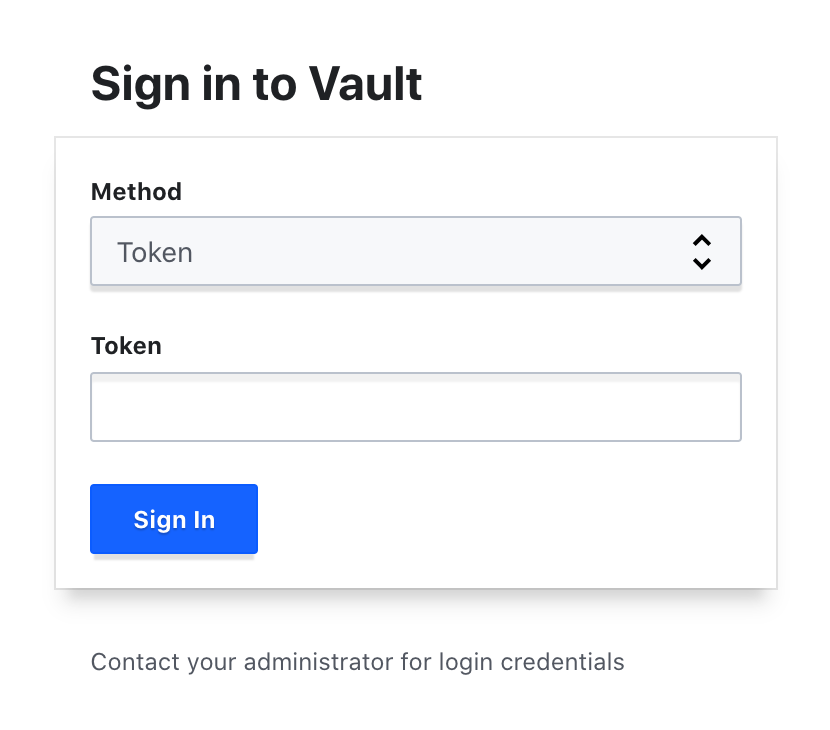
Log in to Vault, using the UI, go to https://server:8200/ui. You will see the following login screen.
-
Enter the root token and click "Sign in". If the vault is not unsealed yet, you need to use the shared keys as well.
-
Open the Vault Browser CLI by clicking the CLI icon:

Step 1d - Creating a Management API Policy in Vault
Complete the Vault setup with the Browser CLI for the following commands:
-
Create a policy named
mgmt-api, via the menu "Policies" >> "Create ACL policy", as follows: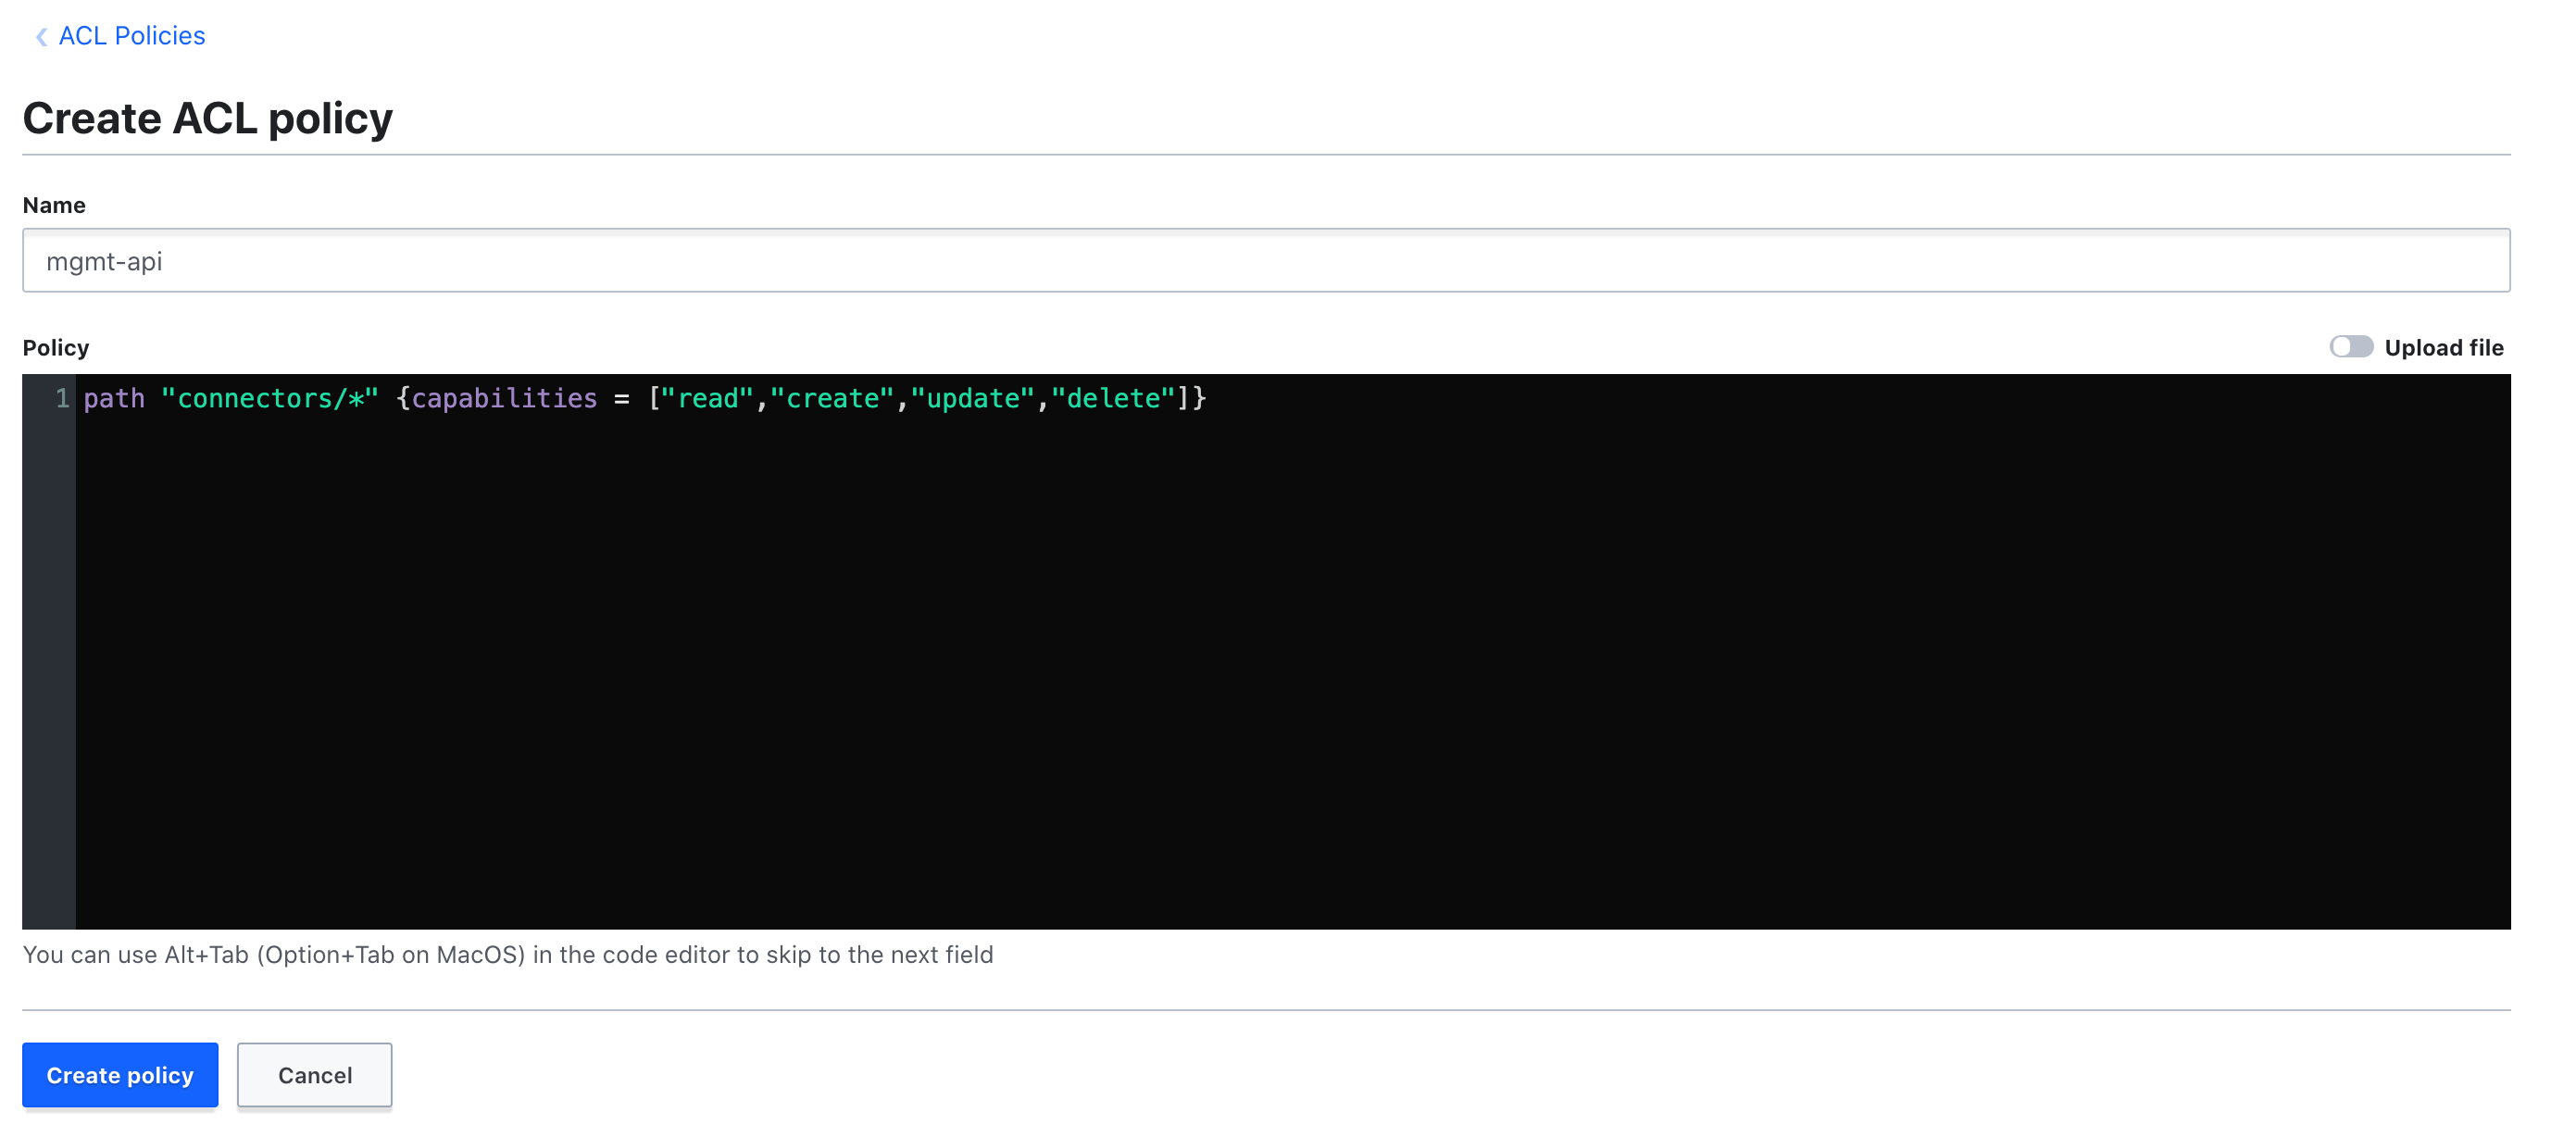
-
Add the policy to the approle for mgmt-api:
vault write auth/approle/role/mgmt-api token_policies="mgmt-api" -
Obtain the role id for mgmt-api.
vault read auth/approle/role/mgmt-api/role-idThe
role_idwill now be shown:Key Value ––– –––-- role_id [MGMT_API_ROLE_ID] -
Create a
secret_idas well, with the following command:vault write -f auth/approle/role/mgmt-api/secret-idThe
secret_idwill now be shown:Key Value ––– ----- secret_id [MGMT_API_SECRET_ID] secret_id_accessor [NOT_USED] -
Update the obtained
role_idandsecret_idandvault-uriin the mgmt-api.sh file in config repomgmt-api.shMGMT_VAULT_URI=https://[MGMT_VAULT_LB_URI]:[PORT] # Vault LB uri MGMT_VAULT_ROLE_ID=[ROLED-ID] # Vault role obtained during initialization MGMT_VAULT_SECRET_ID=[SECRET-ID] # Vault secret obtained during initialization
Step 1e - Create an Axual Connect Policy in Vault
repeat the steps below for every Connect instance. For illustration purposes, {tenant-shortname}=foo and {instance-shortname}=bar
|
-
Create a policy named
connect-foo-bar, via the menu "Policies" >> "Create ACL policy", as follows:
-
Add the policy to the approle for connect-foo-bar:
vault write auth/approle/role/connect-foo-bar token_policies="connect-foo-bar" -
Obtain the role id:
vault read auth/approle/role/connect-foo-bar/role-idThe
role_idwill now be shown:Key Value ––– –––-- role_id [CONNECT_INSTANCE_ROLE_ID] -
Create a
secret_idas well, with the following command:vault write -f auth/approle/role/connect-foo-bar/secret-idThe
secret_idwill now be shown:Key Value ––– ----- secret_id [CONNECT_INSTANCE_SECRET_ID] secret_id_accessor [NOT_USED] -
Keep the values for
role_idandsecret_idand the Vault (load balancer) endpoint, we will need them in [Step 3c - Connect instance configuration]
Step 2 - Setting up Operation Manager
Configuring Operation Manager
-
In platform-config add a file called operation-manager.sh in the mgmt cluster such as (local-config/clusters/local/operation-manager.sh) and provide the configuration parameters as defined in the preparation.
operation-manager.sh# Docker image version, only override if you explicitly want to use a different version # OPERATION_MANAGER_VERSION=1.0.0 ######### # PORTS # ######### # Port at which the web-server is hosted on the host machine OPERATION_MANAGER_PORT=42069 ################# # CONFIGURATION # ################# # Operation Manager default root log level OPERATION_MANAGER_LOGGING_LEVEL_ROOT="info" # When managed service(s) is below a APP-gateway, the port in the URL can be omitted ############## # SERVER SSL # ############## # Secury Enable OPERATION_MANAGER_SECURITY_ENABLED="true" OPERATION_MANAGER_SECURITY_AUTHORIZED_CNS="[MGMT_API_CN]" OPERATION_MANAGER_SSL_CLIENT_AUTH="need" # SSL Enable flag. # Expects a keystore with a single private key inside it at security/app-integrator.server.keystore.jks OPERATION_MANAGER_SERVER_SSL_ENABLED="true" # allowed cyphers OPERATION_MANAGER_SERVER_SSL_CIPHERS="TLS_ECDHE_RSA_WITH_AES_256_GCM_SHA384,TLS_ECDHE_ECDSA_WITH_AES_256_GCM_SHA384,TLS_ECDH_RSA_WITH_AES_256_GCM_SHA384,TLS_ECDH_ECDSA_WITH_AES_256_GCM_SHA384,TLS_ECDHE_RSA_WITH_AES_128_GCM_SHA256,TLS_ECDHE_ECDSA_WITH_AES_128_GCM_SHA256,TLS_ECDH_RSA_WITH_AES_128_GCM_SHA256,TLS_ECDH_ECDSA_WITH_AES_128_GCM_SHA256,TLS_ECDHE_RSA_WITH_AES_256_CBC_SHA384,TLS_ECDHE_ECDSA_WITH_AES_256_CBC_SHA384,TLS_ECDHE_RSA_WITH_AES_256_CBC_SHA,TLS_ECDHE_ECDSA_WITH_AES_256_CBC_SHA,TLS_ECDH_RSA_WITH_AES_256_CBC_SHA384,TLS_ECDH_ECDSA_WITH_AES_256_CBC_SHA384,TLS_ECDH_RSA_WITH_AES_256_CBC_SHA,TLS_ECDH_ECDSA_WITH_AES_256_CBC_SHA,TLS_ECDHE_RSA_WITH_AES_128_CBC_SHA256,TLS_ECDHE_ECDSA_WITH_AES_128_CBC_SHA256,TLS_ECDHE_RSA_WITH_AES_128_CBC_SHA,TLS_ECDHE_ECDSA_WITH_AES_128_CBC_SHA,TLS_ECDH_RSA_WITH_AES_128_CBC_SHA256,TLS_ECDH_ECDSA_WITH_AES_128_CBC_SHA256,TLS_ECDH_RSA_WITH_AES_128_CBC_SHA,TLS_ECDH_ECDSA_WITH_AES_128_CBC_SHA" # The password of the keystore and of the single key inside the keystore OPERATION_MANAGER_SERVER_SSL_KEYSTORE_PASSWORD="[SERVER_KEYSTORE_PASSWORD]" OPERATION_MANAGER_SERVER_SSL_KEY_PASSWORD="[SERVER_KEY_PASSWORD]" # Truststore password. It MUST be "notsecret" this is just an artifact from old versions. # The truststore is generated and the password is hardcoded. OPERATION_MANAGER_SERVER_SSL_TRUSTSTORE_PASSWORD="[SERVER_TRUSTSTORE_PASSWORD]" OPERATION_MANAGER_CLIENT_SSL_TRUSTSTORE_PASSWORD="[CLIENT_TRUSTSTORE_PASSWORD]" # Basic Authentication credentials to connect with all the instance-connects OPERATION_MANAGER_CONNECT_BASIC_AUTH_USER="[BASIC_AUTH_USERNAME]" OPERATION_MANAGER_CONNECT_BASIC_AUTH_PASSWORD="[BASIC_AUTH_PASSWORD]" -
Update your nodes.sh file and add
operation-manageras a mgmt layer service.nodes.shNODE1_MGMT_SERVICES=[..],operation-manager
Step 3 - Setting up Connect
Step 3a - Connect deployment
For each Node in the cluster edit as following the configuration file to support Connect. The file is located in platform-config/clusters/{cluster-name}/ usually called nodes.sh. If you have more than one Node in a Cluster you will need to repeat the following for each .node.sh file. For example, for two Nodes for the files .node1.sh, .node2.sh you will add the configuration NODE1_CLIENT_SERVICES, NODE2_CLIENT_SERVICES respectively.
NODE1_CLUSTER_SERVICES=[NODE NAME]:exhibitor,broker,cluster-api,cluster-browse
NODE1_INSTANCE_SERVICES=[NODE NAME]:sr-master,sr-slave,discovery-api,instance-api,rest-proxy

# ADD THIS LINE
NODE1_CLIENT_SERVICES=[NODE NAME]:axual-connect

NODE1_MGMT_SERVICES=[NODE NAME]:mgmt-db,keycloak-populate-db,mgmt-keycloak,mgmt-api-create-db,mgmt-api,mgmt-populate-db,mgmt-ui,stream-browse

...
Step 3b - Connect instance configuration
For every Connect Instance, add a new axual-connect.sh file under platform-config/{tenants}/instances/{instance} and replace the placeholders with meaningful values.
# Uncomment and set a value to load a different version of Axual Connect
#CONNECT_VERSION=

# Only when set to true will axual connect start
CONNECT_ENABLED="true"

# Expose Prometheus Agent port and JMX port
CONNECT_PROMETHEUS_EXPOSE="enabled"
CONNECT_JMX_EXPOSE="enabled"

# Port number configurations for HTTP/HTTPS/Prometheus/JMX
CONNECT_HOST_HTTP_PORT= # The port used for non TLS Rest API calls
CONNECT_HOST_HTTPS_PORT= # The port used for TLS Rest API calls
CONNECT_PROMETHEUS_AGENT_PORT= # The port number where the prometheus agent exposes the metrics
CONNECT_HOST_JMX_PORT= # The port used for incoming JMX connections

# The passwords of the client and server keystore
CONNECT_SSL_CLIENT_KEYSTORE_PASSWORD= #[CONNECT SSL CLIENT KEYSTORE PASSWORD]
CONNECT_SSL_CLIENT_KEY_PASSWORD= #[CONNECT SSL CLIENT KEY PASSWORD]
CONNECT_SSL_SERVER_KEYSTORE_PASSWORD= #[CONNECT SSL SERVER KEYSTORE PASSWORD]
CONNECT_SSL_SERVER_KEY_PASSWORD= #[CONNECT SSL SERVER KEY PASSWORD]

# The principal names of the client certificate
CONNECT_PRINCIPAL= # The Distinguished Name of the Axual Connect Principal.
# This is used to create read/write ACL to the System Topics and Consumer Group
# If not set, no ACLs will be created
CONNECT_PRINCIPAL_CHAIN= # The Distinguished Name of the Axual Connect Principal with the signing CA DNs chained.
# This is used to create read/write ACL to the System Topics and Consumer Group
# If not set, no ACLs will be created#

# Connection settings for the Vault Config Provider
CONNECT_VAULT_PROVIDER_ENABLED='true'
CONNECT_VAULT_ROLE_ID=[CONNECT_INSTANCE_ROLE_ID] # See Step 1e
CONNECT_VAULT_SECRET_ID=[CONNECT_INSTANCE_SECRET_ID] # See Step 1e
#CONNECT_VAULT_TEST_PATH='connectors/hello/world'
# With test path set the config provider will try to retrieve the data from this path on startup


# Connection settings for the Keystore Config Provider
CONNECT_KEYVAULT_PROVIDER_ENABLED='true'
CONNECT_KEYVAULT_ROLE_ID=[CONNECT_INSTANCE_ROLE_ID] # See Step 1e
CONNECT_KEYVAULT_SECRET_ID=[CONNECT_INSTANCE_SECRET_ID] # See Step 1e

# Basic Authentication for Connect REST endpoint
# CONNECT_BASIC_AUTH_ENABLED="false" # default "true"
Step 3c - Assigning A Cluster to Run Client Service
For every Instance in Axual, add the configuration CLIENT_CLUSTER in instance-api.sh file located at platform-config/{tenants}/instances/{instance}/. The contents of the file will now look as follows:
# These properties apply to all instance-services in this instance,
# as well as all docker containers running on the clusters this instance spans over

##########
# GLOBAL #
##########

# All the root and intermediate .cer files which are used to sign the certificates used by instance-services
# running on clusters this instance spans over, are located at "ca/instance/OWNER/, hence OWNER is the name of that directory
# This property is OBSOLETE since axual-deploy 5.2.0
OWNER="[TENANT_NAME]"

# The name of this instance. It's used for:
# - naming distribution connect-jobs
# - part of the name of every topic owned by this instance,
#   for brokers whose cluster-api use the instance name in the topic naming convention
# - discovery api uses it as "discovery.environment" property
NAME="[INSTANCE_NAME]"

# The name of the cluster which runs management services (like prometheus, MGMT-API and MGMT-UI)
# that should be managing this instance.
MANAGEMENT_CLUSTER="[MANAGEMENT_CLUSTER_NAME]"

# The name of the cluster which runs client services (like axual-connect)
# that should be managing this client service.
CLIENT_CLUSTER="[CLIENT_CLUSTER_NAME]"
Step 3d - Starting Connect
Connect is located in the new client services. These are applications that can connect to any cluster in the instance.
Run the following command for each instance:
./axual.sh start client <instance-name> axual-connector simply use the following command to start all client services for all instances on the machine.
./axual.sh start clientConfiguring Distributor
-
For each
Cluster, add/edit the following configuration in distributor.sh. The located at platform-config/clusters/{cluster-name}/platform-config/clusters/{cluster-name}/versions.sh#DISTRIBUTOR_VERSION="[OLDER VERSION]"
Restarting Distributor
To limit the impact on the users restart distributor in a rolling fashion (one Cluster at a time)
./axual.sh restart cluster distributorThe following output will show
Axual Platform 2020.2
Stopping cluster services for node [NODE NAME] in cluster [CLUSTER NAME]
Stopping distributor: Stopped
Configuring cluster services for node [NODE NAME] in cluster [CLUSTER NAME]
Done, cluster-api is available
Preparing distributor security: Done
Preparing distributor topics: Deploying topic _distributor-config: Done
Deploying topic _distributor-offset: Done
Deploying topic _distributor-status: Done
Done
Starting distributor: Done
Step 5 - Upgrading monitoring
Connect expose new end-points which Prometheus is scraping data from. In order to view the data in Grafana we will need to restart the Prometheus and refresh Grafana Services in Axual.
Restarting Prometheus
Connect to the node which is running Prometheus service and run the following command.
./axual.sh restart mgmt prometheusThe following output will show
Axual Platform 2020.2
Stopping mgmt services for node [NODE NAME] in cluster [CLUSTER NAME]
Stopping prometheus: Stopped
Configuring mgmt services for node [NODE NAME] in cluster [CLUSTER NAME]
Running clean-config-prometheus: /config/prometheus
Done
Generating prometheus targets...
Generating prometheus configuration...
Running copy-config-prometheus: Done
Starting prometheus: Done
Refreshing Grafana Dashboards
-
In platform-config find the following settings in the mgmt cluster such as (local-config/clusters/local/dashboards.sh) and verify that the following settings exist.
dashboards.sh# Controls if provisioned dashboards should be used. # If false the standard dashboards will not be downloaded and provisioned. GRAFANA_DASHBOARDS_PROVISIONING_ENABLED=true # The Branch name or Tag name of the dashboard. # Changing this value will try to download and provision that specific branch or tag GRAFANA_DASHBOARDS_GIT_VERSION=1.2.0 -
Connect to the node which running
Grafanaservice and run the following command.
./axual.sh restart mgmt grafanaThe following output will show
Axual Platform 2020.2
Stopping mgmt services for node [NODE NAME] in cluster [CLUSTER NAME]
Stopping grafana: Stopped
Configuring mgmt services for node [NODE NAME] in cluster [CLUSTER NAME]
Running clean-config-grafana: /config/grafana
Done
Provisioning grafana dashboards...
Running copy-config-grafana: Done
Starting grafana: Done
To validate Connect is running see Monitoring Connect
Step 6 - Upgrading Discovery API
Configuring Discovery API
Make sure you didn’t override the default value before. If you did please remove the following line or comment it out as shown below.
# Docker image version, only override if you explicitly want to use a different version
#DISCOVERYAPI_VERSION="[OLDER VERSION]"
Restarting Discovery API
Run the following command on every VM where Discovery API is running.
./axual.sh restart instance <instance-name> discovery-apiThe following output will be printed
Axual Platform 2020.2
Stopping instance services for [INSTANCE NAME] in cluster [CLUSTER NAME]
Stopping [INSTANCE NAME]-discovery-api: Stopped
Done, cluster-api is available
Deploying topic _[INSTANCE NAME]-schemas: Done
Deploying topic _[INSTANCE NAME]-consumer-timestamps: Done
Done, cluster-api is available
Done, cluster-api is available
Applying ACLs : {...}
Done
...
Done, cluster-api is available
Applying ACLs : {...}
Done
Configuring instance services for [INSTANCE NAME] in cluster [CLUSTER NAME]
Running copy-config-[INSTANCE NAME]-discovery-api: Done
Preparing [INSTANCE NAME]-discovery-api: Done
Starting [INSTANCE NAME]-discovery-api: Done
Step 7 - Upgrading REST Proxy
Configuring REST Proxy
Make sure you didn’t override the default value before. If you did please remove the following line or comment it out as shown below.
# Docker image version, only override if you explicitly want to use a different version
#RESTPROXY_VERSION="[OLDER VERSION]"
Restarting REST Proxy
Restart REST Proxy per instance to effectuate the changes, as follows:
./axual.sh restart instance <instance-name> rest-proxyThe following output will be printed
Axual Platform 2020.2
Stopping instance services for [INSTANCE NAME]n in cluster [CLUSTER NAME]
Stopping [INSTANCE NAME]-rest-proxy: Stopped
Done, cluster-api is available
Deploying topic _[INSTANCE NAME]-schemas: Done
Deploying topic _[INSTANCE NAME]-consumer-timestamps: Done
Done, cluster-api is available
Done, cluster-api is available
Applying ACLs :...
Done
...
Applying ACLs :...
Done
Configuring instance services for [INSTANCE NAME] in cluster [CLUSTER NAME]
Preparing [INSTANCE NAME]-rest-proxy: Done
Warning: 'ADVERTISED_DEBUG_PORT_REST_PROXY' is not an instance variable and a default value is not configured as 'DEFAULT_INSTANCE_ADVERTISED_DEBUG_PORT_REST_PROXY'
Starting altair-constellation-rest-proxy: Done
Step 9 - Upgrading Management API
Step 9a - adding defaults
The default Kafka properties are currently loaded from an app.yml inside management API. In the case a new tenant is set up, defaults for stream configurations are necessary. You can now provide them by adding the following configuration for mgmt-api:
#############################
# Defaults KAFKA_PROPERTIES #
#############################

MGMT_API_DEFAULT_PARTITIONS="1"
MGMT_API_DEFAULT_MIN_IN_SYNC_REPLICAS="1"
MGMT_API_DEFAULT_REPLICATION_FACTOR="1"
MGMT_API_DEFAULT_SEGMENT_TIME="60000"
MGMT_API_DEFAULT_RETENTION_TIME="60000"
MGMT_API_DEFAULT_CLEANUP_POLICY="delete"| existing tenants or instances will not be affected by adding those defaults, only new tenants/instances |
Step 9b - Enabling Connect integration
To the same mgmt-api configuration file, add the following properties to enable communication between Management API and Vault and Operation Manager.
#########
# VAULT #
#########

#Vault LB uri
MGMT_VAULT_URI=https://[VAULT_LB_ADDRESS]:[VAULT_API_PORT]
#Vault role obtained during intialization

MGMT_VAULT_ROLE_ID=[MGMT_API_ROLE_ID] # See Step 1d

#Vault secret obtained during intialization
MGMT_VAULT_SECRET_ID=[MGMT_API_SECRET_ID] # See Step 1d

#####################
# OPERATION MANAGER #
#####################

MGMT_API_OPERATION_MANAGER_CRON="0 0 */12 ? * *"
MGMT_API_OPERATION_MANAGER_BASE_URI='https://[OPERATION_MANAGER_LB_ADDRESS]:[OPERATION_MANAGER_PORT]'
MGMT_API_OPERATION_MANAGER_AUTHORIZER=tls
MGMT_API_OPERATION_MANAGER_AVAILABLE=true

# Keystore filename, make sure path starts with /security
MGMT_API_OPERATION_MANAGER_KEY_STORE=[MGMT_API_CLIENT_KEYSTORE_LOCATION]
MGMT_API_OPERATION_MANAGER_KEY_STORE_PASSWORD=[MGMT_API_CLIENT_KEYSTORE_PASSWORD]
MGMT_API_OPERATION_MANAGER_KEY_PASSWORD=[MGMT_API_CLIENT_KEY_PASSWORD]
MGMT_API_OPERATION_MANAGER_TRUST_STORE_PASSWORD=[MGMT_API_CLIENT_TRUSTSTORE_PASSWORD]
Now you can proceed and restart Management API
Step 9c: Restarting Management API
Restart Management API to effectuate the changes, as follows:
./axual.sh restart mgmt mgmt-apiThe following output will be printed
Axual Platform 2020.2
Stopping mgmt services for node [NODE NAME] in cluster [CLUSTER NAME]
Stopping mgmt-api: Stopped
Configuring mgmt services for node [NODE NAME] in cluster [CLUSTER NAME]
Testing DB connection
Connection successful
Preparing mgmt-api: Done
Starting mgmt-api: Done
Now that Management API is ready to offer support for Connect, the last step is to upgrade Management UI.
Step 10 - Upgrading Management UI
Configuring Management UI
Update your mgmt-ui.sh to enable Connect functionality
MGMT_UI_CONNECT_ENABLED=trueRestarting Management UI
Restart Management UI to make the new functionality available:
./axual.sh restart mgmt mgmt-ui
After restart, log in to Management UI and verify whether the upgrade was successful. Hover the "Axual X" in the top right, you can determine the version of Management API and Management UI. This should be 5.0.0 and 6.0.0 respectively.
|