Starting connectors
Glossary of terms
-
Connect-Plugin: A generic definition of a program which can integrate an external system with Apache-Kafka. In OOP terms, this can be seen as a "class": it has the definition to create one or more instances of itself, it just needs the configuration.
-
Connector: A configured instance of a Connect-Plugin. In OOP terms, this can be seen as an "Object": a Connector is an instance of a certain class ("plugin") and more of its kind can exist at once. A Connector is automatically configured to connect to its kafka cluster, so you only need to configure it to reach the other system you wish to integrate with.
-
Connect-Application: A term used within Axual to refer to a self-service application which defines and instantiates a group of Connectors. This application HAS a "Plugin" type, and it can instantiate one Connector-Application deployment per environment. As with custom applications, this resource helps with facilitating data governance, the Axual way.
-
Connector-Application: An instance of a Connect-Application, so technically just a Connector, deployed onto an Axual-Environment.
-
Connector-Task: Connectors are generally run as multiple tasks (multiple instances). This is how connectors scale: by having multiple parallel (and distributed) processes, all with the same configuration.
-
Connect-Cluster: A cluster of nodes running Kafka-Connect. All Connect-Tasks run on these machines. This cluster is usually owned and operated by Axual.
Ask your TENANT_ADMIN to enable Axual-Connect for your instance, otherwise you won’t see any available plugins. See Enabling connect for an instance
|
Connect-Applications
Differences between Connect-Applications and custom applications:
-
For Connect-Applications, you need to select a Plugin type that corresponds to the system you are integrating with (e.g. JDBC, MQTT, etc.), instead of choosing an "application type" (e.g. Java, Python, Rest, etc.).
-
Custom application deployments require a Certificate PEM file. Connector-Applications also require the Private key associated with that certificate. This is simply because the private key must be in the location the program is running. Custom applications run on the tenant’s infrastructure. Connectors run on Axual’s infrastructure.
-
Connector-Applications' tasks can be started and stopped from the Self Service interface.
Creating Connect-Applications
-
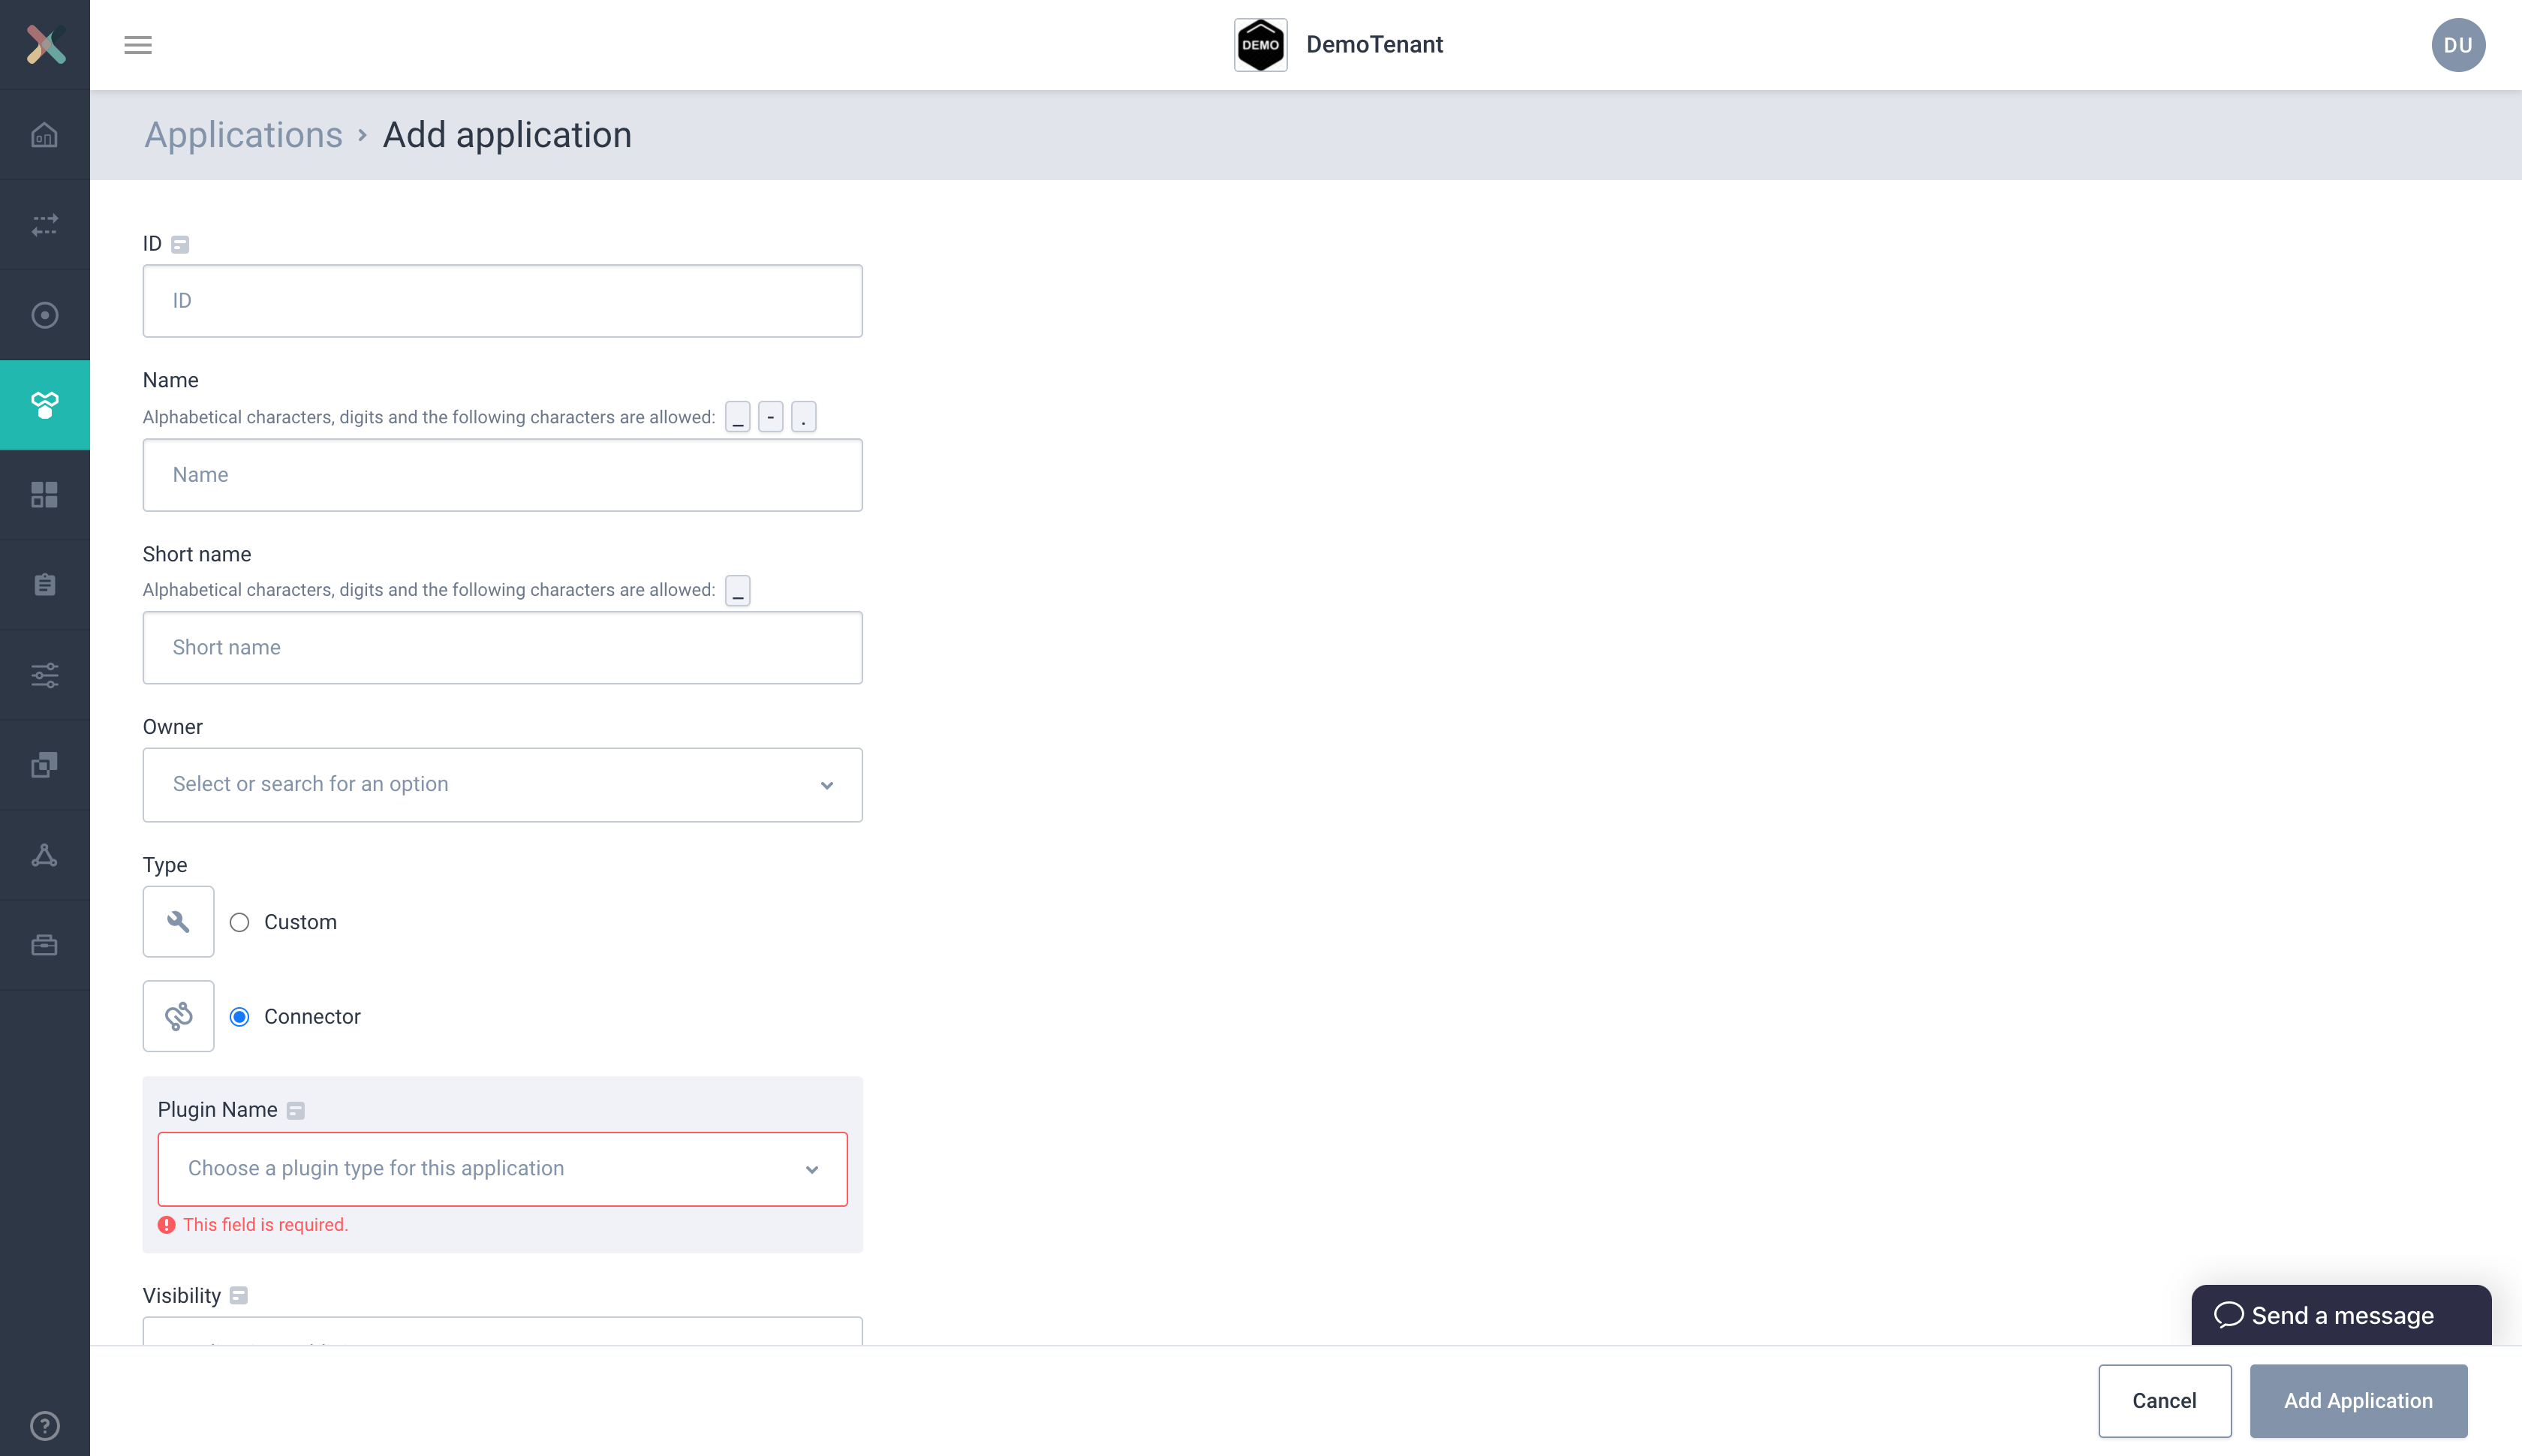
Open the Applications page in the Self-Service portal and click the New Application button.
-
Fill the required information in the form:
-
ID: This represents the Application ID of your application. This is a string that uniquely identifies your application. We recommend using a fully qualified package/class name, which is sufficiently unique within the organization, e.g.
com.company.division.AlertingApp. The maximum length is 255 and the value should be alphanumeric with no spaces. -
Name: The name of the application. It should not be more than 50 characters. Spaces are allowed.
-
Short Name: A unique human-readable short name for the application. This name is used as a label in the Self Service portal. Only alphanumeric characters and underscores are allowed. The maximum length is 60 characters.
-
Owner: This dropdown lists all the groups you belong to. Choose a group. If none is listed, ask a team member or operator to add you to a group. All members of the selected group will be authorized to edit this Connect-Application.
-
Type: choose "Connector"
-
Connector plugin: choose the plugin, depending on the system you want to connect to Axual.
-
Visibility: Choose either public or private. Public applications are readable to the entire organisation. Private applications are only readable by its owners.
-
Description: A short summary describing the purpose of this application, e.g. "Importing transaction events from the <team-name>'s memory-queues". This field must not exceed 200 characters.
-
Upon creating the Application in the Self-Service portal you will be directed to the application detail page. Here you can "instantiate" this Connect-Application onto multiple environments.
Configuring Connector-Applications
A Connector-Application needs 2 types of configuration for every environment in which it’s deployed:
-
Security: the certificate and private key PEM files, used for authentication and authorization against the Kafka cluster (operated by Axual).
-
Plugin Configuration: plugin-specific configuration, depending on the connector implementation
A blue indicator is shown if the Security or Plugin Configuration is not yet provided. 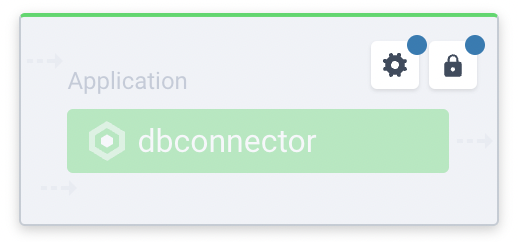
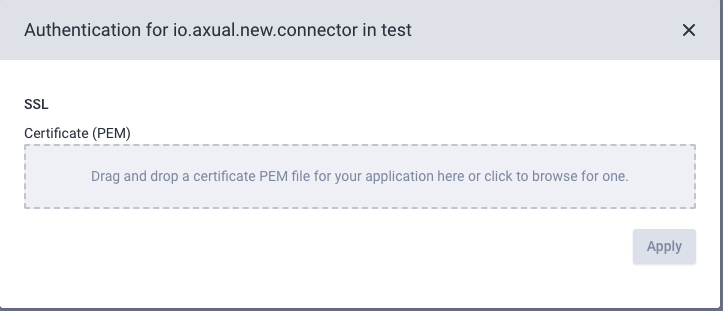
Security configuration
The certificate and private key is used to authorize the Connector-Application to connect to streams deployed in an environment.
If you need instructions to extract the PEM file from a JKS keystore, for your Connector-Application certificate, see Generating certificate PEM Files
-
Go to Self-Service Applications and click your Connect-Application to open the Application detail page
-
Select the environment for which you want to configure the certificate and private key.
-
Click on the Lock button inside the application box (hovering on the button will show the text 'Configuration'). You will see such a modal:
-
Click on the Padlock button in the application box (hovering on the button will show the text 'Authorization'). You will see a modal as below:
-
Upload the Certificate file your connector will use in this environment.
The following file-extensions are supported: .crt, .cert, .pem -
Upload the private-key file that matches the certificate.
The Key used by connector must be in pkcs8 format. -
The private key will not be displayed on the screen. You will only see whether it was upload successfully or not.

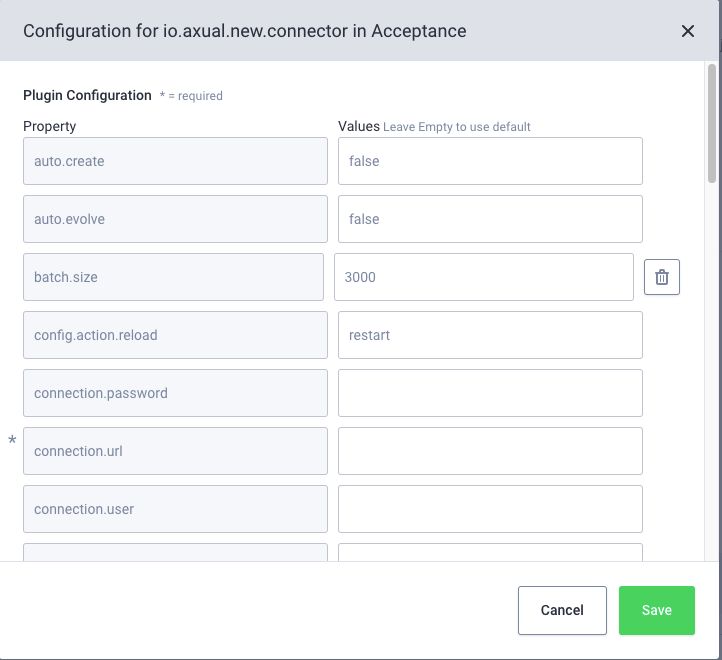
Plugin configuration
-
Go to Self-Service Applications and click your Connect-Application to open the Application detail page
-
Select the environment for which you want to configure the connector.
-
Click on the Gear button inside the application box (hovering on the button will show the text 'Configuration'). You will see such a modal:
-
Set your Connector configuration as instructed by your integrated-service operator and then click the Save button
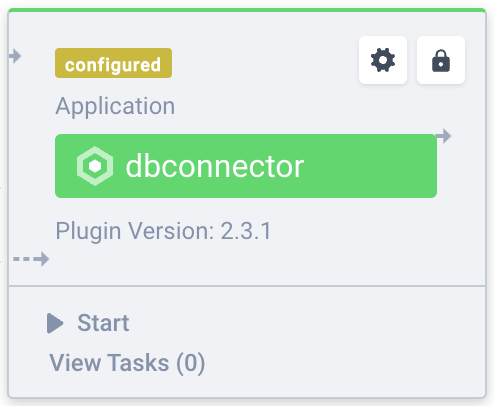
If your Connector-Application was successfully configured in the selected environment, you will see an extra box at the bottom of the application box and a status label at the top as follows:
Requesting Stream Access
Your Connector cannot start until it has been granted produce/consume permissions for the stream you intend to connect to.
Follow the Requesting Stream Access docs to grant it access.
Starting and stopping Connector-Applications
You can start the Connector by clicking the 'START' button. Within seconds, the status should change to 'RUNNING'.
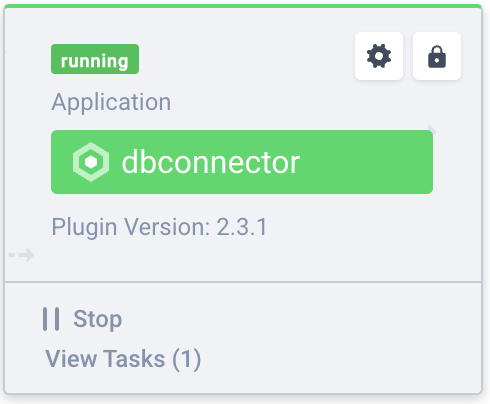
If the status changed to FAILED, then you can click "View tasks" to open up a modal which shows you a stack trace which should give you more information.
Available Connector Application Actions
The following actions are available for Connector-Applications:
Connector action |
Effect |
|
start the connector application |
|
stop the connector application |
|
remove any existing active connector and its configuration (including offsets) |
The following actions are available for Connector-Tasks
Task action |
Effect |
|
view the task(s) status and trace (in case the status is FAILED) |
|
restart a task in a FAILED state |