Self Service User Guide
Contents
Accessing Self Service
To access Self Service Portal, use the url provided to you by Axual or your local installation. Latest versions of Chrome and Firefox are supported.
| Internet Explorer is not a supported browser! |
Logging In
When you visit the Self Service URL in a browser, you are presented with the below login screen.
Please use the credentials provided to you.
Browsing The Self Service Portal
Dashboard
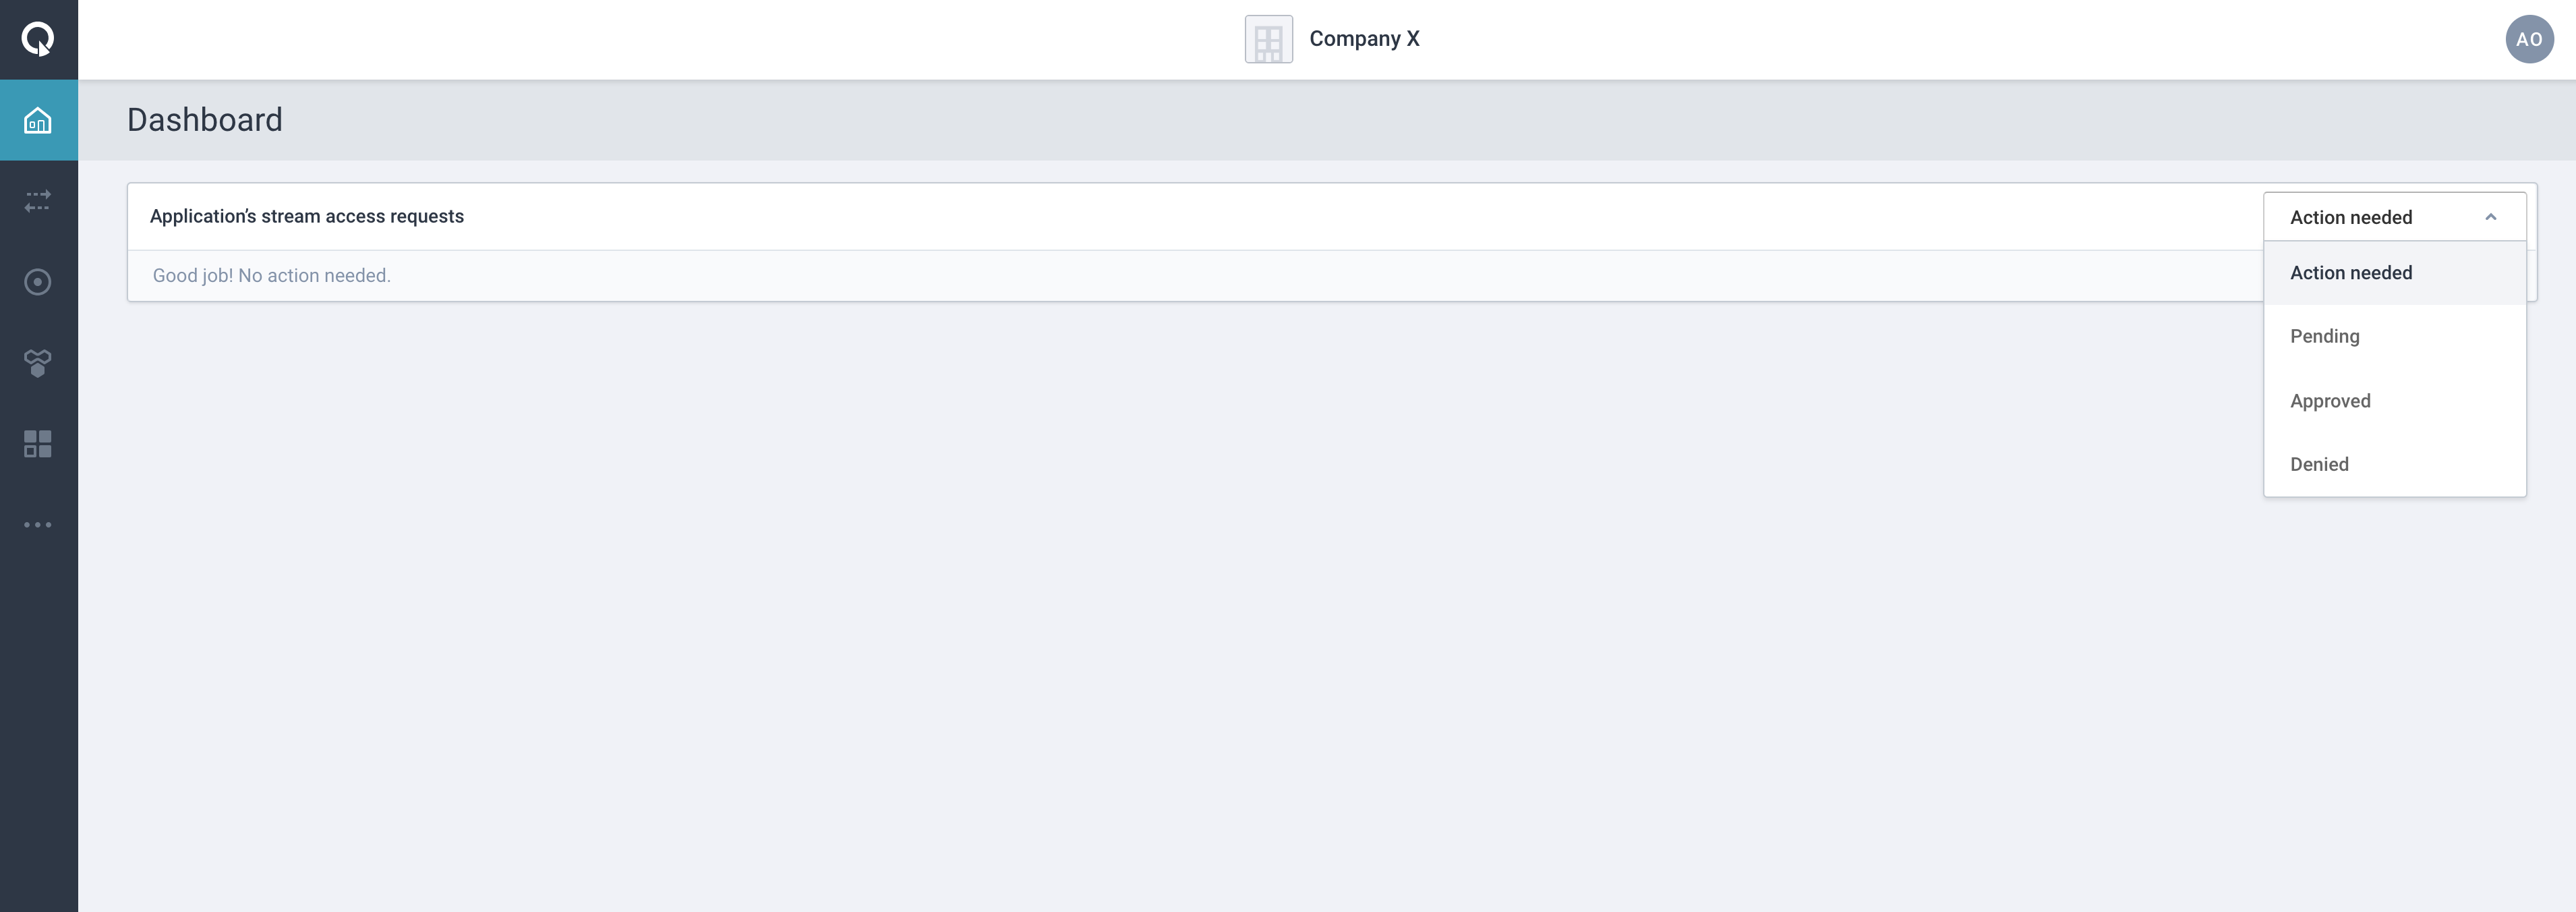
In this page you can have an overview of all stream access requests that need an action, are pending, approved or denied. In order to browse through the different lists you can use the dropdown on the right.
If you are a member of the group owning a stream, the action needed list is displayed when you first visit the page. Otherwise, the pending requests list is displayed.
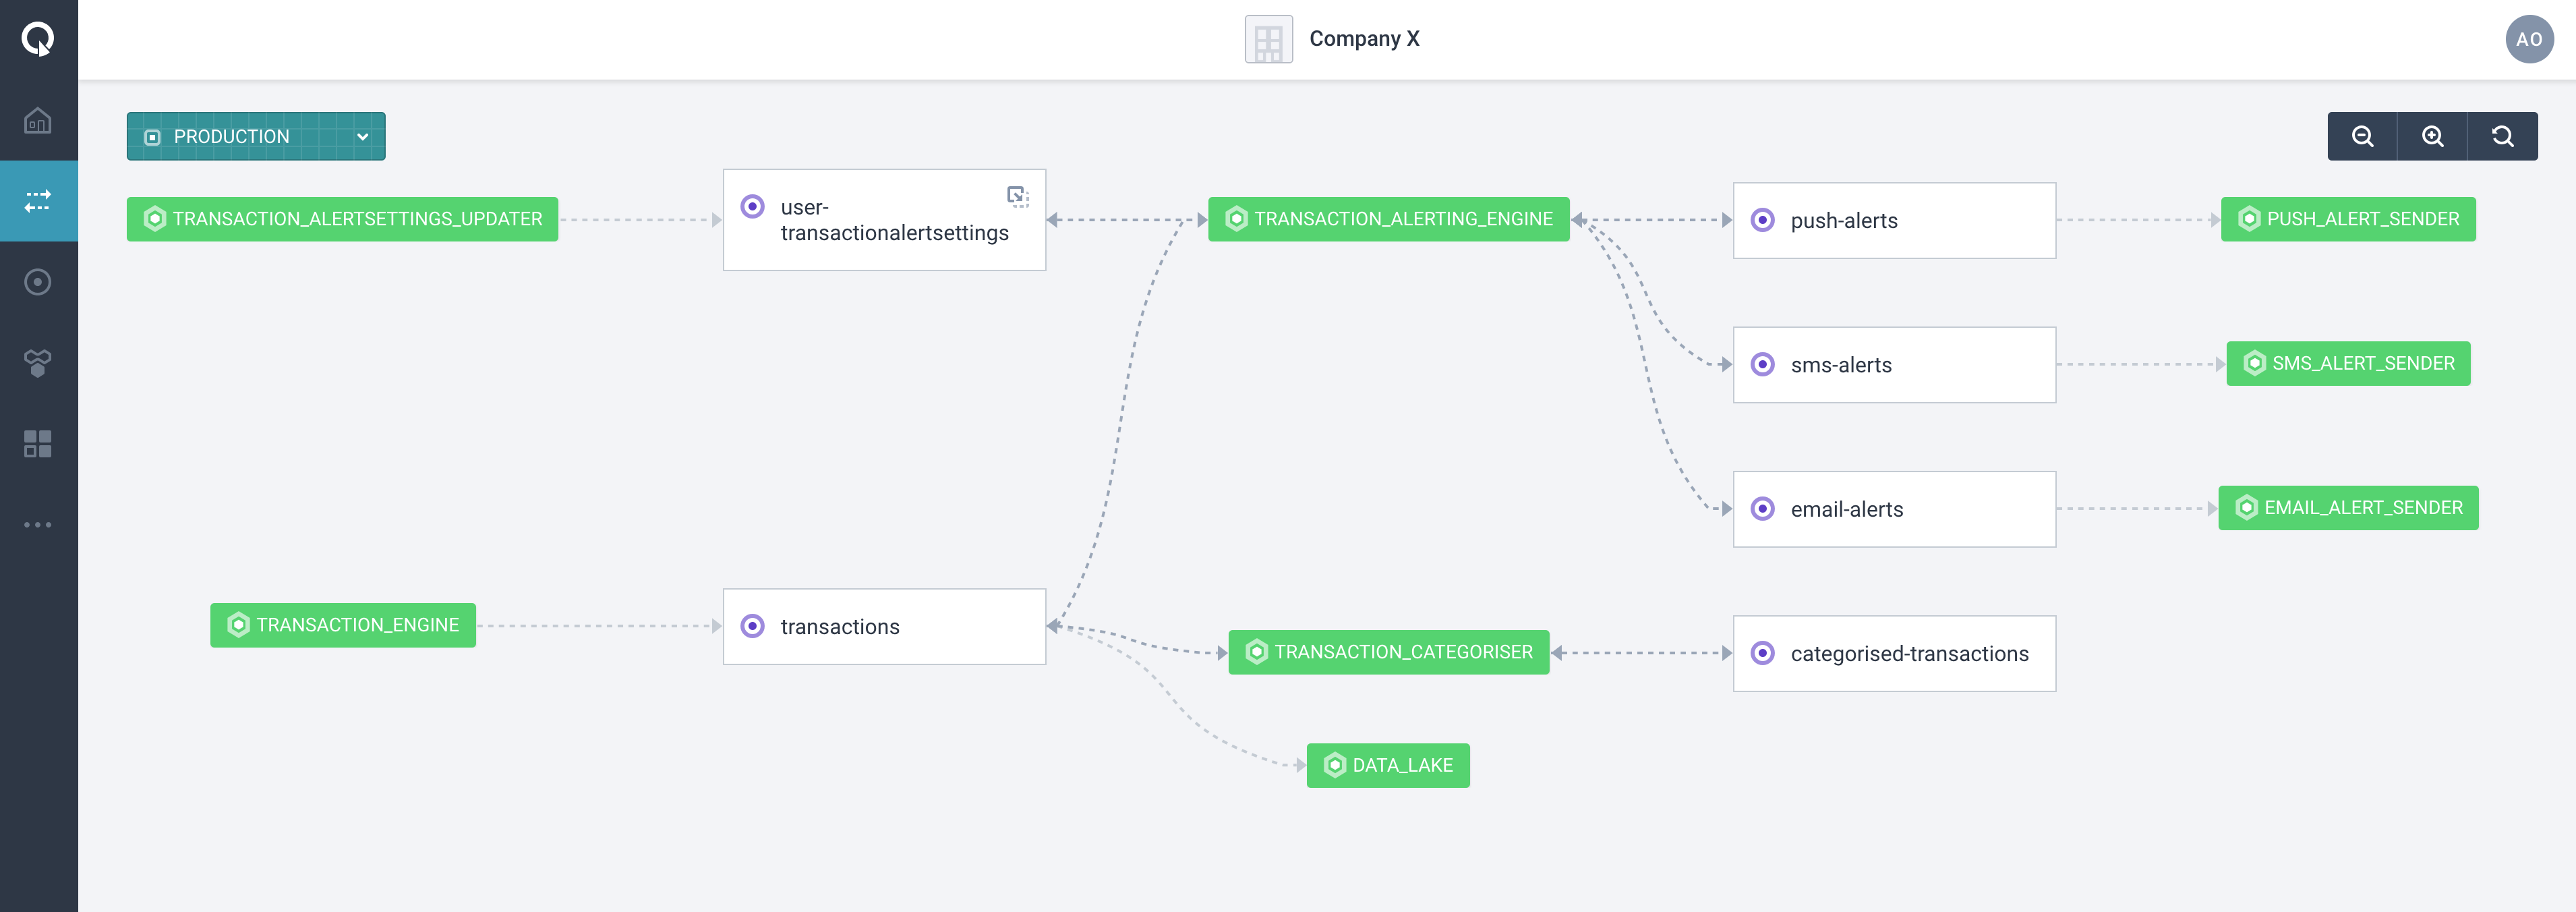
Overview Graph
In this page you can see a graphical representation of all applications consuming and producing streams in the selected environment. Use the dropdown in the top to switch to a different environment.
Streams
The Streams overview displays a list of all streams:

Clicking on a stream takes you to the stream’s detail page:
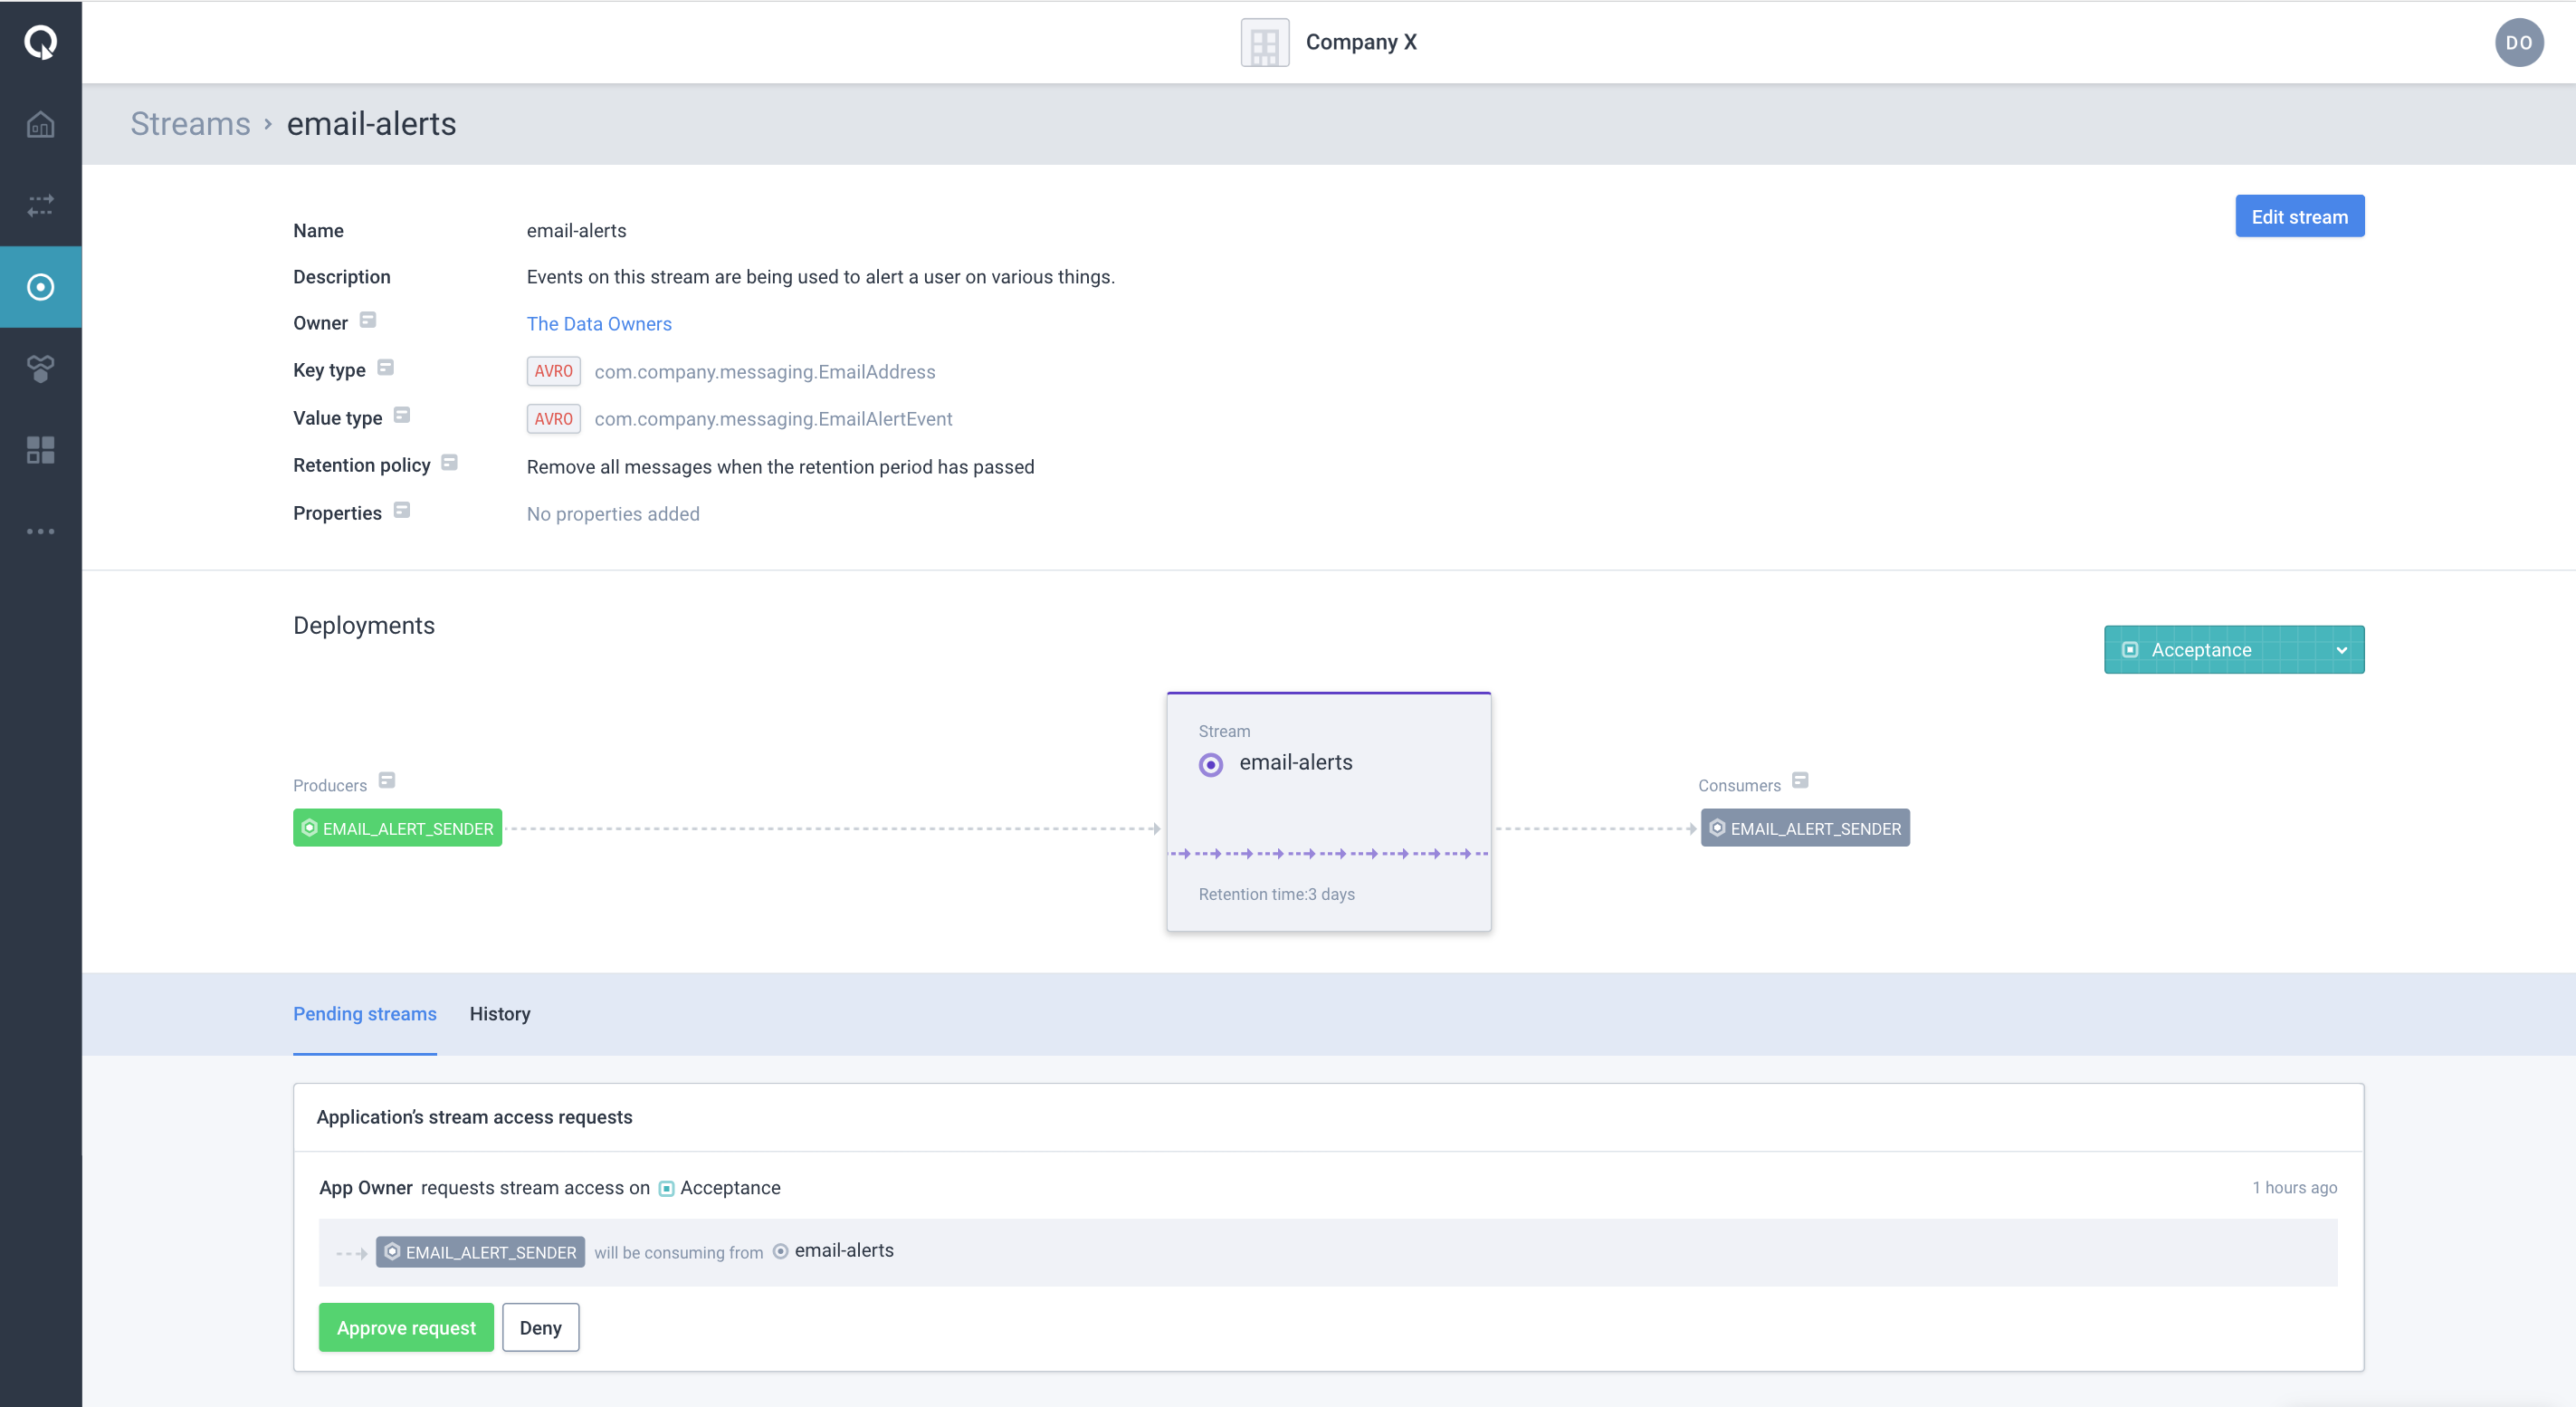
The top section of the page describes the details of the stream, such as the Key and Value schema type and schemas and the retention policy.
If you are a member of the group owning the stream, you will also see an Edit stream button on the top right corner.
The middle section of the page titled Deployments visualises the stream itself and the producer and consumer applications surrounding it. Applications displayed in green have been approved to produce to or consume from the stream, while others in grey are awaiting approval. Use the dropdown on the right to switch to a different environment.
The bottom section of the page shows the pending and approved access requested by the applications. This section is only visible to owners of the stream. For any pending request, in the Pending streams tab, there is an Approve request button, which can be used to approve the request on a particular environment and a Deny button, which can be used to deny the request. In the History tab, all applications that are already approved or denied, on an environment, are shown.
Applications
The Applications page displays a list of all applications:
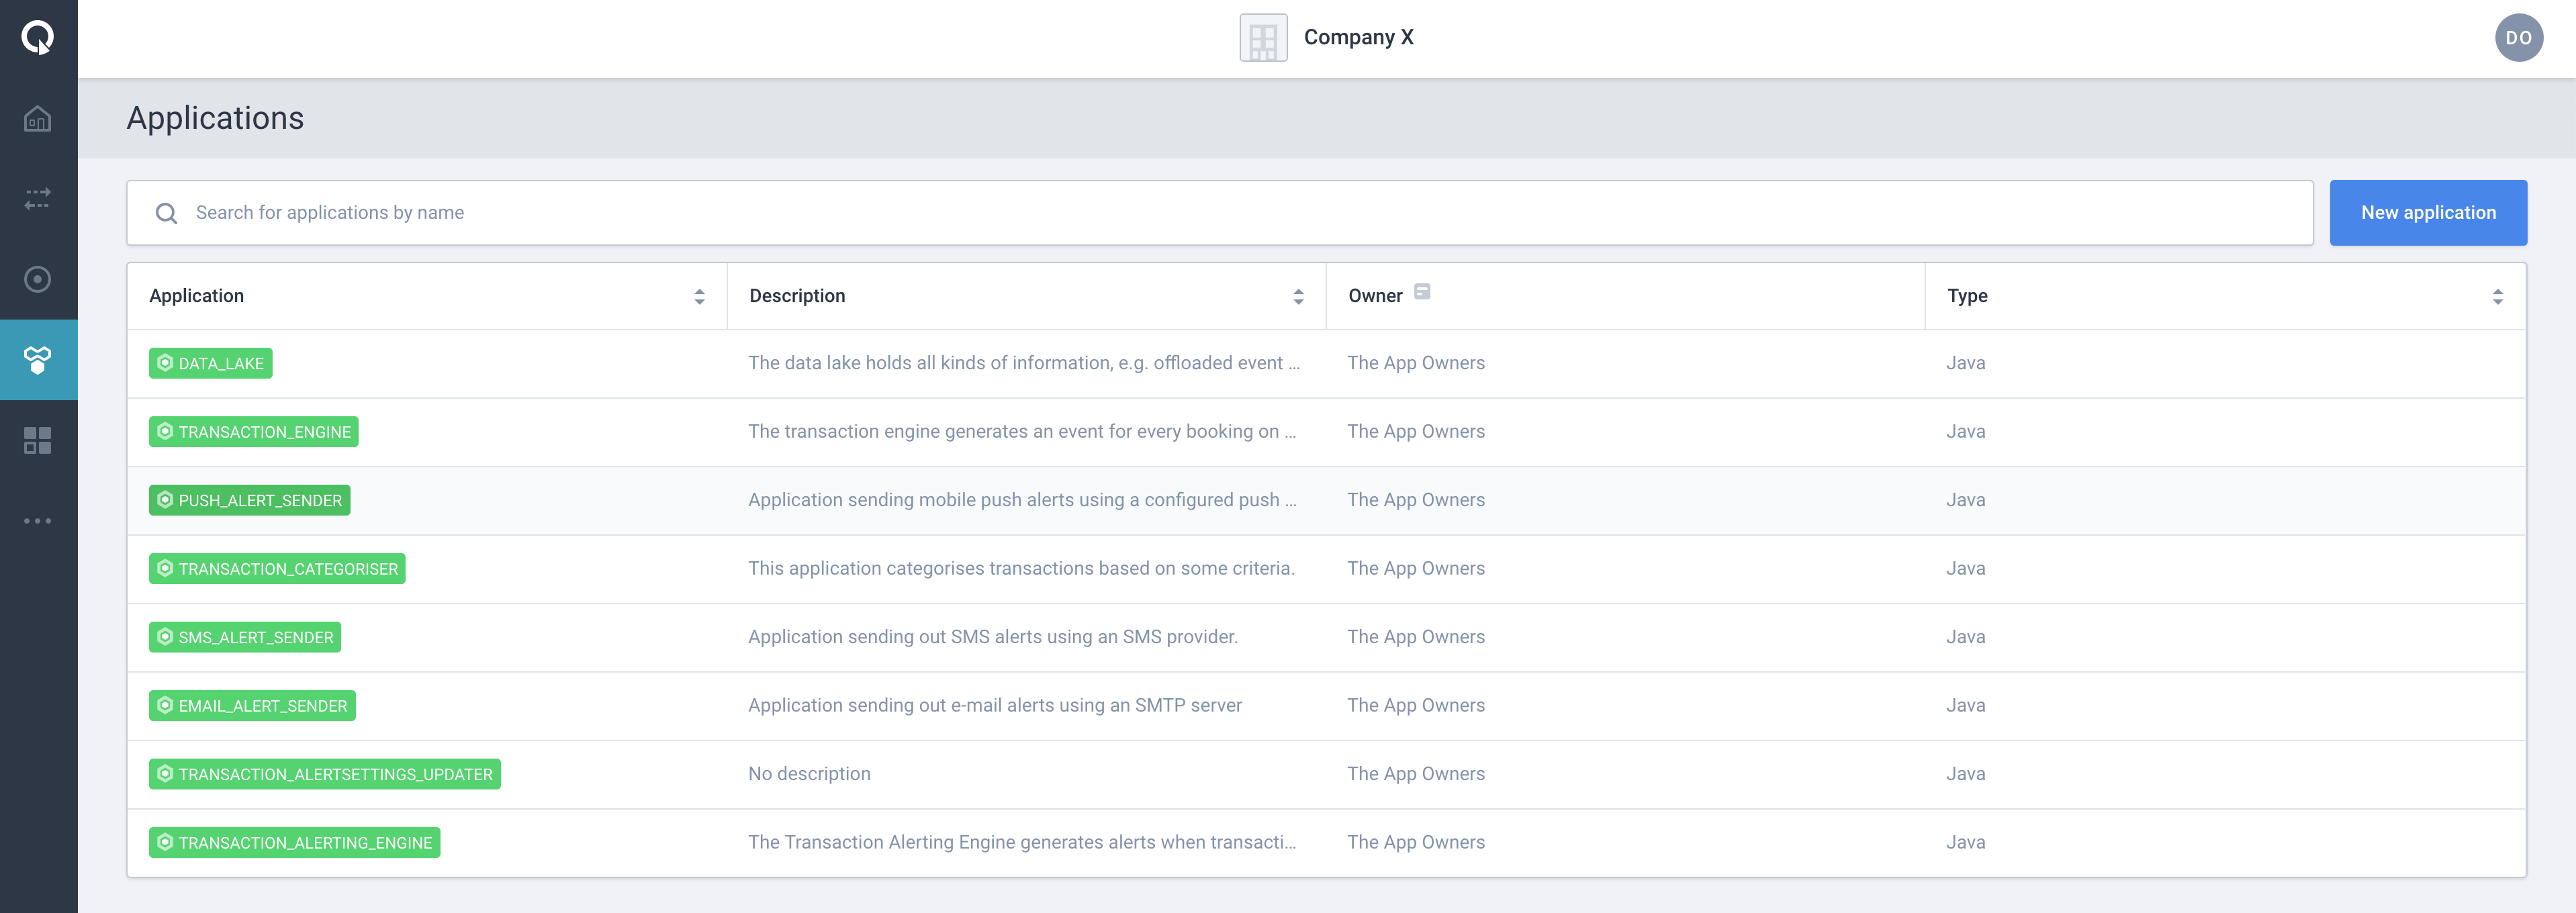
Clicking on an application takes you to the application’s detail page:

The top section of the page describes the details of the application. If you are a member of the group owning the application, you will also see an Edit application button on the top right corner.
The middle section of the page titled Deployments visualises the application and the streams (topics) it produces and/or consumes from any environment. The dropdown on the right can be used to switch to a different environment.
The bottom section of the page shows the streams where this application has produce or consume access under History tab. If the application has requested access (pending approval) it is also shown under the Unapproved requests tab.
To create a new access, click the + Add request button.


Start Using The Self Service Portal
Registering A New Producer Or Consumer
There are 3 steps involved in registering a new producer or consumer:
-
Creating An Application In Self Service
-
Configure Application Principal
-
Request Access to a Stream
Creating An Application
You can use Self Service Portal to create (register) your application. This can be done before the application is actually developed and/or released. To register your application, visit the Applications page and click on New Application button. You will see a screen as below:

Start filling the form with required information:
-
ID: This represents the Application ID of your application. This is a string that uniquely identifies your application. We recommend to use a fully qualified package/class name as it is sufficiently unique within the organization. The max length is 255 and the value should be alphanumeric with no spaces.
The Application ID is used by consuming applications to keep track of where it left off reading messages on a stream. Consumers sharing the same ID share the events on a stream. So one event can be only read by one consumer with the same Application ID. -
Name: The name of the application. It should not be more than 50 characters. Spaces are allowed.
-
Short Name: A unique human-readable short name of the application. This name is used as a label in Self Service. Only alphanumeric characters and underscore is allowed. Max length should not exceed 60 characters.
-
Owner: Choose the group which would be the owner of this application. Choose your DevOps team’s group. Is it not available yet? Please refer to the section Creating A Group.
-
Type: Choose the type of application. This is metadata information that does not affect the functionality in any way.
-
Visibility: Choose whether this application is public or private. If this is a real application that will be eventually deployed in production, then mark it as public. The configuration of this application will propagate to all the public environments.
If this is a test application that will never be deployed in production but only needed for testing purposes then mark it as private. -
Description: A short summary describing the purpose of this application, e.g. "Enriching transaction events with transaction categories.". Must not exceed 200 characters.
At this point you have created your Application in Self Service. Once the application is successfully created, you will be directed to the application detail page. To understand the application detail page, you can refer to Applications section.
Configuring An Application Principal
The application principal is used to authorize the application to use the stream (either producing or consuming). The principal is formed by the Distinguished Name (DN) of the certificate used by the application.
IMPORTANT For every distinct environment, a principal needs to be defined. Without a principal, an application can not have consumer or produce access to a stream.
To configure the application principal on the selected environment:
-
Visit the detail page of the application.
-
Select the environment for which you want to configure the principal.
-
Click on the Configure button in the application box. You will see a modal as below:

-
Paste the principal certificate value.
-
Click on Save.
IMPORTANT Please make sure that the principal elements are separated by a comma, and that no spaces are being used directly before or after the comma
The application box name will turn green indicating that the application is configured properly on that environment. Above steps can be repeated for different environments where application is required to access the stream.
Requesting Access To A Stream
Before your application can produce to a stream or consume from it, a Stream Access Request has to be done. If you are making a request for an environment for testing purposes (private), an approval will not be necessary. For all other (public) environments, approval is necessary. The request is then received by the data owner of the stream.
Requesting access to a stream is easy.
Follow the below steps:
-
Visit the detail page of your application.
-
Scroll to the bottom of the page where + Add request button is visible.
-
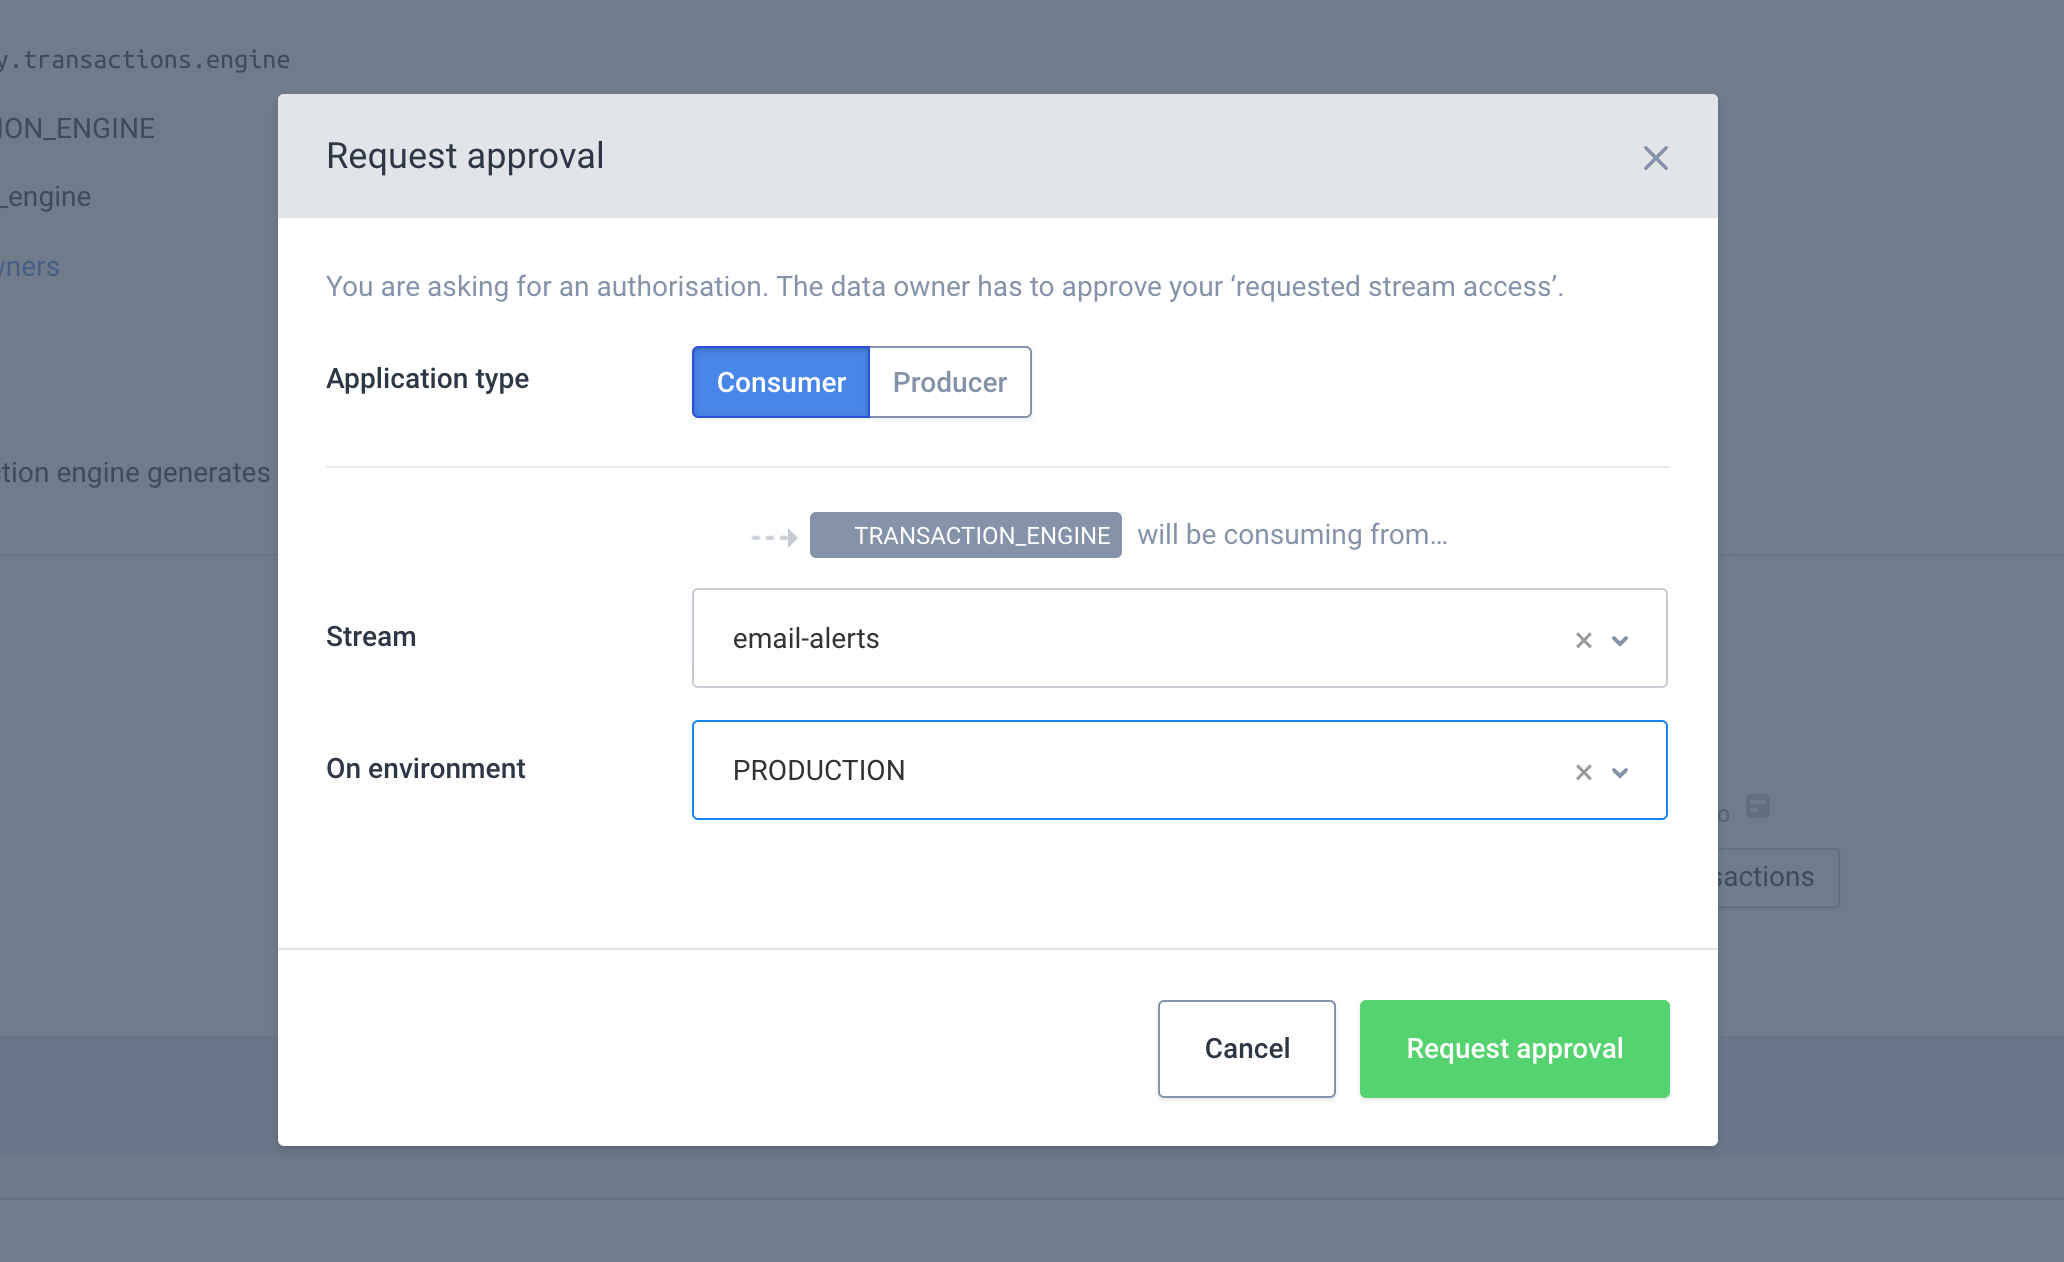
Click on the button to open the Request approval modal:
-
Select the Application type by clicking on Consumer or Producer button.
-
Select the Stream from the Stream dropdown. If there are already pending and/or approved requests for this stream a list of them will appear after selection.
-
Select the Environment from the dropdown.
-
Submit the request by clicking the Request approval button.
The data owner will receive your request and has to approve your ‘Stream Access Request’.
| Make sure you have configured the Application Principal for the specific environment before you submit the request. |
Creating A New Stream
OR
Before creating a new stream (topic) most likely a schema must be discussed and finalized. This is currently outside the scope of Self Service. Once schema is developed and available for use, you can proceed with below steps to create a new stream in Self-Service.
There are 2 steps involved in Creating a new Stream:
-
Creating a Stream
-
Configuring a Stream per environment
Creating A Stream
Visit the Streams page and click on New Stream button. You will see the below page:
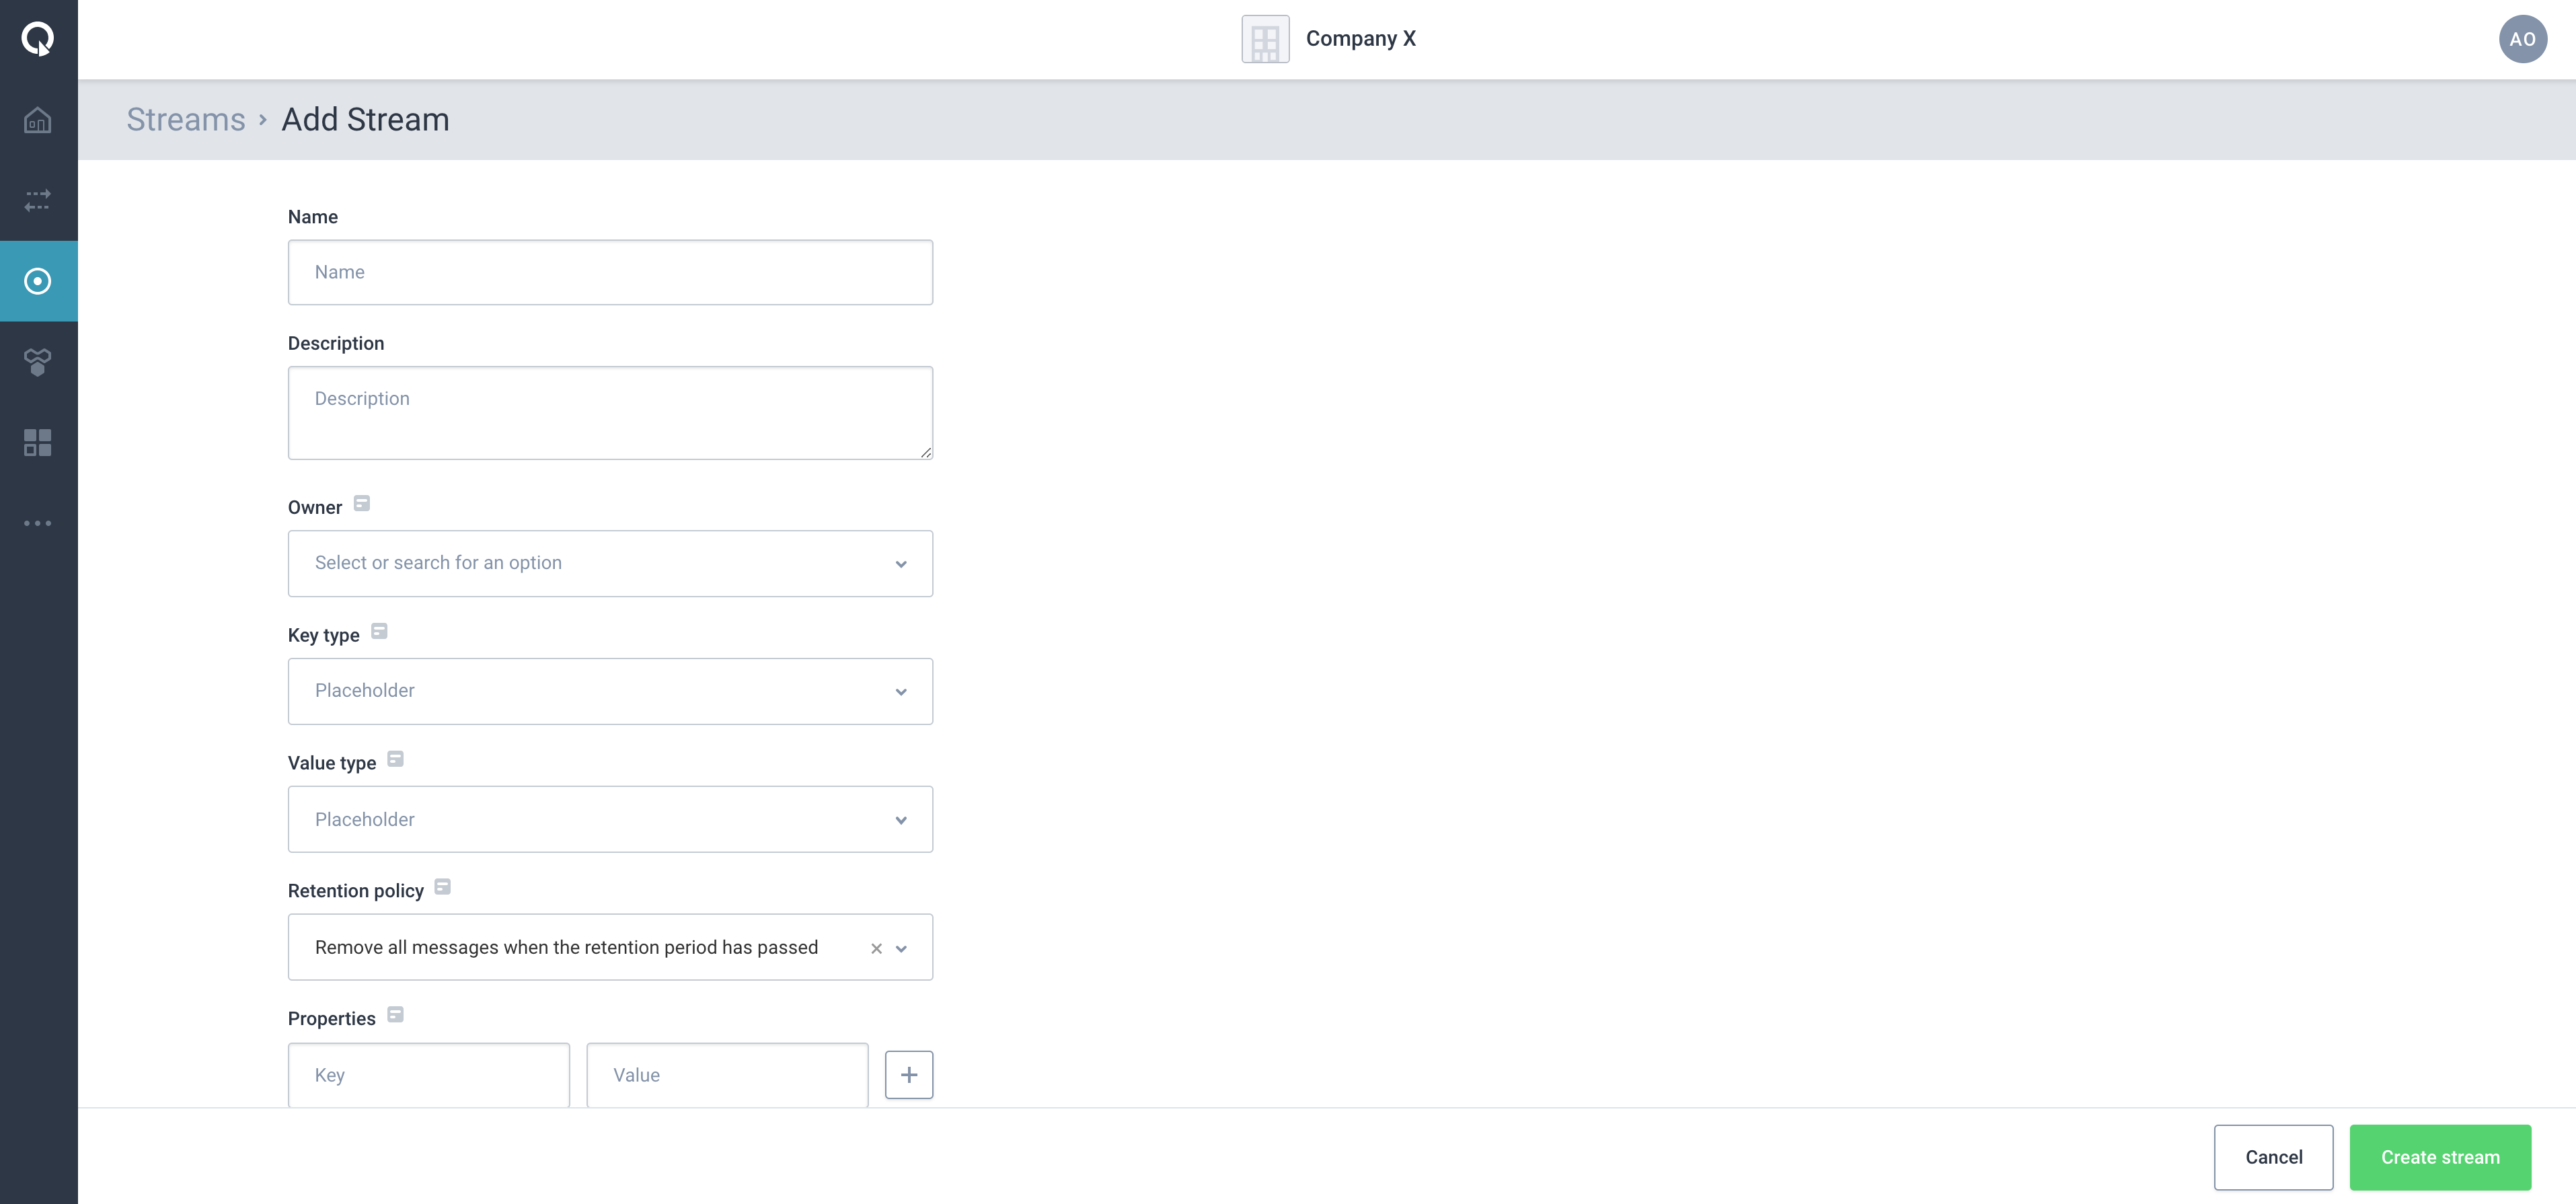
Start filling the form with required information. If you are unsure about certain values, please contact the team supporting the Axual Platform within your organization.
-
Name: The name of the stream. This must be in the format string-string (Needs to contain exactly one dash). The stream name is usually discussed and finalized as part of the Intake session or a follow up.
-
Description: A text describing the purpose of the stream+ TIP Make sure to be very descriptive here, because that helps your colleagues implementing their data driven use case faster.
-
Owner: The group which will own this stream. All members of that group will be able to modify the stream. This group should be created before creating the stream. Please refer to the section Creating A Group.
-
Key Type: The type of data that will be stored in the KEY part of the stream. This is usually AVRO.
-
Key Schema: If Key type is selected as AVRO, a new input field Key Schema will appear. This will have a list of available AVRO schemas. Choose the correct schema. As part of Schema design and development, these values would be known. If the required schema is not available, please contact support.
-
Value Type: The type of data that will be stored in the VALUE part of the stream. This is usually AVRO.
-
Value Schema: If Value type is selected as AVRO, a new input field Value Schema will appear. This will have a list of available AVRO schemas. Choose the correct schema. As part of Schema design and development, these values would be known. If the required schema is not available, please contact support.
-
Retention Policy: This field determines if the stream will retain messages forever or the messages will be deleted after a certain period. This would have been discussed in the Intake session.
-
Remove all messages when the retention period has passed: Choose this option if the messages should not be stored forever. The actual retention time will be configured later per environment.
-
Keep latest value for each key forever: Choose this option if messages should be retained forever. This is also called COMPACTION topic.
-
-
Properties: This is a set of key:value pair for setting various properties of a stream. For now this can be kept empty.
Click on Create stream button in bottom right corner. Once the stream is created, you will end up on Stream detail page.
At this point, you have created a Stream in Self Service Portal. The stream is not ready for use yet. It needs to be configured for an environment.
Configuring Stream For An Environment
Once the Stream has been created, the next step to actually configure the stream for any environment is to configure the stream properties. In this section, the steps needed to configure a stream for an environment are explained.
-
Visit the Stream page.
-
Select the environment from the dropdown for which the stream needs to be configured
-
If the stream has not yet been configured for the environment, a big bold + Configure Stream button will appear in the stream box. Click on it.
-
A pop up will show up with some information to be filled:
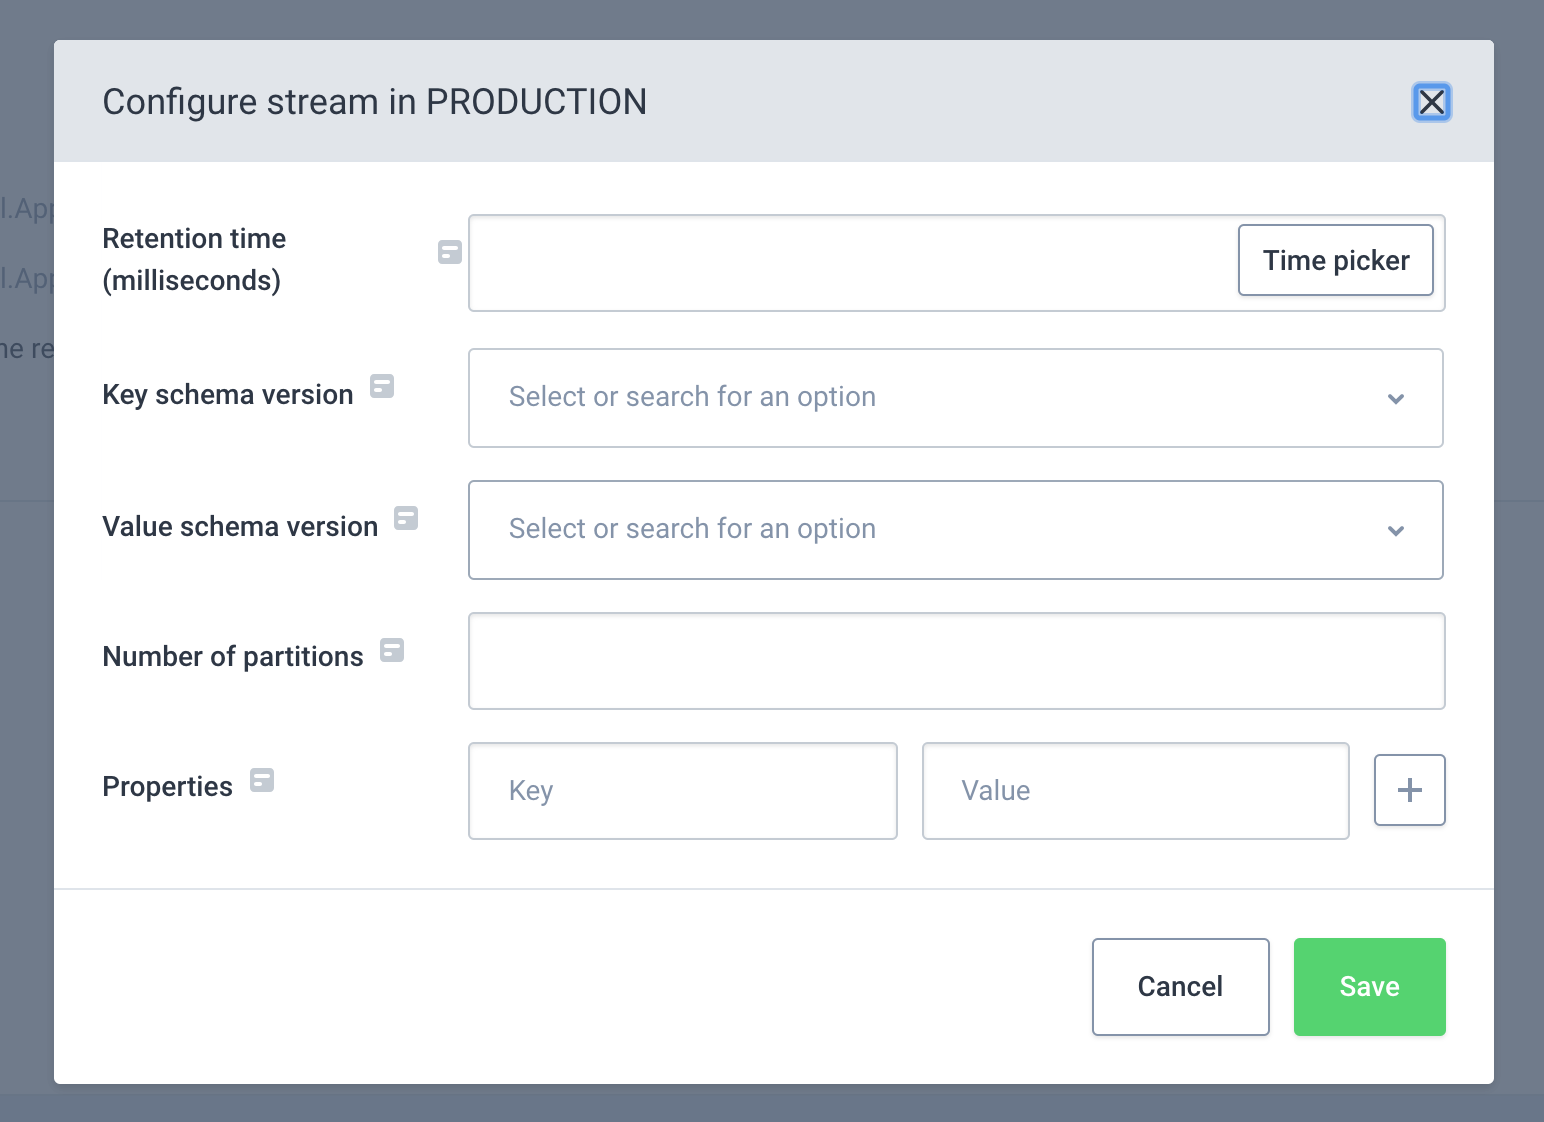
-
Retention time (milliseconds): Determine how long the messages should be available on a stream. There should be an agreed value most likely discussed in Intake session with the team supporting Axual Platform. In most cases, it is 7 days.
-
Key Schema Version: If the Stream Key Type is AVRO, then this field will show up. Choose the version of the key schema that should be used by the stream.
-
Value Schema Version: If the Stream Value Type is AVRO, then this field will show up. Choose the version of the value schema that should be used by the stream.
-
Number of partitions: Choose the number of partitions in which the stream must be split. If unsure, leave it empty. This values defines the maximum number of consumer instances that can read from the stream.
-
Properties: A key:value pair describing the various configuration options that can be set. This can be left empty.
-
Click on Save button. The stream is now configured for the specific environment. Repeat this process for any other environment.
Authorizing An Application To Access A Stream
As mentioned above, this scenario applies to Stream owners who want to authorize an application to access your stream. This can be performed only after application owner has created a stream access request.
-
Visit the Dashboard page.
-
Find the application that has requested access to the stream. Also verify the environment where request needs to be approved.

-
Click the Approve request button. A confirmation popup appears verifying that the request was approved.
-
The application ACL will be authorized to allow access to your stream.
Authorizing an application to access a stream can also be done from the stream’s detail page:
-
Search for your stream and visit the stream detail page.
-
Scroll down to the section with a tab titled Pending streams.
-
Find the application that has requested access to the stream. Also verify the environment where request needs to be approved.
-
Click the Approve request button. A confirmation popup appears verifying that the request was approved.
-
The application ACL will be authorized in Axual Cloud cluster to allow access to your stream.
-
The application request entry should move to the next tab titled History.
-
The application color in the visualization also changes to green.
Deny Authorisation To An Application To Access A Stream
Please refer to the above section Authorizing An Application To Access A Stream. Follow the same steps up to step 4 and then instead of Approve request button click on Deny button, and provide a reason for the requestor.
Revoking An Application Access From Your Stream
In order to revoke access for a certain application in a certain environment, use the garbage icon next to the application that is connected to the stream, click it to open the "Revoke stream access" modal.
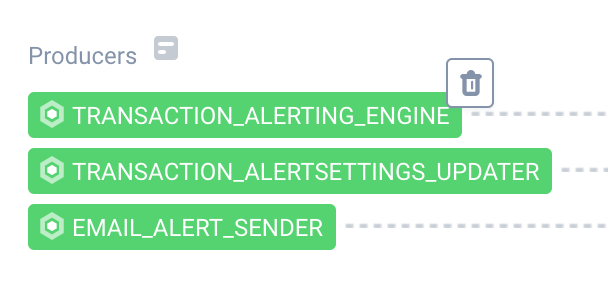
Select the environments for which you want to revoke access and provide a reason, followed by clicking "Save" to revoke access to the selected environments.

Once the action has completed, you can close the modal.
Creating An Environment
A private environment acts as an environment suffix which is needed to create a copy of a stream (topic) exclusively for your team for testing purposes. This is useful when developing a producer or a consumer where you need full access to the stream (topic).
Private environments are only visible to you as person in the team owning the environment.
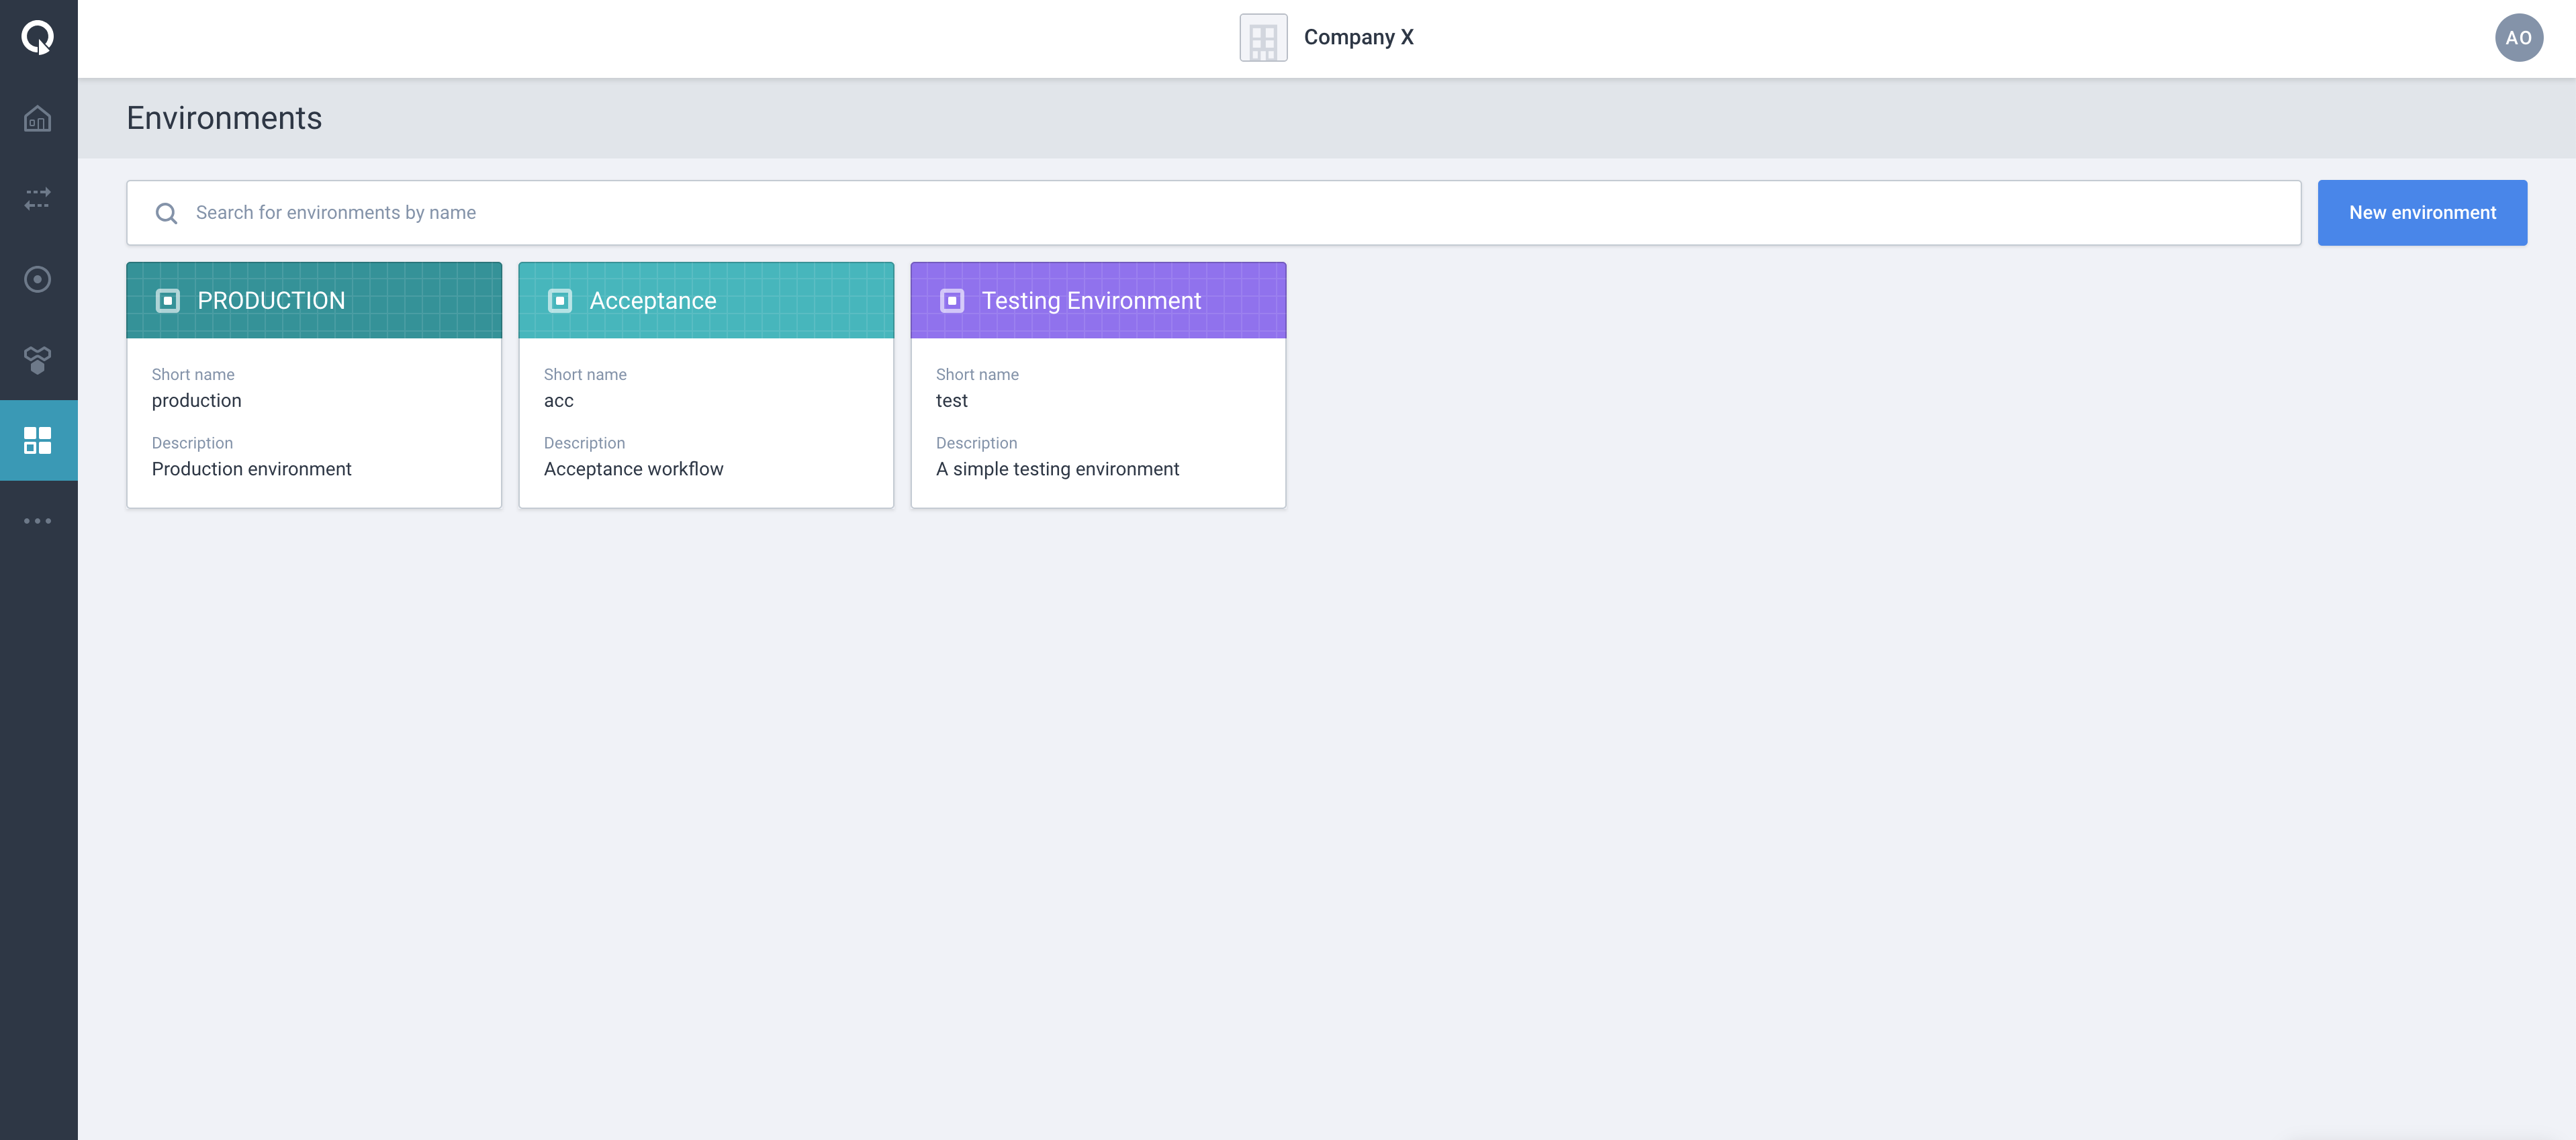
To create a private environment, visit the Environments page and click on New environment button. You will see a form as below:
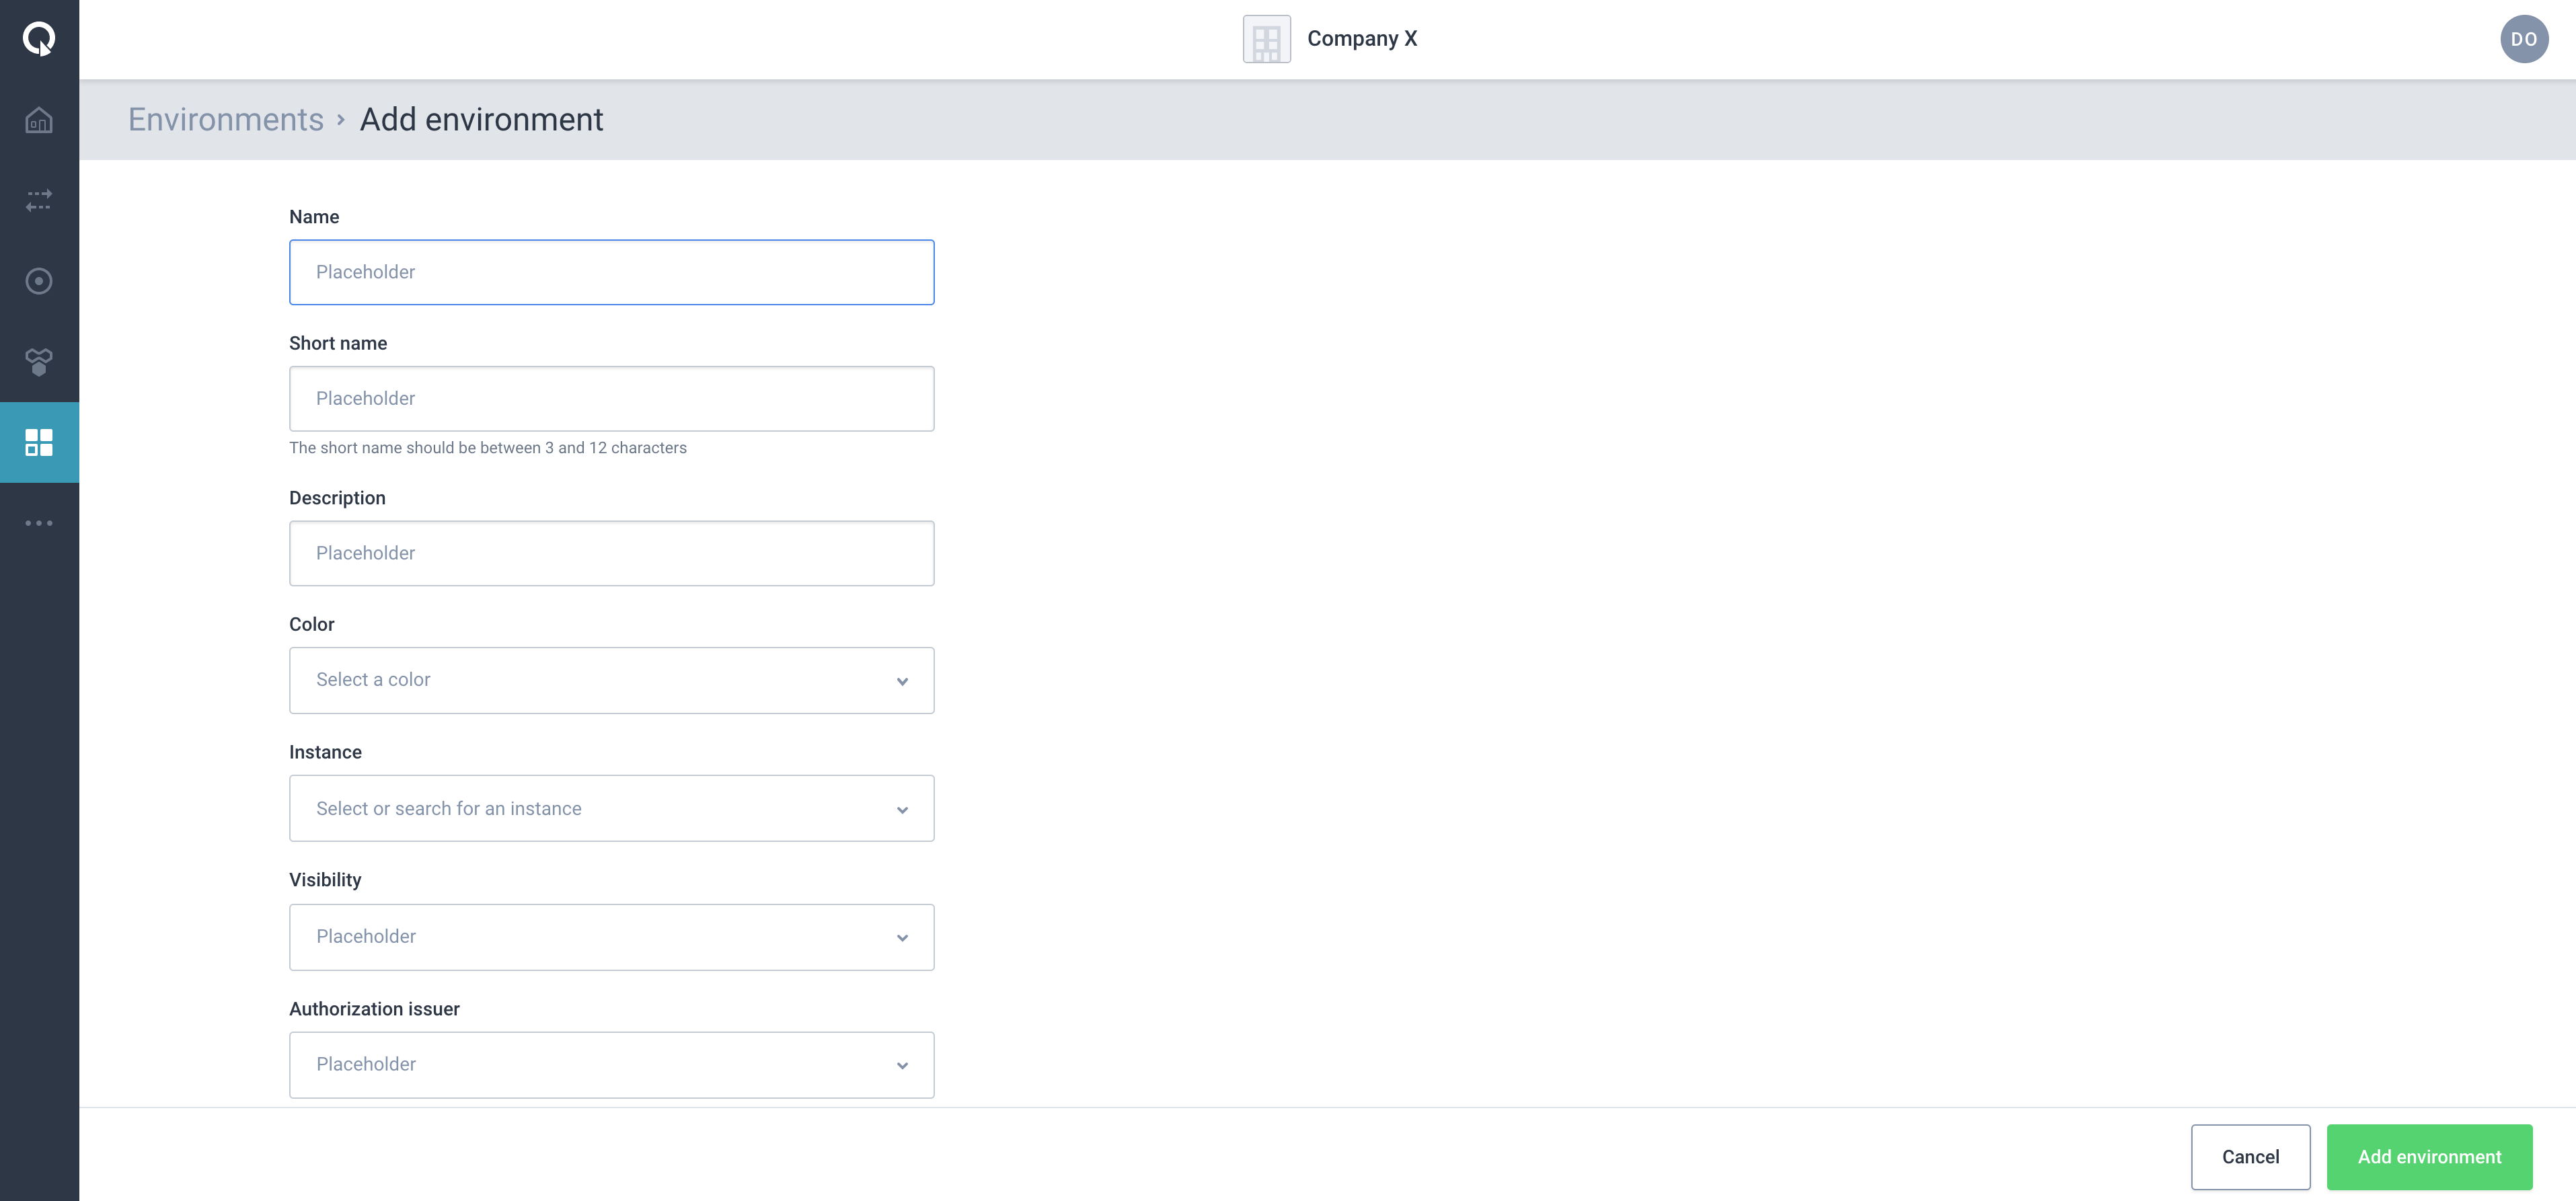
Start filling the form with required in formation:
-
Name: A suitable name identifying this environment.
-
Short name: A short name that will uniquely identify this environment.
-
Description: A short text describing the purpose of the environment.
-
Color: Choose a color as you like.
-
Instance: Choose the instance in which this environment should be created. If not sure, select ?????
-
Visibility: Choose PRIVATE. Private environments are only visible to the owning group (your team). They are not included in dashboard visualisations.
-
Authorization Issuer: This option indicates if any deployments on this environment should be AUTO approved or requires approval from Stream Owner. For private environments, only AUTO can be selected.
-
Owners: Choose your DevOps team’s here. If not found, refer to the section Creating A Group.
-
Properties: Define environment specific properties here. Can be left empty.
Click on Add Environment button. The environment will be created.
Synchronizing Your Clusters
The Self Service Portal uses a database holding the truth about the stream and applications that exist within your company. In some cases, e.g. when a cluster is offline for some time, or a new cluster is added, the streams might not have been created and configured on that cluster, and clusters become out of sync. When this is the case, the "Synchronize" feature can be used to bring the underlying clusters back in sync.
Synchronizing an Environment
| Use this feature only if you understand what you are doing. |
When synchronizing an environment, you are creating and configuring all streams and their authorizations on any cluster that is bound to this environment.
-
Log in as a Super admin
-
Switch to the tenant for which you want to synchronize the environment
-
Select or search the environment
-
Click "Synchronize" and wait for all streams to be synchronized
Synchronizing an Instance
| Use this feature only if you understand what you are doing. |
When synchronizing an instance, you are creating and configuring all streams and their authorizations on any cluster that is bound to this instance (for all environments).
-
Log in as a Super admin
-
Search for to the tenant for which you want to synchronize the environment
-
Select or search the instance
-
Click "Synchronize" and wait for all streams to be created & configured